Manage and Upload Component Packs
Component packs, as their name implies, are zipped archives of one or more custom components for use within Skuid. Making use of component packs— whether they are developed by your team, yourself, or Skuid developers across the web—is a great way to extend the power of your Skuid implementation.
To properly use component packs, you must be familiar with how Skuid recognizes them, specifically:
- How to use the Component Packs tab to view your existing packs
- Uploading new packs as static resources
- Creating new entries for those pack static resources in the component pack table
The Component Packs tab
How do you know what component packs are installed in your instance of Skuid?
What if you need to modify an installed component pack—change the Load Order or make a pack inactive?
You can do all of this on the Component Packs tab:
- In the main Skuid menu, click Configure.
- Select the Component Packs tab.
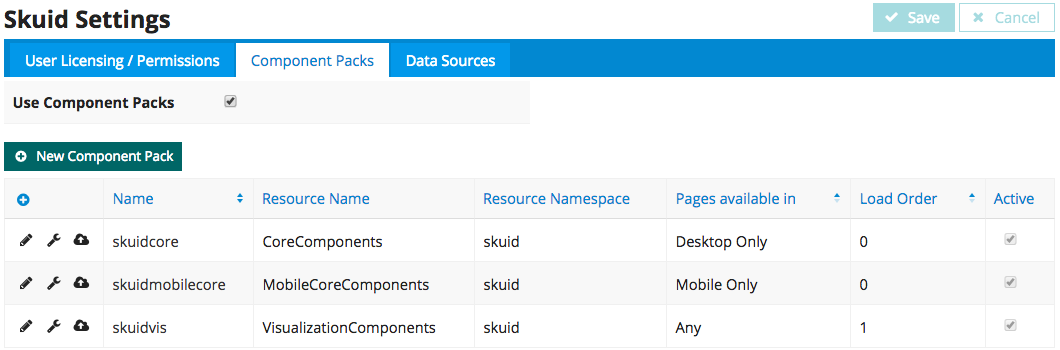
In this tab, you’ll see a list of available component packs.
Note
In Skuid on Salesforce, by default, Skuid displays a list of essential Skuid component packs:
- skuidcore
- skuidvis
- skuidmobilecore
- skuidvismobile
You cannot delete these component packs; they contain the primary Skuid components library, the standard visualization components, and their Skuid Mobile counterparts. These essential component packs are also included in Skuid Platform, but do not display in the Component Pack list.
Basic Component Pack Fields
From the Component Packs tab, you’ll see a table with the following fields. Each field serves a purpose in telling Skuid how to properly use the component pack.
In Skuid Platform [[]]
- Name is the id property of your component pack as it appears in the manifest files. Note that this field is case-sensitive and must match the component pack ID exactly.
Note
If you did not develop this component pack, check with the developer for the correct name.
- Ensure that the Activate checkbox is checked to enable the pack.
- Load Order determines the actual order in which packs are loaded in the App Composer. If your component pack contains dependencies that require resources contained in other packs, set them to load after those packs.
- The File Name is the name of the uploaded static resource.
- Created By indicates who created the static resource.
- Last Modified By indicates who last edited the component pack.
In Skuid on Salesforce [[]]
- Name is the id property of your component pack as it appears in the manifest files. Note that this field is case-sensitive and must match the component pack ID exactly.
Note
If you did not develop this component pack, check with the developer for the correct name.
- Resource Name is the name of the static resource you created.
- (Optional) A Resource Namespace is required if the component pack’s Javascript resource includes a namespace.
- Under Pages available in, indicate if the components are available for desktop pages, mobile pages, or both.
- Load Order determines the actual order in which packs are loaded in the App Composer. If your component pack contains dependencies that require resources contained in other packs, set them to load after those packs.
- Ensure that the Activate checkbox is checked to enable the pack.
Modifying fields on the component packs list
Edit fields
To change names, load order, page availability, or make a component pack active or inactive:
- Click Edit .
- Make your changes.
- Click Save.
Warning
- The pack’s Name is an id property specific to the manifest files—critical files that govern the component’s JavaScript. Do not change the pack Name unless you are also able to update the manifest files and any necessary resource files to reflect this change; otherwise, the App Composer will not recognize the component pack.
- If you change the name of the static resource in Salesforce, you must also change the Resource Name here to prevent errors.
Delete a component pack
- Click Delete . The record will be flagged for deletion and highlighted in red.
- Click Save.
Additional properties in Skuid on Salesforce
Click Additional Properties to open a drawer with the following properties:
Runtime Definition File
- Edit the field to identify the correct file within the component pack. | Typically skuid_runtime.json.
Builder Definition File
- Edit the field to identify the correct file within the component pack | Typically skuid_builders.json.
Cache Package Definition
- Check this box to store the component pack’s files in the server-side cache for a performance boost. (With the files already loaded in memory, data will be accessed faster.)
Note
If you check the Cache Package Definition box, you must click the Update Cache button (see next section) anytime you update the component pack so that your Skuid UI will reflect the changes you’ve made.
Update the cache
- If you checked the Cache Package Definition box on the component pack, click Update Cache to update the cache so that any changes to the component pack are reflected in the App Composer and runtime.
Add new component packs
While you are free to create your components and build your own component packs, you can also use component packs assembled by others within your own Skuid org—without any code.
To add a new component pack, follow the steps below:
For Skuid Platform [[]]
- In the Skuid main menu, navigate to Configure > Component Packs.
- Click Add Component Pack.
- In the Add Component Pack dialog, click Upload and navigate to the component pack zip file you want to use.
Your component pack is now uploaded and ready for use.
Note
You cannot “update” an existing component pack.
- Create an updated zip file using the same name as the existing component pack.
- Click Add Component Pack, and choose the updated zip file. The new version will overwrite the current version of the same name.
For Skuid on Salesforce [[]]
Enable component packs
First, you’ll need to enable component pack usage in Skuid’s configuration settings.
You’ll only need to do this once.
- In the main Skuid menu, click Configure, and then select the Component Packs tab.
- Check the box next to Use Component Packs. In most cases, this box is checked by default.
Note
If you’re updating Skuid from a previous version, then this may be unchecked.
And that’s it! Skuid will now recognize any properly formatted component packs listed in its component pack library.
Upload Component Packs
In order for Skuid to recognize and utilize your component pack, you’ll need to do two things:
- Upload that zipped file to a Salesforce static resource that Skuid can access.
- Create a reference to that static resource within Skuid’s component pack list.
In Salesforce
- Navigate to Setup > Develop > Static Resources.
- Click New.
- Enter the name of the Salesforce static resource containing your component pack zip file.
- Click Choose File to upload the file.
- Set Cache Control to Public.
- Click Save.
Once you’ve uploaded your component pack as an accessible static resource, it’s time to let Skuid know it’s available for use.
In Skuid
- In the main Skuid menu, click Configure
- Select the Component Packs tab.
- In the Component Pack tab, click at the top of the table to add a new component pack.
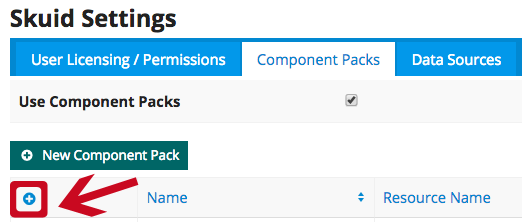
Note
Do not click New Component Pack. This begins a different workflow designed to give examples for building component packs, not uploading already-built packs.
- In the Component Pack table, fill in the necessary component pack fields.
- Click Save.
Your component pack is now uploaded and ready for use.
Export Component Packs
If your component pack is no longer available on your local drive, or if you have modified the pack since using it within your org, you may want to export that component pack for use with other orgs.
To do so, you’ll need to download the component pack’s file.
In Skuid Platform [[]]
- In the Skuid main menu, click Files.
- In the Files list, click View File next to the component pack name. This allows you to download the zipped pack to a location of your choosing.
In Salesforce [[]]
- Navigate to Setup > Develop > Static Resources.
- Click the Name of the static resource containing component pack.
- Click View file under the Size field.
- Save the component pack to a location you will remember.
- Repeat the steps as listed in Add new component packs.
Troubleshooting
Component packs are assembled using several files that refer to each other and must be properly formatted to work correctly. If different aspects of your custom component are not working then you may need to troubleshoot the construction of the component pack.
As a Skuid administrator, your ability to verify these elements may be limited, but if you’re having problems with an uploaded component pack, confirm with its developer that:
- the paths indicated in the manifest files are correct
- the runtime and manifest files are mapped correctly
- the name of the component pack matches the id property of the component pack in the manifest files
- the resource name matches the name of the static resource
For more information, see Building Component Packs.