In This Section
- Concepts
- Data
- Build
- Style
- Deploy
- Extend
- Skuid Developer Resources
- Skuid and JavaScript
- Skuid and Apex
- Create a Skuid Custom Component
- Dynamic Creation of Models and Components
- CI/CD with Skuid
- Event Handling Between Custom Lightning Components and Skuid
- Automated Testing
- Reference
- API Reference
- skuid.$
- skuid.actions
- skuid.ajax
- skuid.builder.core
- skuid.builder.core.coreProps
- skuid.calendar
- skuid.collaboration
- skuid.component
- skuid.componentType
- skuid.events
- skuid.formula
- skuid.hotkeys
- skuid.label
- skuid.load
- skuid.model
- skuid.model.Model
- skuid.mustache
- skuid.page
- skuid.sfdc
- skuid.snippet
- skuid.time
- skuid.ui
- skuid.utils
- skuid.version
- Component-Specific APIs
- Skuid Model Metadata Object
- Skuid Model Child Relationship Metadata Object
- Skuid Model Condition Metadata Object
- Skuid Model Field Metadata Object
- Skuid Model Record Type Metadata Object
- Page XML API
- skuid-sfdx
- Skuid Metadata Object Reference
- Skuid Glossary
- Formula and Function Reference
- Open Source Software Attributions
- API Reference
- Site Administration
- Tutorials
- Skuid Page Tutorials
- Add Related Lists with the Table Component
- Build an Activities Related List Tab
- Build a Custom “Create New Record” Page
- Build a Custom Detail Page
- Build a Custom List Page
- Compose a Branded Header and Navigation
- Compose a One-Page App Using Tab Actions and Conditional Rendering
- Conditionally Display Fields
- Create a Custom Clone Page
- Create a Custom “Clone Account” page
- Highlight Critical Data: Wrappers, Rich Text, and Ui-Only Fields
- Mass Create Records
- Show Products in an Opportunity Page
- Skuid Pages for standard Salesforce CRM
- Salesforce Tutorials
- Add Product Line Items to Opportunities with a Popup
- Add Gmail to Salesforce functionality in your email fields
- Create a Custom Edit Page and Set Visualforce Overrides
- Getting Help: Grant Skuid Login Rights to your Org
- Reclaim the Salesforce Home Page
- Redirect to Salesforce Processes
- Skuid for Sales: A Turn-Key Template to Augment Lightning Sales Cloud
- JavaScript Tutorials
- Skuid Page Tutorials
- Legal terms and conditions
- Skuid for Salesforce Evaluation Guide
In This Topic
- Create a Custom Header and Footer
- Step 1: Click on Skuid Page > Layout to configure the header and footer.
- The header and footer regions will now appear on your page.
- Step 2: Click on your header to edit its properties.
- Configure header styling.
- Step 3: Drag and drop components into your header and footer.
- Step 4: Click Save, then click Preview to open your new page in a new tab.
- Success! You new header and footer will be displayed!
- Troubleshooting Tips, or, “Learn from our mistakes!”
Create a Custom Header and Footer
The Header and Footer aren’t found in the Component library, rather you can enable them in Page Properties (where you can also disable the standard Salesforce header). The best practice is to create your custom header and footer as a master page, and then create child pages defining the body of each page that you want to have the custom header and footer (that way you don’t have to re-build the header/footer on every page). See a detailed example of creating a branded header in a master page in this tutorial.
Step 1: Click on Skuid Page > Layout to configure the header and footer.
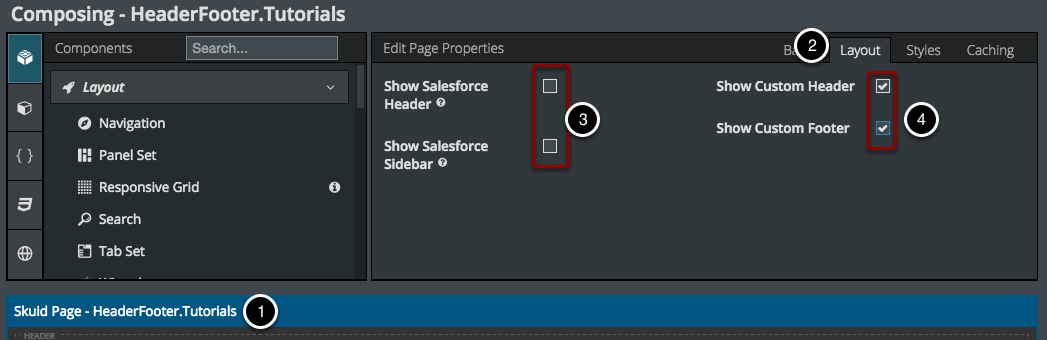
- Click on the page title.
- Click Layout.
- (Optional) uncheck Show Salesforce Header and Show Salesforce Sidebar.
- Check Show Custom Header and Show Custom Footer.
The header and footer regions will now appear on your page.
Now you can drag and drop components into the header and footer.
Step 2: Click on your header to edit its properties.
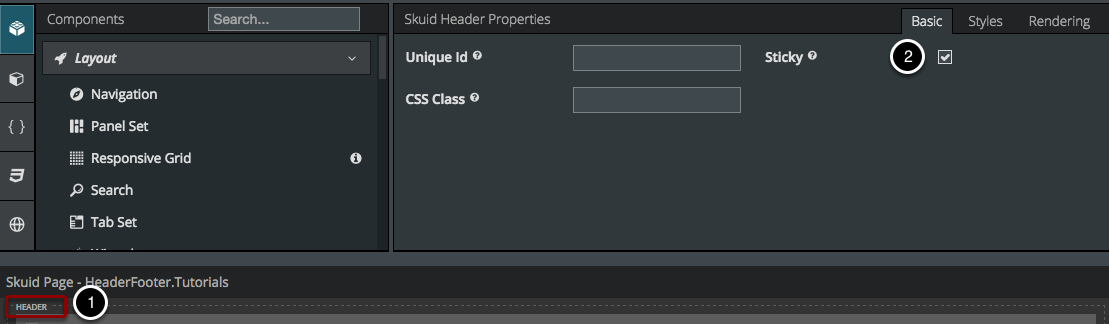
- Click on the Header.
- Configure basic header properties, like making it Sticky. This means that no matter how far you scroll down the page, your header will always appear on top.
Configure header styling.
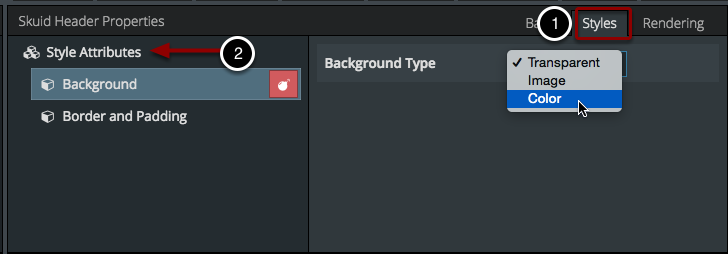
- Click the Styles tab to configure your Header styles, such as Background and Border and Padding.
- Click Style Attributes to add more.
Step 3: Drag and drop components into your header and footer.
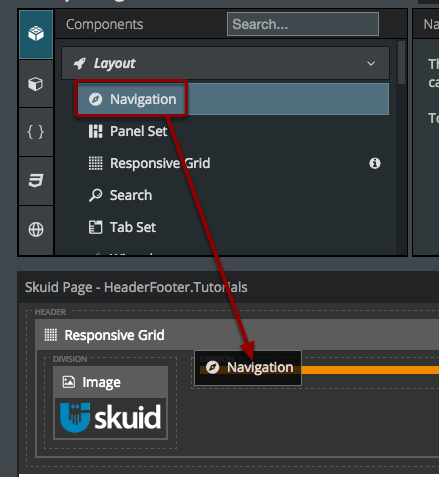
- Let your imagination run wild!
- We typically like using a responsive grid to space out a logo image, navigation, etc.
- If you need some inspiration, check out our Build a Branded Header use case.
Step 4: Click Save, then click Preview to open your new page in a new tab.
Success! You new header and footer will be displayed!
For the body of this page I used a stock photo from https://stockphotos.io. I set it as the page background in Page Properties > Styles.
Troubleshooting Tips, or, “Learn from our mistakes!”
Sometimes images in headers can cause problems if they’re taller than the header would normally be. If you suspect this is the case, go into Image > Styles and under size choose “set height” and specify a smaller Minimum Height of your image.