Creating a data source connection in Skuid Platform
Once you register for a Skuid Platform site, you need to create a data source (or multiple data sources) in Skuid to connect to an external system. Skuid comes with several pre-configured data source types to get started. If you have an external system compatible with one of Skuid’s data source types, then set up an authentication provider to access it. If no authentication is required, then dive right into building pages.
Want more information on how to setup data sources? Take a look at our Data section.
How to connect a data source to Skuid
This tutorial shows you how to connect a free, publicly-available data source to Skuid. We will use a database provided by OData in their reference section: http://services.odata.org/V3/Northwind/Northwind.svc/
The Northwind data source is OData v3, which means it can be accessed by Skuid’s OData data source type. This data source is read-only, so we will only be viewing data, not creating or making edits.
Add new data source
Click Configure from the Skuid navigation header.
In the Data Sources tab, under the Data Sources subheader, click New Data Source.
Select OData as your data source type.
Enter a unique name for your data source. We’ll call our data source NorthwindTestData in this example.
Click Next Step.
In the Configure Connection and Authentication step:
Enter the URL / Endpoint for the new data source.
In this example, we will use http://services.odata.org/V3/Northwind/Northwind.svc/
Check Use Proxy. This data source will not work otherwise.
For OData Version, select the version your data source uses, in this case, OData 3.
(Optional) Check Supports Batch Operations if you wish to allow the data source to group multiple operations into a single request.
Note: While batch processing can improve performance as well as support a type of “roll back on error” behavior, some service providers do not support it.
Authentication Method: No Authentication.
Click Save.
You’ll now see the data source you created in the list.
Create a model with data source
Okay, now that you have a data source, you can create models that provide data to components in a Skuid page. You’ll need to create a Skuid page to do that. Go to compose > new page and create a blank page with a unique name.
In your new page:
Click on the Models tab in the App Elements pane.
Click Add Model .
Give your model a unique Model Id. In this example, we’ll call it NorthwindTest.
Select OData as your Data Source Type.
- If your data source doesn’t auto-populate in the Data Source field, then select your recently created data source from the picklist.
For the External Object Name, type in a couple of letters to get the available objects to show up. In this example, you can type in the letters OD to get a list of all the objects available from the Northwind data source.
Not sure what to pick for this example?
Choose ODataWebV3.Northwind.Model.Customers.
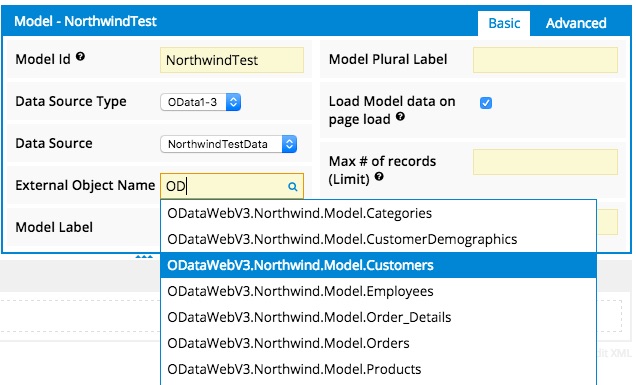
Give your model a label and a plural label that can be used on the page. (In this exercise, enter Customer for the model label and Customers for the model plural label.)
In the model, click Fields and add the fields needed for your Skuid page. (In this exercise, choose ContactName, CompanyName, and Phone from the Customers object.)
Test your data source with a component
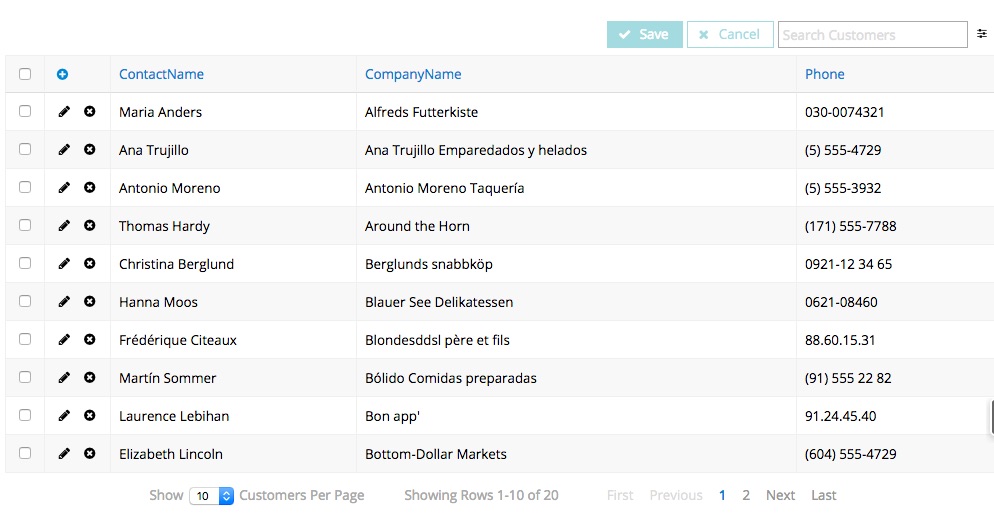
To verify that your data source and model are pulling in data, let’s test it within a Skuid table.
Drag a Table component into your canvas.
Ensure that your table is pointed to the appropriate model in the component properties pane, i.e. NorthwindTest
On your Table, click Add Fields > Model Fields to open the Add Field(s) popup.
Check the boxes next to a few fields and click Apply. For example, the ContactName, CompanyName, and Phone.
Save the page.
Click Preview.
You should see a simple Skuid page like the one below: