Private Data Service
Warning
This feature is not available for use. This document remains viewable for legacy support and archival purposes.
Skuid’s Private Data Service (PDS) is an application that enables Skuid to securely communicate with a data server without data leaving the network on which the server is hosted. That means the data does not got out over the open internet, and there is no need to expose the data by opening a port on a firewall.
Most Skuid data sources connect to data services that exist in the cloud, exposed to the open internet. Skuid can even access data that exists within private environments—connecting to specific ports opened to the internet. There are typically strong forms of authentication available to prevent nefarious users from gaining access, but some users just need their data locked away from the internet, period. And while this may be possible by writing an exhaustive API gateway from the ground up, Skuid provides that with PDS; you can access one or more SQL data sources, for use in one or more Skuid apps or sites, without the need to write an exhaustive API for accessing your data.
Warning
The PDS requires a technical background more in line with development operations than Skuid design. Work closely with your team’s technical experts to determine how to best implement it in your technology stack.
How Private Data Service Works

Prerequisites and Concepts
While PDS is powerful, it requires a technical background to use it effectively, and a full implementation will likely require collaboration across several teams in your organization.
Ensure that you feel comfortable with the following concepts before beginning your implementation:
- Docker, docker-compose, YAML files, and ENV files
- Container orchestration, such as Kubernetes
- Navigating compute environments and package installation
- Technology stack requirements and concepts
- Virtual Private Cloud (VPC)
- Load balancer (commonly ELB)
- Package management and container management
- The compute environment where PDS will run, like a server
- Network and security
- Domain Name System (DNS)
- Transport Layer Security (TLS)
Supported data source types and platforms
PDS currently only works with Skuid’s SQL data sources types and is available for both Skuid Platform and Skuid on Salesforce.
Networking Setup
PDS’s entry point must be accessible to internal users over HTTPS. That entry point may be the a singular compute environment, such as an EC2 instance, or a load balancer, but the IP address of that entry point must have a TLS certificate, and thus a DNS subdomain.
Coordinate PDS use with Skuid
Skuid must authorize any Skuid sites attempting to use PDS. Admins must send Skuid their Skuid Platform Site Id in order to activate the PDS feature.
Microservices within Private Data Service
PDS is made up for several microservices running in conjunction.
API Gateway (Sluice)
The PDS API gateway is responsible for receiving a variety of requests and then routing that request to the appropriate microservice. This gateway is a secure, scalable, authenticated API endpoint that Skuid pages and apps running in the user’s browser can connect to.
As the gateway is the point of entry for any end user requests from the Skuid client, running in user’s browsers, it must be accessible by a direct AJAX request via an exposed port.
Typically developers write a REST API that sits in between an end user and a database. The PDS provides that layer so the company doesn’t have to. Saves a lot of boilerplate and repetitive logic.
Warden
The Warden microservice processes each user request, comparing the permissions of that user with a record of permissions, stripping out any unpermitted requests based on those permissions, and then sending the request along to Skuid’s parser to actually query for data.
Because Warden intercepts each request, it allows for a robust security model to ensure only authenticated users can even make a request to any connected database, and that only the data the end user is allowed to access is returned to the user’s browser.
Depending on the amount of request traffic to the database, consider scaling vertically using a container orchestration product.
Because Warden ties much of PDS together, it must be accessible to the API gateway and able to access the following:
- Seaquill
- State and metadata database
- Key-value cache
State and Metadata Database (PostgreSQL Database)
PDS requires a PostgreSQL database to store the necessary metadata and state information required by Warden to process requests, such as user permissions, conditions, data source configurations. It must be accessible to Warden within the technology stack.
Skuid bundles an optional PostgreSQL database with Warden’s image to allow for faster configuration, but if you’ll be vertically scaling the PDS within your stack (instantiating new containers of Warden to handle load, for example), then it is best practice to use a central database as opposed to the bundled database.
SeaQuill
A query builder, this service translates Skuid’s JSON-based syntax into SQL queries formatted based on the flavor of SQL used by the database being accessed by PDS. Once the database sends a response, Seaquill then translate that response from SQL into Skuid’s syntax so it may be used within a Skuid page. It must be accessible to Warden, and it also must able to access the database of record within the technology stack.
Key-Value Cache (Redis Database)
PDS also requires a key-value caching layer to improve the performance of Warden as it makes its requests. This Redis database can be run in its own Docker container, or it can be created as a new logical database within an existing Redis cluster, such as an AWS Elasticache instance. This must be accessible to Warden.
Public Key Store
A service that stores the public key associated with a PDS instance/Skuid customer pair. This key is retrieved after clicking Register Site with Data Service once a PDS configuration has been created.
Implementation Strategy
Because each microservice handles a different part of the PDS, it’s possible to have a relatively simple implementation or an immense and scalable solution. For an example of a basic implementation, see the PDS reference implementation repository.
While it is possible to have an init script that runs in your compute environment to initiate these different microservices with a docker run command, PDS is ideally run within a container orchestration service, such as Kubernetes. This allows for health checks, traffic spike notices, and logic that will automatically scale the containers for PDS’s microservices based on usage.
Compare this relative simple PDS configuration on an EC2 instance (based on the above reference implementation):
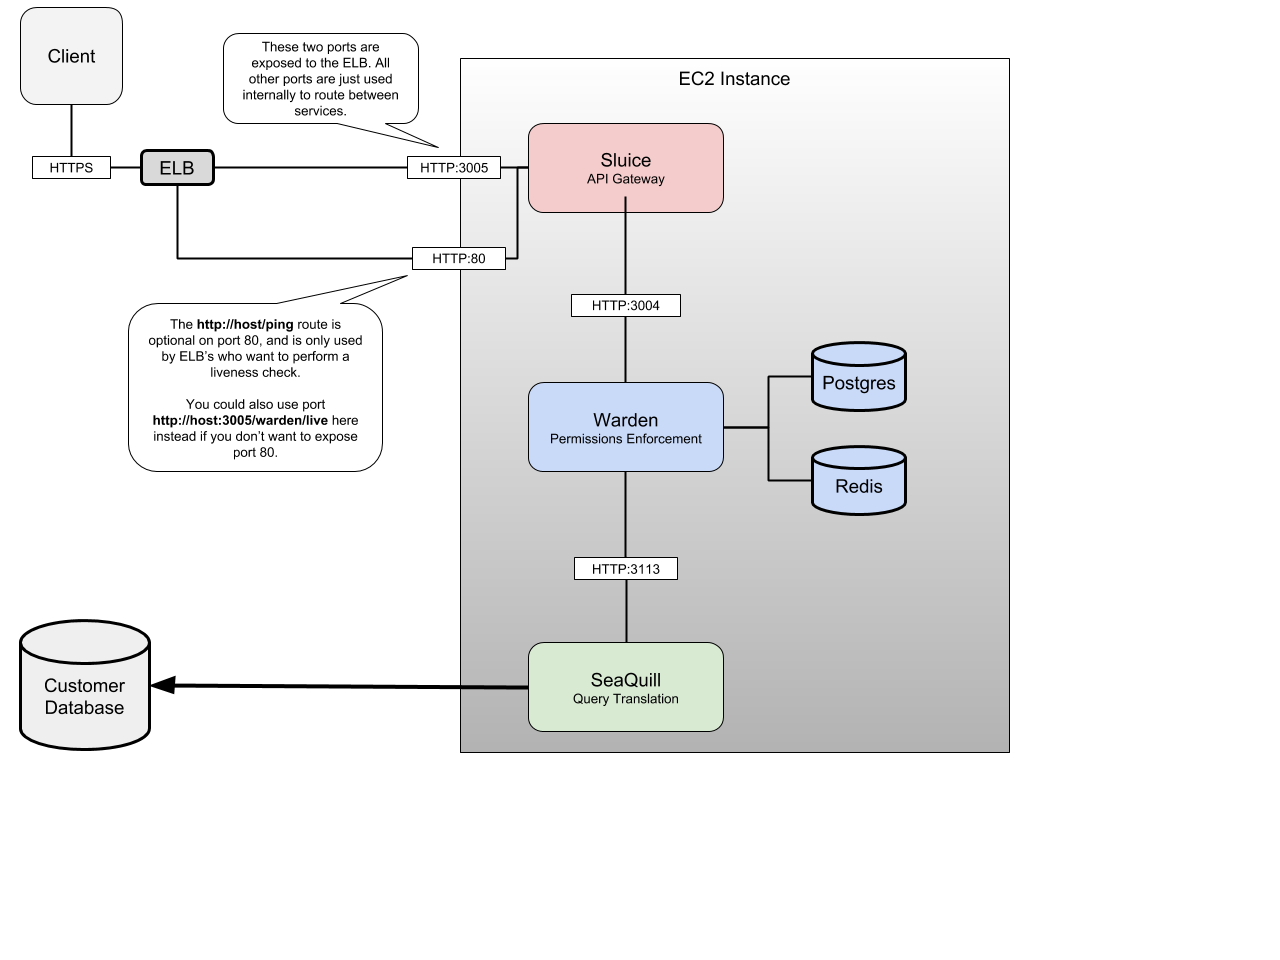
To this more advanced configuration, which includes load balances and container orchestration:

The primary difference between these two configurations is the use load balancers to ensure connections are distributed to containers that can handle the traffic and the scaling of multiple containers.
But also note what they have in common:
- Both implementations use a single PostgreSQL database and Redis database for all Warden microservices in the stack. This is a best practice.
- Both implementations ensure that the different microservices can speak to each other through specific ports—which will be important when creating the ENV file used to initiate PDS
Warden’s State and Metadata PostgreSQL database
- The PostgreSQL database must be accessible by Warden (running in the EC2 instance) using ODBC/JDBC on a network-accessible host/port.
- The credentials for this database should be entered in the Warden ENV file.
- The Warden ENV file’s location must be specified in the Warden service’s
env_filevariable in the Docker Compose file. - For runtime, Warden will need to access the PostgreSQL database as a root / superuser that has permissions to do the following. For simplicity, this can be the owner/root user, or it can be a separate user if desired, as long as it has essentially superuser permissions:
- Create / Modify tables
- Select / Insert / Update / Delete all tables
- This database Name, Username, and Password—along with its Host and Port—are required for Warden’s ENV file
PDS File Examples
ENV file
Warden requires its own ENV file in order to connect to the PostgreSQL database used to store it metadata and state data. This ENV file is specified in the env_file variable of the Docker Compose file.
This ENV file must contain the following variables.
PGDATABASE=<Name of the PostgreSQL database>
PGHOST=<The host of the PostgreSQL>
PGPASSWORD=<Password of the database>
PGPORT=<The port the database is accessible on, typically 5432>
PGUSER=<The superuser role for Warden>
WARDEN_ENCRYPTION_KEY=<Alphanumeric string 32 characters long>
Note
The WARDEN_ENCRYPTION_KEY variable may be any random alphanumeric string that is 32 characters long. An easy way to generate a random string is to run
cat /dev/urandom | LC_ALL=C tr -c -d 'a-zA-Z0-9' | \
 fold -w 32 | head -n 1
If using the the postgres service included in the example Docker Compose file below, then update the PGPASSWORD ENV variable with the password used within the Compose file. Otherwise, ensure these credentials match the PostgreSQL database used for Warden metadata and state data.
Docker Compose file
The Dockerfile used to compose PDS’s containers uses several services that each have their own configuration options. Several of these options must match to ensure the microservices can speak to each other.
Consider the following example Compose file, based on the PDS reference implementation:
version: "2"
services:
  postgres:
    image: "postgres:10.5"
    ports:
      - "5432:5432"
    environment:
      PGHOST: "postgres"
      POSTGRES_PASSWORD: "wardenDBpass"
      POSTGRES_USER: "warden"
    volumes:
      - "./pgdata:/var/lib/postgresql/data"
  redis:
    image: "redis:3.0.7"
    ports:
      - "16379:6379"
    volumes:
      - "./redis:/var/lib/redis/data"
  seaquill:
    image: "skuid/seaquill-image"
    ports:
      - "3113:13113"
    environment:
      - NODE_ENV=production
      - SEAQUILL_PORT=3113
  warden:
    image: "skuid/warden-image"
    ports:
      - "3004:3004"
    env_file:
      - /opt/skuid/env/warden
    environment:
      - WARDEN_PORT=3004
      - REDIS_HOST=redis
      - REDIS_PORT=6379
      - WARDEN_QUILL_ADDRESS=http://seaquill:3113
      - WARDEN_AUTHCACHE_TTL=5s
      - WARDEN_DATABASE_ON=true
      - WARDEN_GZIP_LOAD_PROXY=true
      - WARDEN_GZIP_LOAD_RESPONSE=true
      - WARDEN_STREAM=true
      - WARDEN_USE_KMS=false
    depends_on:
      - "redis"
      - "seaquill"
    links:
      - "redis"
      - "seaquill"
  sluice:
    image: "skuid/sluice-image"
    ports:
      - "3005:3005"
      - "80:80"
    environment:
      - WARDEN_HOST=http://warden:3004
    links:
      - "warden"
Note several of the variables that must align:
- If the
postgresservice within the example above, each of the environment variables in thepostgresservices determine the PostgreSQL credentials that must be entered in the Warden ENV file, particularly thePOSTGRES_PASSWORDvariable must match the ENV’sPGPASSWORDvariable.- If you are using your own PostgreSQL database, then you may remove the
postgresservice from the Compose file.
- If you are using your own PostgreSQL database, then you may remove the
- The ports for several services must align with several environment variables within the Compose file:
- Sluice’s WARDEN_HOST variable must align with Warden’s WARDEN_PORT
- Warden’s WARDEN_QUILL_ADDRESS must align with seaquill’s port number
- Warden’s REDIS_PORT must align with redis’s port number
- Warden’s
env_filevariable must point to the appropriate ENV file
Private Data Service and Data Source Configuration in the Skuid UI
By default Skuid will use its cloud data service to process any data source requests. To utilize the PDS after implementing it within your tech stack, you must create a new data service configuration.
Create the data service
- Navigate to Configure > Data Sources > Data Services
- Click New Data Service.
- Fill out the required fields:
- Name: A recognizable name for the data service
- Service Host: PDS’s entrypoint URL without protocol on front—i.e. do not include HTTPS
- Service Port: The port on which PDS’s entry point is available
- Click Save.
While the configuration’s metadata will be saved, the configuration will not be operational until the data service is registered with Skuid’s services. Click Register Site with Data Service beside the newly created configuration.
Note
At this point in the process, the Warden microservice within the PDS will interact with Skuid’s cloud services to retrieve a public key. After this interaction, the PDS will retain that public key and no longer interact with services outside of its network.
- Click Test Connection
Once the data service configuration is created, create the data source associated with the private SQL database.
Create the data source
- Navigate to Configure > Data Sources > Data Sources.
- Click New Data Source.
- Enter a recognizable name and select the SQL dialect for the database being accessed.
- Click Next Step.
- Check Use a Private Data Service.
- Select the data service configuration created in the previous section.
- Enter the rest of the SQL data source’s information:
- URL/ Endpoint: The IP address of the database being accessed within the network not the IP address for PDS’s entrypoint. For VPC-based implementations, this may be an alphanumeric endpoint. Must include the port number. e.g.
tw91jhkmf1.rds.amazonaws.com:5432 - Database Username: The username used to login and access the database.
- Database Password: The password used to login and access the database.
- URL/ Endpoint: The IP address of the database being accessed within the network not the IP address for PDS’s entrypoint. For VPC-based implementations, this may be an alphanumeric endpoint. Must include the port number. e.g.
- Click Save.
Skuid will then communicate with the PDS instance to store this data source’s information within its state/metadata database
Import data source objects and use the SQL data source
After the creation of the data source, you may import data source objections and utilize the SQL data source as you would any other.