Skuid Platform
App Deployment on Skuid Platform
Designing a variety of powerful, intuitive pages with the Skuid’s App Composer doesn’t serve much purpose until those pages have been deployed—that is, made available for end users. To achieve this, Skuid Platform uses apps and routes. An app is a collection of Skuid pages and their associated URLs. These individual page URLs are known as routes. These two features work in tandem to allow users to find the appropriate Skuid pages based on logical URL paths.
Deployment on Skuid Platform with apps and routes follows this general process:
- Design and create Skuid pages
- Create a new app (if one does not already exist)
- Create routes for individual Skuid pages within the app
- Assign access to the app to appropriate user profiles
Once created, end users may access apps directly by visiting the appropriate URL paths or by selecting the app from the My Apps menu in the Skuid navigation bar.
Note
While apps and routes clarify the URL structure of your site and make your Skuid pages available for your end users, they do not allow data to flow freely between page. For more information on creating connections between pages, see Connecting Skuid pages.
Warning
Since your Skuid pages will be using external data source connections, end users should disable any popup blockers when using Skuid Platform. Authentication popups may be blocked at runtime, preventing your Skuid pages from functioning properly.
How Apps and Routes Work Together
Each app has a default page, usually a homepage or dashboard, which is assigned a base URL path under your Skuid site’s domain URL:

Each route is assigned a sub-path under your app’s base URL:
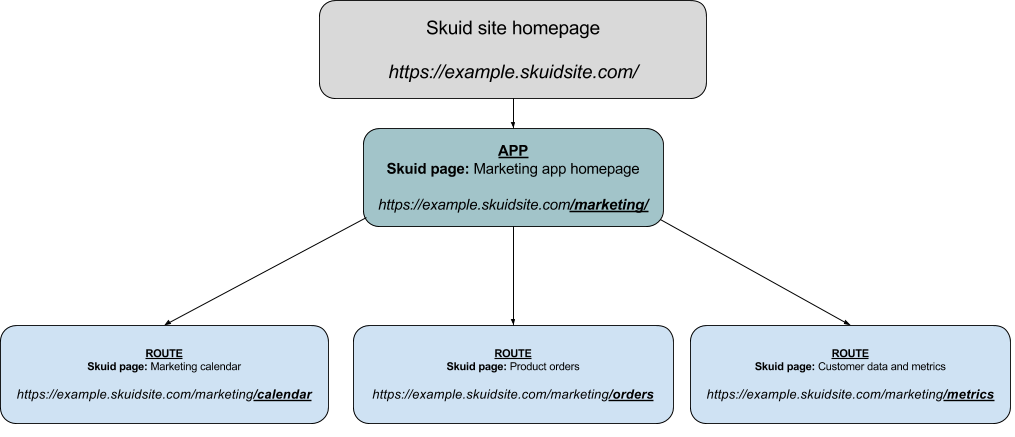
And for every app and route URL, there is an associated Skuid page.
For example, the basic marketing app illustrated above is made up of four Skuid pages:
- A marketing homepage or dashboard
- A calendar for marketing events
- A product order page for marketing collateral
- A customer metrics page for more in-depth data analysis
The marketing app then uses /marketing base URL, which is connected to the marketing app homepage Skuid page.
The routes are then configured as follows:
/calendar, which points to the calendar Skuid page/swag, which points to the product orders Skuid page/data, which points to the marketing data Skuid page
So for end users to navigate to the calendar page within the marketing app, they would enter a URL similar to …
example.skuidsite.com/marketing/calendar
Best Practices:
- Consider the routes and design of your apps as early as possible, even before creating your Skuid pages, to ensure their structure makes sense to end users.
- Create apps by use case and create routes within them for Skuid pages related to that use case.
- Give routes intuitive names so it’s easier to find them in the routes list.
Apps
Apps are created from the Configure Apps page, accessed by clicking Apps in the Skuid navigation bar. This page displays a table of all apps on the Skuid site, as well as basic information about each app.
Each app has three detail fields:
Name: The name displayed within both the Configure Apps table and the My Apps menu.
Base URL: This is the URL-encoded path added to the end of your Skuid site’s URL. For example, example.skuidsite.com/marketing/
Default Route: This field affects which part of the app users are directed to when they click the app’s name from the navigation bar’s app selector. When creating apps, the default route always defaults to the base URL, but it can be updated to a new route after the app has been created.
For example, a marketing app can have a base url of /marketing but a default route of /calendar.
When end users select the marketing app from their My Apps menu, then they will automatically be directed to the marketing/calendar route.
Creating new apps
In the Configure Apps page, click New App.
Set your app details:
- Name
- Base URL: While this field is auto-populated based on your app’s name, you can enter any URL-encoded value as an app’s path.
Set the default page for your app by typing its name or clicking the search icon and selecting it from the list of pages. This is the Skuid page that will display whenever end users visit your app’s base URL.
Note
To create a new app, you must have already created a page.
Click Save.
After creating the app, Skuid navigates to a configuration screen, where you can begin creating routes for the app.
Configuring apps
Beside each existing app is a Configure icon. Clicking this will take you to the configuration page for that individual app. On this page, you can can create and configure routes, or update the app’s details:
- Name
- Base URL
- Default Route
Mobile app properties
If an app is bundled as a mobile package, then its mobile app properties are also displayed.
Name: The name of the native mobile app, as determined by the name of the Skuid app. Will be displayed on as the app name on the mobile device.
Platform(s): Displays which platforms the native mobile app has been packaged for.
Status
- Unpackaged: Mobile packages for this app have not been built.
- Deployed: A mobile package has been created for at least one platform.
Version: Displays the version of Skuid native mobile features available (the first two digits) and the number times the native mobile app has been packaged (the final digit).
Mobile App Id: The internal identifier of the native mobile application, primarily for use when generating Apple certificates.
Note
If your Skuid Platform site’s URL changes—for example, when upgrading from free trials to production subscriptions—this ID may change.
Routes
Routes—the connection between a Skuid page and its URL path—are configured within apps. Each route appends a path to the app’s base URL, and that larger URL is then connected to a specific Skuid page.
To see an app’s routes, click Configure beside your app of choice. Beneath the Routes header, a table displays all routes associated with the app. This table includes the app’s base URL—the one for the default page—as a route.
Note
Routes do not determine navigation within an app. To configure your Skuid pages to interact with each other, see Connecting Skuid pages.
Creating new routes
Click Add New Route.
Enter the preferred path for this route.
Note
Entering the base URL is not necessary; Skuid will automatically prepend the base URL.
Select the Skuid page to associate with this route, either by entering the page’s name or clicking the search icon.
Click Save.
Updating routes
Update routes within the table by clicking Edit Row on a route. Once the table is in Edit mode, enter a new path or select a new Skuid page for that route.
Note
Be thoughtful about updating routes; updating too often or without warning may break user bookmarks.
Route parameters
Route parameters allow for additional information to be passed into a Skuid page as a distinct part of the URL and are added when creating new routes within an app.
- To create a parameter, encase its label in one set of curly brackets, e.g.
my-route/{myParameter}. - To specify a parameter as optional, add a question mark just before the final curly bracket, e.g.
my-route/{myOptionalParameter?}.
Note
Unless a parameter is marked optional with ?, then end users will see a Page Not Found error if they navigate to that page without the parameter in the URL.
Contrast route parameters with URL parameters, which are appended to a pages URL in a format similar to ?aParameter=this&another=that and do not constitute a distinct URL. Having parameters be a distinct part of URL can be advantageous for your app’s URL structures or SEO.
To better illustrate this concept, consider a page that requires a productName parameter. Its route would look like products/{productName}.
If this route were in an app with a base URL of store, it would result in a URL like the following: https://example.skuidsite.com/store/products/milk
Compare this with the URL parameter-based alternative: https://example.skuidsite.com/store/products?productName=milk
To best utlize route parameters while navigating between Skuid pages, consider using the Go to Skuid Page action and specifying route parameters by clicking Add Parameter.
Accessing route parameters in Skuid pages
- Parameters are accessible to model conditions, actions, render/enable conditions, and other Skuid features through the Page/URL Parameter option.
- Values are also accessible through the $Param global merge variable, e.g.
$Param.myRouteParameter. They may also be passed to Page Includes by setting the component’s Query String property to point to this global merge variable, e.g.productName={{$Param.productName}}
App Access and Profile Permissions
Once an app is created, it must then be assigned to profiles through the App Access tab. An app, and its routes/pages, cannot be accessed by any non-admin profiles until this has been done.
- Navigate to Configure > Profiles.
- Click Configure beside the appropriate profile.
- Click App Access.
- Check Allowed beside the appropriate apps.
Note
Page permissions are determined by the apps containing them, not the pages themselves. Any pages not assigned a route within an app will not be viewable by any end user without an Admin profile.
This is particularly important when working with Page Includes, as each Skuid page must have an associated route even if the pages are never shown independently, i.e. not in a Page Include component. These permission errors may manifest as empty pages or “session expired” messages.
See the user and permission management topic for more information about profiles.
Connecting Skuid Pages
While apps and routes serve as the skeleton for a Skuid site’s URL framework, bundling pages into an app does not mean they speak to each other. A critical concept is that, despite the name, a “route” is not an A->B path to a page, nor can it be used for navigation in any way. A route is simply a URL that points to a specific Skuid page, an “address” for that page.
Because of this, apps and routes do not provide built-in navigation nor do they send data between their Skuid pages. Both of these things are possible, however, by creating an app navigation bar and using URL parameters.
Build an app navigation bar using the Redirect to URL action
The most useful features for creating consistently branded apps are master and child pages. Within the header portion of the master page, use the Navigation component to redirect end users to different routes. By doing this, each of the app’s pages will automatically have a way to navigate between other app pages.
For the marketing app listed above, the navigation bar might look like this:

Each of these navigation items uses the Redirect to URL action to redirect to a specific route. Unless a full URL path is specified, such as https:///www.example.skuidsite.com/app, this action will add the page URL to end of the the current Skuid site domain—the www.example.skuidsite.com from above.
So what does this actually mean in practice? To direct end users to a specific app and route, just enter the base URL and route in the Redirect to URL action. A button redirecting users to the calendar page within the marketing app, would use /marketing/calendar as its redirect URL.
Once you set the redirect URL, Skuid will then add it to the end of Skuid site’s domain URL (such as https:///www.example.skuidsite.com/), sending users to the appropriate route at https:///www.example.skuidsite.com/marketing/calendar.
Begin the redirect URL with a backslash (/), otherwise the value will be appended to the page URL as a whole. For example, clicking a button with a redirect URL of marketing/calendar from a marketing dashboard located at https:///www.example.skuidsite.com/marketing will send users to https:///www.example.skuidsite.com/marketing/marketing/calendar.
Note
It’s also possible to use absolute URLs, with the full domain path included.
For example, using https:///www.example.skuidsite.com/marketing/calendar as the redirect URL will work just as well. However, if these Skuid pages are used across multiple Skuid sites, their redirect URLs will only work in www.example.skuidsite.com; they will not work in the other sites, because the absolute URL references only the www.example.skuidsite.com domain.
Structure your navigation with this in mind.
Exercise: Setting up a Navigation Bar
Let’s recreate this example navigation bar to illustrate how this process works.

First, create pages to mirroring the example listed in What are Apps and Routes, beginning with the master page containing the navigation. You can also follow along with your own app’s routes and pages.
- Create a new Skuid page.
- In the Page Properties pane’s Basic tab, check Available as a Master Page.
- In the Layout tab, check Show Custom Header.
- Drag and drop the Navigation component into the header area within the canvas.
- Drag and drop a Page Region into the canvas.
After this, create several child pages based on this master page. While you don’t need to completely build out each page at this point, make sure you’ve created your app and routes to connect each page to a URL path.
Return to the app’s master page and create a navigation item that will point back to the route’s base URL:
Add a navigation item, setting its labels and icons:
Label: Home
Icon: sk-icon-menu
Click the Home navigation item, and select its Actions tab.
Click the Redirect to URL action.
- If this action is not available, click Add Action and Redirect to URL as the action type.
Enter the URL:
- /marketing
Click Save.
Preview the page. Assuming you’ve set a marketing app with a base URL of /marketing, the Home navigation item should open the correct Skuid page.
Next, create the navigation items that point to the rest of the app’s routes.
Add three additional navigation items, setting their labels and icons:
Click the Calendar navigation item, and select its Actions tab.
Click the Redirect to URL action.
- If this action is not available, click Add Action and Redirect to URL as the action type.
Enter the URL:
- /marketing/calendar
Repeat the previous steps for the remaining navigation items.
Click Save.
Using this master page, create child pages for each of your app’s routes, with the content for those pages placed within the page region at the beginning of this tutorial. Because of this master page’s navigation header, each page within the Skuid app will have a functional navigation bar which points to every other page—ensuring end users always have a way to maneuver through the app.
Pass data between pages with URL parameters
An introduction to URL parameter formatting
URL parameters are bits of data appended to a URL. Because web apps need to send variables back and forth between pages, it’s common practice to insert those variables in the URL. When working in web applications, you’ll often see a URL like this:
example.com/apage?id=AuXun109274009&name=Beep
The bolded part of this URL contains two URL parameters: an ID (AuXun109274009) and a name (Beep).
Within Skuid Platform, you can use this functionality to pass data between pages—such as navigating from a list page into a detail page. When doing this, there are two important rules to keep in mind:
- The first variable always must be prepended with a question mark (?) to indicate that what comes after the question mark begins a string of one or more URL parameters.
- Every subsequent URL parameter must be prepended with an ampersand (&).
As long as URL parameters are used in this format, they are accessible within a Skuid page.
Using the Redirect to URL action with URL parameters
When creating a link with URL parameters in Skuid Platform, most of the process is the same as outlined in Build an app navigation bar using the Redirect to URL action.
Beyond that, write the URL parameters to point to a merge variable—which be a context-dependent variable or a global merge variable. For example, the marketing/orders route has a table listing each order, displaying some general information. That table could have a row action that redirects to the following URL:
/marketing/orderdetails?Id={{Id}}
This redirect URL differs from those in the previous section. First, it sends end users to a new route (/marketing/orderdetails), as the previous redirect URLs have done. However, the question mark (?) indicates the beginning of the Id URL parameter.
What follows is some Skuid magic: a merge variable that references the model’s Id field. This means that whichever row the end user clicks determines the context, passing in that row’s Id value when clicked. So if the user clicked an order that had an Id of AuXun109274009, Skuid sends the user to the detail page with the row item’s Id in the URL parameter:
/marketing/orderdetails?Id=AuXun109274009
The final step is setting a condition on the detail page that looks for this URL parameter:
- Click the Models tab in the App Elements pane.
- Click the Orders model.
- Add a new condition for the Id field.
- Set the Value as follows:
- Content: Page/URL parameter value
- Value: Id
- Set its condition state to Always On.
With this condition set, this model will always look for the URL parameter named Id for the appropriate object Id.
This is just one small of example of what you can do with URL parameters. Experiment and find new, intuitive ways for your end users to work.