The Composer
The Composer is a visual building tool that houses many of the things you need to create an app—which is a collection of Skuid pages. It’s also where a builder spends most of their time.
Skuid adheres to a “Declarative first, code second” philosophy. A developer can create custom applications in the Composer without writing a single line of code. However, you can also extend Skuid with Javascript snippets, which allows for even more customization if an app function can’t be built declaratively.
A tour of the Composer
The Composer is accessed by selecting an existing page or creating a new page.
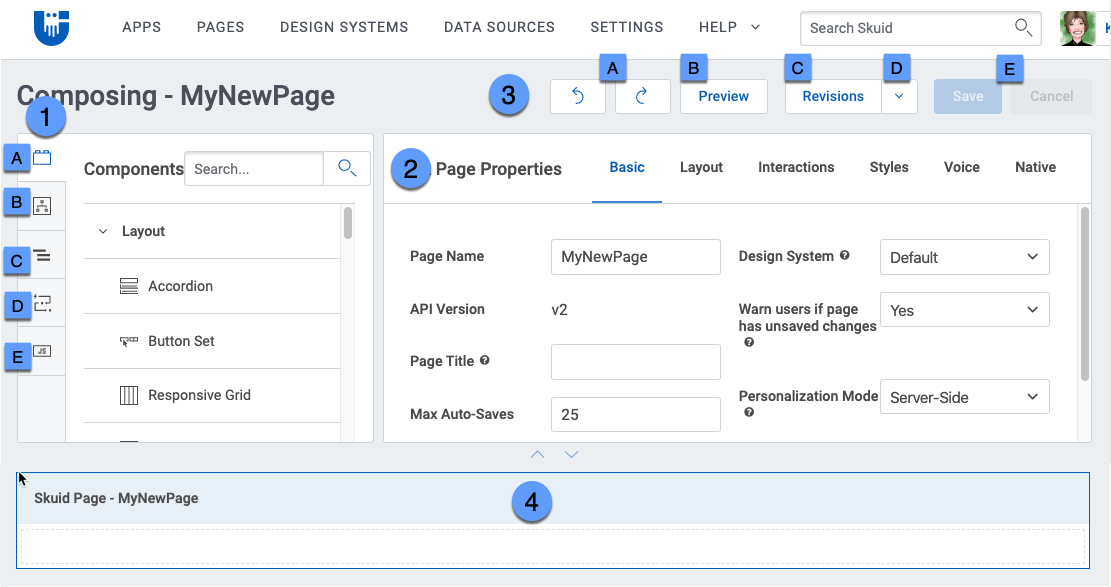
1. The Elements pane [[]]
In the Elements pane, you’ll select the components that make up your page, configure your models, create and configure action sequences, and include JS files.
- Components: Compose the visual aspects of your page with components. They display and allow you to interact with the data in your Models.
- Models: Models interface with your Salesforce objects and external objects and services, and they provide the fields that you use on this page.
- Index: An expandable/collapsible list of a page’s components and their child elements
- Action Sequences: Create reusable, named sequences of Actions which can be run in response to user interactions, events, or hotkeys.
- JavaScript: Include custom JS in your Skuid page. For more information about using JavaScript in Skuid, see the Skuid and JavaScript topic.
2. The Properties pane [[]]
The Properties pane displays the options and settings for whatever Skuid element is currently in focus (components, models, snippets, etc.)
3. Global page actions [[]]
A. Undo and Redo: Click to undo the last action taken (keyboard shortcut Cmd+Z for the Mac; Ctrl+Z for Windows), or redo the action that you undid. (keyboard shortcut Cmd+Shift+Z or Cmd+Y for the Mac; Ctrl+Y for Windows). Use these buttons to undo/redo actions taken on the page or in the components, or undo/redo operations within the Models, Action Sequences, or Javascript tabs in the Elements pane.
B. Preview: Click to preview a live version of your Skuid page.
C. Revisions: Click to see a list of snapshots taken at various points of page history. Revisions can be used to rollback a Skuid page to a previous point in the development process.
D. Revisions dropdown: A dropdown menu with more global page actions:
- Clone: Make a duplicate of the current page.
- Download as XML file: Download the current page as XML file.
- Configure Access: Open the page’s sharing details in Salesforce, where you can add new sharing rules or view reasons users currently have access.
- Delete: Delete the current page.
E. Save and Cancel: Click to save (keyboard shortcut Ctrl+S, ⌘ +S) or cancel changes to a page.
4. The canvas [[]]
The canvas is a configurable representation of your page—drag and drop components here to arrange how the page looks and functions.
Using the Composer
The video below demonstrates the typical workflow while using the Composer.
- Drag and drop a component from the Elements pane onto the canvas.
- Then, in the Properties pane, configure that component.
- With some components, like the Table component, you can add and configure fields by clicking Add fields and selecting the desired field.
For more information about specific components, see the Components section.
Note
Clicking the arrows above the canvas expands and collapses the element and properties panes.
View and edit Page XML
After a page is saved, you can click View/Edit XML to see the XML version of the page and interact with the XML directly. Here, copy Skuid page XML and use it to export your pages to other orgs. This is especially useful when encountering problems with a Skuid page. By sharing page XML in a post on community.skuid.com, others can recreate the page in their org and help solve your problem faster.
