Data
The power of Skuid lies in the ability to bring together all of your data within a cohesive user experience. To bring that data into your pages, you’ll first connect to that data in the Skuid UI.
There are three key concepts in connecting to data with Skuid:
Data source types (DSTs) are Skuid “helpers” that facilitate the communication between Skuid and a data system. These bundles of code allow Skuid to speak with other systems, and new DSTs generally are included with every major release of Skuid.
Skuid contains several pre-configured data source types, which allow for plug-and-play connections to specific data services. Some of these include Sharepoint, Salesforce, Google Drive, Microsoft Outlook, among the others listed in this section’s table of contents.
But to allow admins and developers the flexibility of connecting to other services, there are data source types that are not attached to specific products—such as the REST and OData DSTs. While these require additional configuration to use, they facilitate connections to a plethora of services.
Authentication providers are used to authenticate to data systems and are often the first step in connecting to data. They are configured by admins in the Skuid UI to coordinate with—and authenticate to—an external system. Additionally, admins often make adjustments within the external system to properly configure permissions and create the necessary credentials for authentication. For systems produced by the same company—such as Google or Microsoft—it is often sufficient to create one authentication provider for multiple data sources.
Data sources are the individual connections between Skuid and a specific service. They are configured by admins in the Skuid UI and depend on both of the above concepts. Skuid data sources use data source types to speak a service’s language and authentication providers to authenticate to a service.
Once you’ve created your data sources, you can implement as many as you want in each Skuid page through Skuid models; you can mix and match data from Salesforce orgs, REST data sources, and various other sources all in one page.
Any headers or parameters that should be sent with every request (such as API keys and/or authentication) are configured on the data source.
Warning
Before creating any data sources within Skuid on Salesforce, enable My Domain for your org.
Without My Domain enabled, your org uses a generic domain URL—a potential point of vulnerability if client ID and client secret credentials are compromised. Enabling My Domain gives your org a unique URL, resulting in a unique callback URL and an additional layer of security.
Creating an Authentication Provider
If Skuid must cross a bridge to get to the data it needs, then an authentication provider is its access card once it gets there. Because of this, creating a connection to an external system often starts with configuring an authentication provider. Creating an authentication provider typically involves tweaking a few properties relevant to your service, but the steps are usually the same.
In the Skuid UI
- Navigate to Configure > Data Sources > Authentication Providers.
- Click New Authentication Provider.
- Fill out the necessary fields for your external system. These are detailed in each DST’s topic.
- Click Save.
- If using Skuid on Salesforce, click OK if asked to create a Remote Site Setting.
Note
Most data source type topics will include instructions on how to create authentication providers that connect to the system using the OAuth 2.0 protocol, but this is not the only way to authenticate to your systems. If you are an advanced user and wish to learn more, see Authentication and Skuid.
Creating a Data Source
Pre-configured data source types
Each pre-configured data source type features a configuration wizard tailored to that data source’s unique requirements; setting up a Microsoft Dynamics data source will not look the same as setting up a Google Drive data source. Skuid handles much of the heavy lifting—figuring out fields and easily determining permissions scopes—wherever it can. But there are some common steps.
In the Skuid UI
- Navigate to Configure > Data Sources > Data Sources.
- Click New Data Source.
- Select the appropriate data source type.
- Name the data source, preferably something unique and easily identifiable.
- Click Next Step.
After these initial steps, the specific configuration properties will vary per data source type. Refer to the documentation regarding the specific data source type you wish to use for more information.
Default Conditions
You may notice that some data sources will automatically generate one or more model conditions when created. Skuid does this to account for necessary values needed to access certain data sources, such as ID fields. These default model conditions will vary from data source to data source.
Many of these default conditions have standard uses within their respective data sources—often saving you the need to create the condition yourself. Certain data sources allow you to delete these default conditions, however others will not; this protects the model’s functionality.
Data source actions
Skuid’s pre-configured data source types may also incorporate specific functionality from their respective services. These data source actions simplify complex external data requests into a declarative option within the Action Framework.
To utilize a data source action within a Skuid page:
- Create an Action Framework action (row, global, mass, model action, etc.).
- Set its Action Type to Run Multiple Actions.
- Give it an appropriate Action Label.
- Click the Actions tab.
- Click the + button to add a new action.
- Set the Action Type to Run Data Source Action.
- For Data Source, select one of your configured Skuid data sources
- From the picklist, select a specific data source action for your particular data source.
For more information on how to use data source actions, see the relevant sections within each data source type topic or the Action Framework topic.
Additional Concepts
To gain a fuller understanding of how connected to external data works, and the moving pieces within it, read these conceptual, introductory articles:
Proxy Configuration
Using the Proxy
Warning
Due to security reasons, most systems expect external requests to be sent through a proxy as opposed to direct connections. Because of this, using the proxy is recommended for most data sources. Many external systems will actually return errors if they receive a request over direct connection. Unless you are certain that the external system you are accessing accepts direct connections, use the proxy.
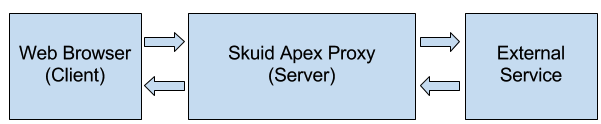
When setting up a new data source, you can choose whether or not to use the Proxy, whether that be Skuid’s own proxy within Skuid Platform or the Apex Proxy within Skuid on Salesforce.
When using the proxy, any requests sent from the web browser (or client) to your service will first go through another server, and then on to your service. From the perspective of your service, requests will be coming from—and going back to—either the proxy servers used by Skuid Platform or servers in Salesforce’s data center. Once these servers receive the services’ response, they will relay the response back to the client. To visualize this process:
Benefits of using the Proxy
- Storing Credentials Securely: Skuid can keep all credentials needed for authentication on the Server, and never send them to the Client where they could possibly be stolen or otherwise compromised through an XSS attack other issue.
- HTTP Connections Allowed and No Problems with Same Origin Policy: All requests go through Skuid’s proxy servers or Salesforce. This means that, from the perspective of the web browser (client), responses from the service are coming from the same domain that the page was served from. For browsers that enforce a “Same Origin Policy,” using the proxy meets the requirements of this policy. Because of this, services that provide data over HTTP (instead of HTTPS) or from different domains will work without any additional configuration.
Drawbacks of using the Proxy
Services must be accessible to Proxy Servers: Since requests come from a server besides the end-users current network, services behind a firewall will be inaccessible using the proxy. This means that services must (in some way) be open to the public internet. IP restrictions and authentication can still allow these services to be locked down, but they cannot be behind a firewall.
Subject to Apex and Salesforce Limits: Because all data that your service returns must pass through Apex, it is subject to Salesforce limits (such as the Apex Heap Size). Payloads of sizes close to (or over) 6MB will fail because of these limitations. To resolve, you must uncheck Use Proxy but note that doing so poses a security risk.
Note
This drawback does not apply on Skuid Platform.
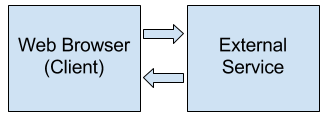
Making a direct client connection (No Proxy)
Alternatively, Skuid data sources can be set up to make a direct connection from your user’s browser straight to the service. This means that you can set up a connection to services that are inside of an internal network and behind a firewall. As long as your user is on a network connection (usually a VPN) that is on the same network, they can access the service directly. The data never goes to the public cloud.
Benefits of Making a Direct Connection
Speed: Direct connections to services do not require the extra step of a proxy. Combined with the fact that the services are usually on the same network as the client, they can be very fast.
No Apex Limits: Pull in large payloads without running into any Salesforce limits.
Note
This does not apply on Skuid Platform.
Make connections behind a firewall: Data from these services never go out to the public cloud.
Drawbacks of Making a Direct Connection
- Credentials must be sent to the client: Because the user’s web browser is actually making the connection to your data source, it must have the credentials to make the request. This means that credentials are stored in memory in the user’s browser and vulnerable to various attacks.
- HTTPS connections are required: Browsers that serve pages over HTTPS require any connections made from that page to be HTTPS as well.
- Same Origin Policy Restrictions: Because of the “Same Origin Policy,” services accessed directly from the browser must return an “Access-Control-Allow-Origin” (CORS) header that allows requests to be made from a page served from a Skuid or Salesforce domain.
Troubleshooting
Skuid on Salesforce and Remote Site Settings
When working with external data using Skuid on Salesforce, a remote site setting is required for each external data host.
Skuid typically creates these remote site settings automatically whenever a data source is created. However, if a remote site setting is not created, this error can occur when selecting a Skuid model’s object:
Invalid Request: Unauthorized endpoint, please check Setup->Security->Remote site settings. endpoint = https://example.datahost.com/V3/etc/
To resolve this, manually create a remote site setting for the domain that the data source must access. You can determine which domain to use based on the error message. In the example above, the domain would be https://example.datahost.com/