Create a Custom “Clone Account” page
This tutorial shows how create a custom Clone page for the Account object and other objects that do not include a “clone” action in standard Salesforce.
One very common feature Salesforce users request is the ability to clone not just a single record, such as an Account, but also some or all of its child records as well, such as an Account’s related Contacts, Cases, Opportunities, Partners, etc. Accomplishing this typically involves a lot of custom coding and development work, but with Skuid, you can craft a custom clone page for any object type using the Skuid drag-and-drop page builder! Let’s get started.
The first thing to know is that any Skuid detail page, such as an Account detail page, is a custom clone page waiting to happen — the fastest way to create a custom clone page is to just clone an existing detail page, such as an “AccountDetail” page you may have already created, and then tweak it to remove components that are not needed during the clone process, such as system information fields.
Step 1: Create a new Skuid page, optionally by cloning an existing detail page.

To save time, we can clone an existing Skuid Page by going to that Skuid Page in the Page Builder, clicking More Page Actions, and selecting Clone.
For detailed instructions on building a detail/view page like this, see the Build a Detail Page tutorial.
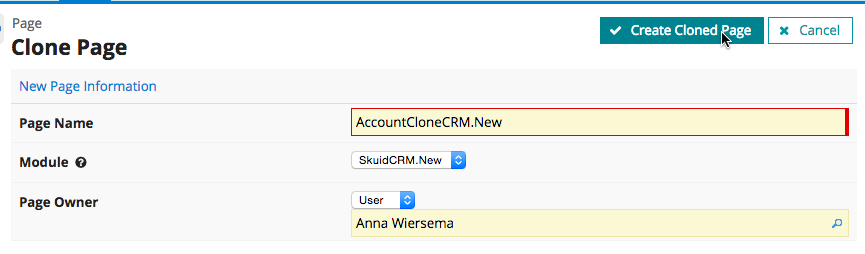
Name the cloned page and click Save.
Step 2: Update the main model to Clone Model data.
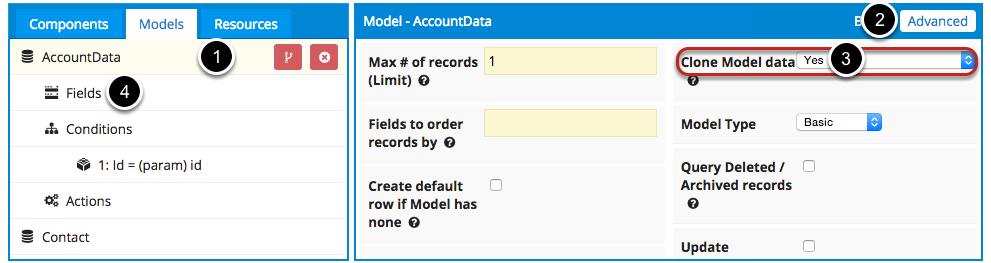
- Click on the main page model.
- Click Advanced.
- For Clone Model data, choose Yes. This will make it so whenever this page is opened it will clone the record whose Id is supplied in the URL.
- All of the fields included in this model will be cloned (even if they don’t appear on the UI). Remove any fields you don’t want to be cloned.
Step 3: Update related models so that they will also be cloned.
Repeat Step 2 for each related model, selecting Yes for Clone Model data.
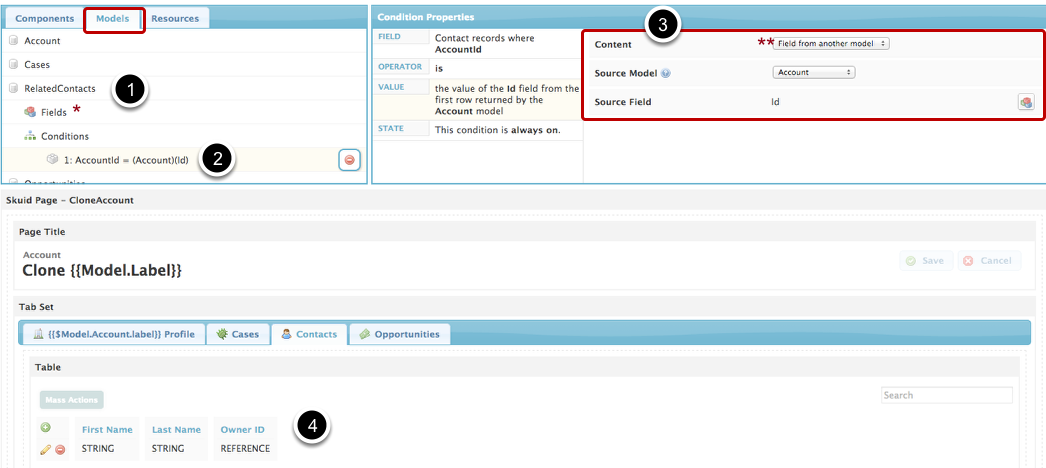
A. Make sure all your related models are linked to the main model with a “Field from another model” condition.
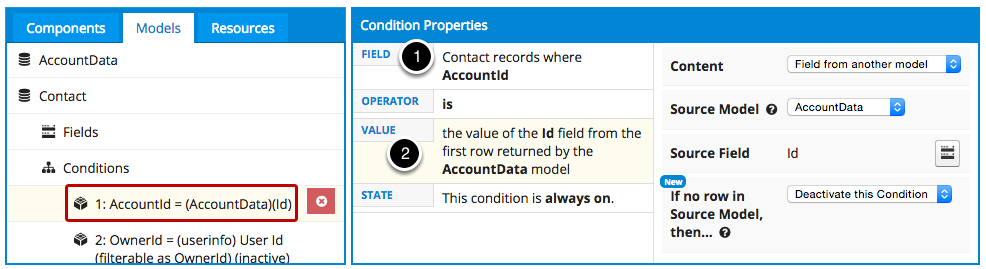
- Create a condition on the Lookup relationship with the main object,( e.g. AccountId for standard objects, Account__c for custom objects).
- For value choose Field from another model. Choose the main page model (e.g. AccountData) for the source model, and the record Id field for the source field.
Warning
Make sure all related objects include the “Account Id” field in the model. Otherwise the records that are created in these models will not be related.
You must use a Field from another model condition for all of your related objects so that the Clone page will associate them with the cloned record and not the original.
B. Include all fields in the model that you want to be cloned from the parent object.
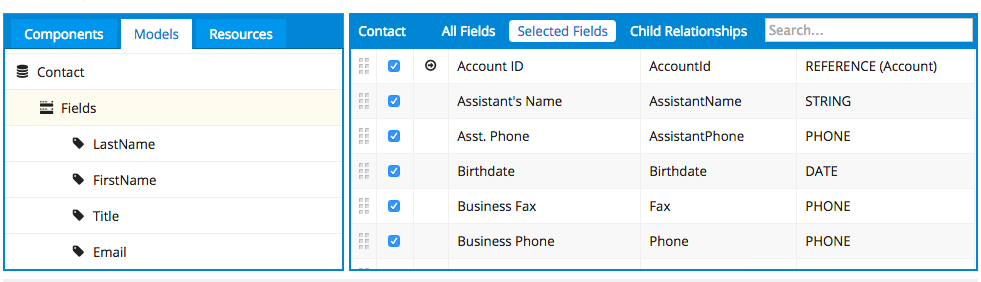
- Pull in all fields on the object that you would like to clone — any fields not in the model will not be cloned from the original record.
- Include in the UI those fields that you’d like users to be able to change during the clone process. For more information about adding tables of related records, see Add Related Lists with the Table Component.
Step 4: Delete any models for related objects you DO NOT want to clone.

You can clone records on any standard or custom object but, for example, we don’t want to clone our Statement records because they are time-sensitive and personalized to each Contact in the org.
- Click on the model you want to delete, and click to delete.
- Click OK to delete this model and all components built on it.
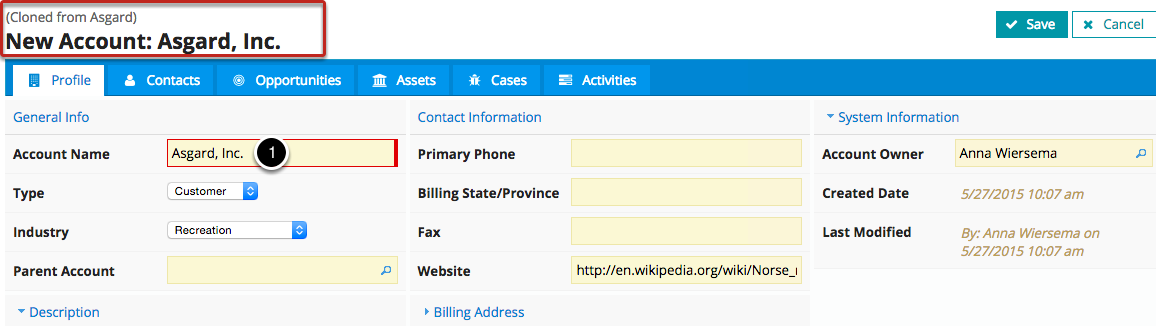
Step 5: Change the Page Title to reflect that this is a Clone page.

- Click on the Page Title.
- Edit the Title and Subtitle fields to reflect that this is a clone plage.
Note
On this page we created an additional model called: “OriginalAccount” with just the Id and Name fields and an Id=param(Id) condition. While the title will reflect changes to the clone, if you create a similar model, this subtitle will pull in the name of the original account:
(Cloned from {{{$Model.OriginalAccount.data.0.Name}}})
You can learn more about this type of merge in the tutorial about Global Merge Variables.
A. Remove all Page Title Actions except for Save/Cancel.

Click on a Page Title Action, then click to delete it.
B. Click on your Save/Cancel button and make sure it’s saving all the models you want to clone.
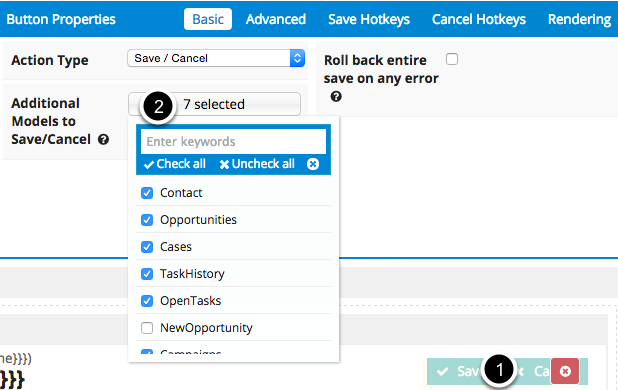
C. In Advanced, change the redirects after Save/Cancel.
- Click to open Advanced Button Properties.
- For Redirect after Save, enter /{{Id}}
- For Redirect after Cancel, enter /{{$Param.id}}
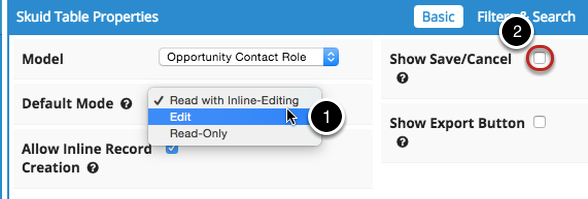
Step 6: Set all components to Edit Mode and Remove the Save / Cancel buttons.
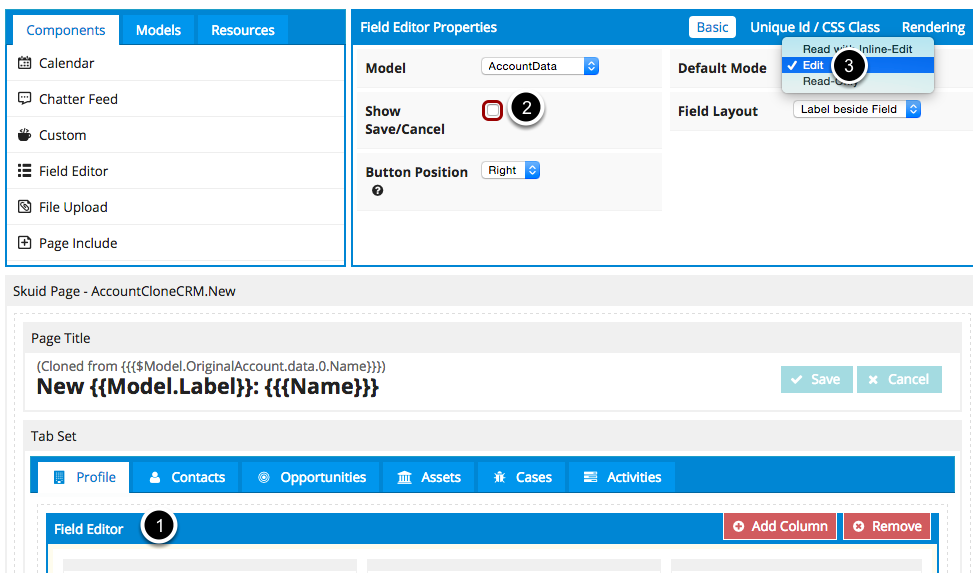
Because the Save / Cancel we created in Step 5 will function for the whole page, you can go into every table and field editor and remove its Save / Cancel button.
- Click on each Component.
- Deselect Show Save / Cancel.
- Choose Edit as the Because the Save / Cancel we created in Step 2 will function for the whole page, you can go into every table and field editor and remove its Save / Cancel button.
- Click on each Component.
- Deselect Show Save / Cancel.
- Choose Edit as the default mode.
Do the same for all your tables.
Step 7: Remove all fields that you don’t want users to modify.
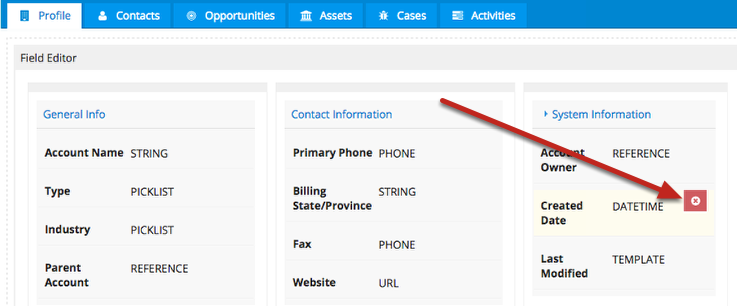
Remember, all fields and objects you’ve included in your models will be cloned, but you can choose what you allow the user to modify.
A. Remove tabs and components you don’t want to appear in the clone page.

We’re streamlining this page, so there’s not too much to distract this user from the clone process.
B. Remove unwanted table actions.
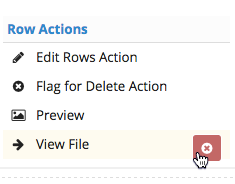
For this example, I’m removing any table actions that would redirect the user to another page.
Note
You also may want to enable mass update and mass delete on this page’s tables, if not already enabled.
Step 8: Save your page.

This is really key; hopefully you’ve been doing it periodically throughout the process.
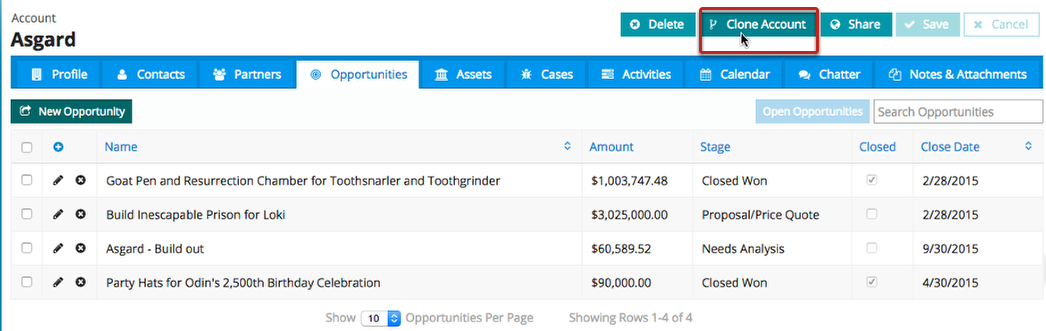
Step 10: Return to the Detail Page (the one you cloned in Step 1), and create/update the Clone button in the Page Title.
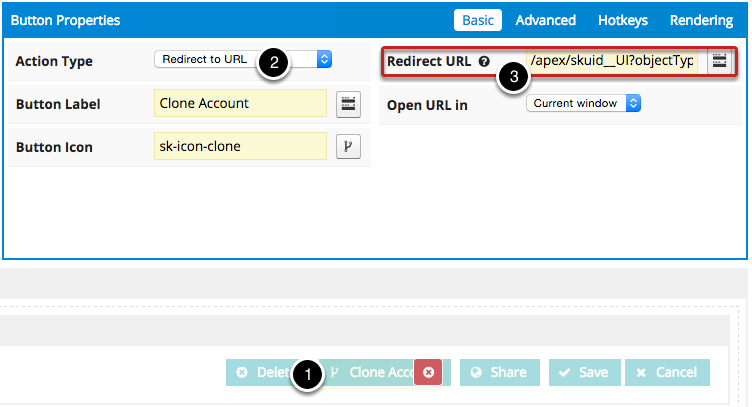
- Click on the Clone button.
- Choose Redirect to URL as the action type.
Note
Insert a URL which will redirect the user either directly to your clone page (see Option A below) or to a Page Assignment that will then redirect them to a clone page based on record type and/or profile/user (Option B).
- Goes directly to your clone page. (Replace “CloneAccount” with the name of your page)
/apex/skuid__UI?page=CloneAccount &clone=1&Id={{Id}}
- Goes to a page assignment that then directs users to the appropriate clone page. (Replace “Account” with your own object type.)
/apex/skuid__UI?objectType=Account &actionType=Clone&clone=1&id={{{Id}}}
If using Page Assignments create the appropriate page assignments.
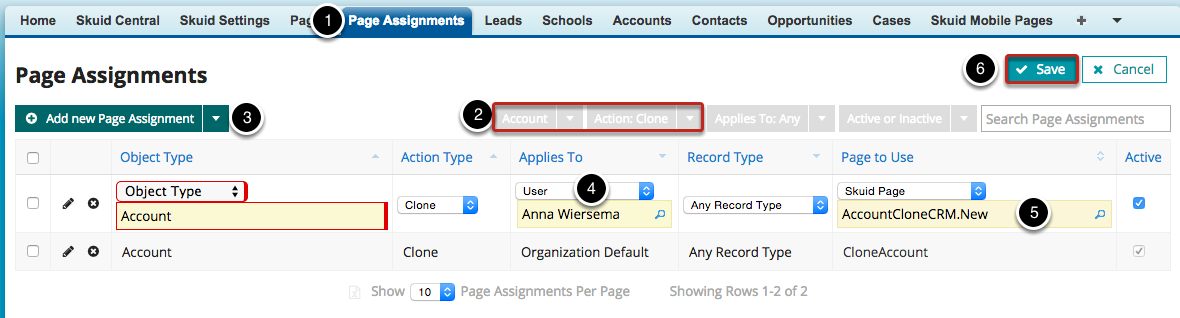
- Click on the Page Assignments tab.
- Filter Page Assignments by the appropriate Object/Situation and Action.
- Click to Add a new Page Assignment.
- Choose the User/Profile and/or Record Type this Page Assignment applies to. In this example, I’m choosing User > Me so I can test my new page.
- For Page to Use, select the clone page you just made.
- Click Save.
Step 11: On the Account Detail page, click Save and then click Preview.

A. Select the account you would like to Preview, then click Go.

B. Test your new Clone button!
Click the Clone button. This should load up your CloneAccount page (if not, check out the common problems list at the end of this tutorial).
On your Clone Page, go through each tab making changes to each object to test that the clone page works properly.
C. Change information on the main page object.
D. Go through your related records tabs and make changes to make sure that each model is working properly. Then click Save.

Success! When you click Save, you should be redirected to your newly-created record’s page.
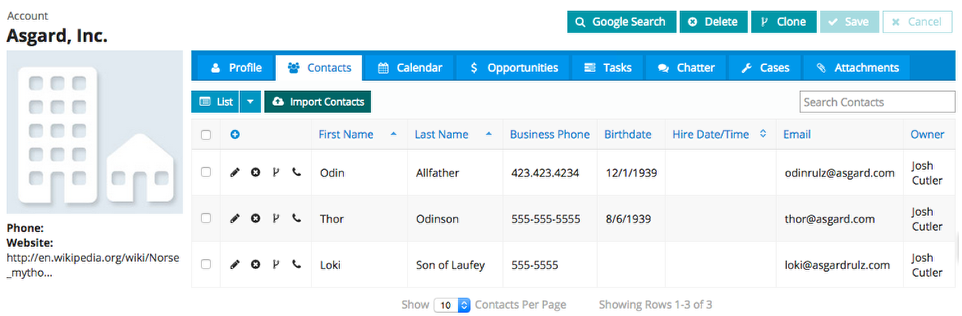
Notice that all of its related information, including related Contacts/Cases/Opportunities, were cloned as well, along with all the changes you made during the clone process!
Not Working? Common Problems
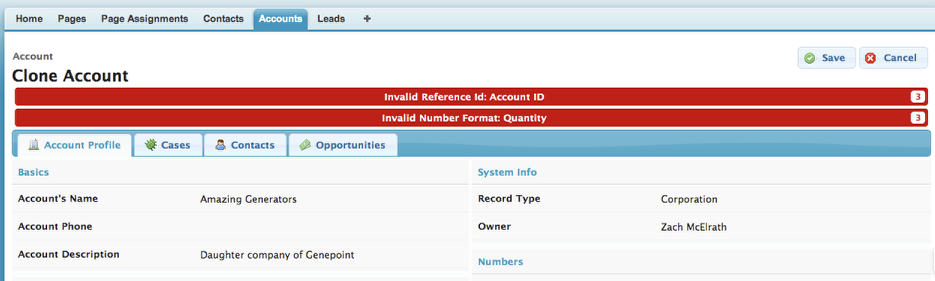
If your custom Clone page isn’t appearing when you click ‘Clone’, double check the Clone button on your Account page (see Step 10). It should be a Redirect action directing users to the following URL (with a capital {{Id}} and with the name of your Clone page substituted for “YourClonePage”):
/apex/skuid__UI?page=YourClonePage&clone=1&id={{Id}}
If some of your objects aren’t cloning, make sure that each model includes the Account Id field (see Step 3).
Make sure that all your related objects include the Model Merge condition described in Step 3.
Another problem could be that you didn’t set Save / Cancel to all objects (see Step 5).