Models
Models are what make Skuid do what Skuid does, as they give your components data to display.
They determine what data will be pulled into a page, with each model being based on a single object. You can configure a variety of settings on each model as well: you can choose which fields to pull in from its data object, create conditions to limit the loaded records, and specify full processes for model actions.
For a friendly video overview, see here.
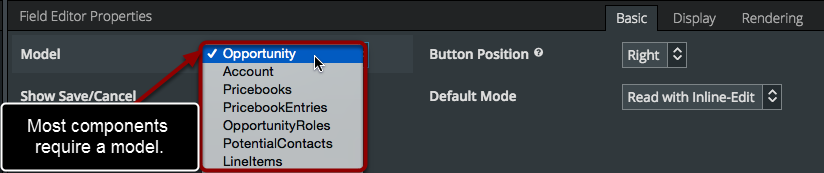
With the exception of a few purely visual components (Tab Set, Responsive Grid, Wrapper, etc.), all components can or must be set to a model.
Why? Because without models, your pages would look like this:
The Models Tab

Simply click on the tab, and then click the Plus symbol beside the search bar. You can create as many models as needed—including multiple models pointing the same object.
Note
One thing to be aware of about the Models tab is that models will load in the order they are listed. If you’re new to Skuid, you’re unlikely to encounter any errors stemming from this behavior, but it is important to be aware of it.
Use the model to connect the Skuid page to data sources
A model corresponds with a single data object from a data source. Models can be set to any Salesforce object (standard or custom) or to any external data object as well. There are several key parts to models:
- Properties specify some essential behaviors for the model.
- Fields determine the fields from this object that you want to use in this page.
- Conditions are used to limit or filter which records are pulled into your model. (Learn more about conditions.)
- Actions allow you to specify actions to perform when certain events are triggered on a given model. Actions are an extension of the Action Framework.
Model Properties
Warning
Not all model properties will be available for all data source types. If you do not see a property listed here, it may not be available for your data source type.
Basic
Model Id: The unique name by which components will refer to this model. Each model must have a unique name wherever it appears. Meaning, all models within one Skuid page must have unique names, and if other pages are included within that page—such as through the Page Include component or child pages—then the models in all of those pages must have unique names.
Data Source Type: This identifies the data source type to use for this model, which narrows the selectable options in the Data Source property.
Data Source: This property sets the data source—a connection to a system configured by a Skuid admin—that the model will use to access records.
Object: Determines the data object to pull data from. The name of this property can vary based on data source type, but they all mean the same thing:
- Salesforce Object Name
- External Object Name
- Model Entity
Query on Page Load: If unchecked, no data rows will be loaded into this model when the page initially loads. Uncheck this box if you want to use this model to create new records or if you plan on loading this model later via the Action Framework (examples include opening its specific drawer, popup, or tab).
Prior to Skuid v10.0.3, this property was labeled Load Model data on page load.
Allow Page Render Before Query Completes: Only available if Query on Page Load is set to true, this property controls whether Skuid must finish loading the metadata for the model before rendering the Skuid page.
When unchecked, the model is considered synchronous—meaning it is given priority and its query must complete before the page renders. If this property is checked, the model is considered asynchronous, and the page will render even if its query is not yet finished.
Prior to Skuid v10.0.3, this property was labeled Load Model After Page.
Note
Skuid loads metadata for every model prior to rendering a page, even those without visible UI components, by default. A model containing a picklist with hundreds—or even thousands—of values could extend page load times, especially if there are many models on a page. Use this field to tailor which models are higher priority, giving users access to the most meaningful data and UI elements first.
Note
This model property is unavailable for server-side models. To use with Salesforce models pointing to objects in the current org, set the Process Model client-side property to true.
Max # of records (Limit): The maximum number of records that will be pulled in to this model when it is queried. The smaller this number is, the faster your page will load, but the less data available within the page.
Fields to order records by: Determines how records are sorted within the model by a field name and a sort command, written as
FieldName SORT.Two sort commands are available:
- ASC: Ascending, meaning records of higher “value”—alphabetically or numerically—appear at the bottom of the record list.
- DESC: Descending, meaning records of higher “value”—alphabetically or numerically—appear at the top of the record list.
If no sort command is specified, ASC is assumed.
Multiple sort statements can be used in this property and are applied in the order they appear.
For example, to order a model’s rows alphabetically—ascending—by the Name field and then by their Number field descending, enter:
Name, Number__c DESC(Note that the first sort statement works because ASC is assumed.)
If used on a Salesforce data source model, this property is also compatible with the NULLS FIRST and NULLS LAST syntax.
Create default row if Model has none: When checked, a new record will automatically be created if there are no records within the model on page load. Useful for “Create New Record” pages.
Model Label: If the model’s selected object does not have a singular label—such as Account—this property can be used to specify one. However, if a label is specified for the object within the data source this property has no effect.
Correlates with the {{Model.label}} merge variable for a model.
Model Label Plural: If the model’s selected object does not have a plural label—such as Accounts—this property can be used to specify one. However, if a label is specified for the object within the data source this property has no effect.
Correlates with the {{Model.labelPlural}} merge variable for a model. Commonly appears at the bottom of paginated components—like Tables or Decks—and in Page Title components.
Advanced
Prevent users from leaving page if this Model has unsaved changes: When checked, a dialog box will appear to prevent users from leaving the page if there are unsaved changes in this model. If unchecked, users can leave freely but may potentially lose data changes within this model, so determine the best behavior for your use case.
Defer Rendering: When checked, fields specified by the data source type or marked in the Fields to Defer property will load asynchronously—meaning all other fields in the model may load and display in any components as soon as they are loaded. Deferred fields display placeholder text while they load and do not prevent other fields from rendering. Useful for fields that may incur longer load times, such as image fields or other binary files.
Note
While some data source types allow for deferred fields to be specified, some will not. For data source types that do not, the Fields to Defer property will not appear.
Fields to Defer: Available for some data source types, this property sets which fields should load asynchronously. Requires Defer Rendering to be checked.
Note
Models for some data source types will have totally unique properties. These properties are detailed in the topics for those respective data source types.
Model Fields
Okay, after adding a model, connecting it to a data source, and adjusting some of the properties, there’s two more steps:
- Add fields to your model so you can specify what data to pull in for your components.
- Add components and connect them to your model.
Add fields to your model
There are two places to do this.
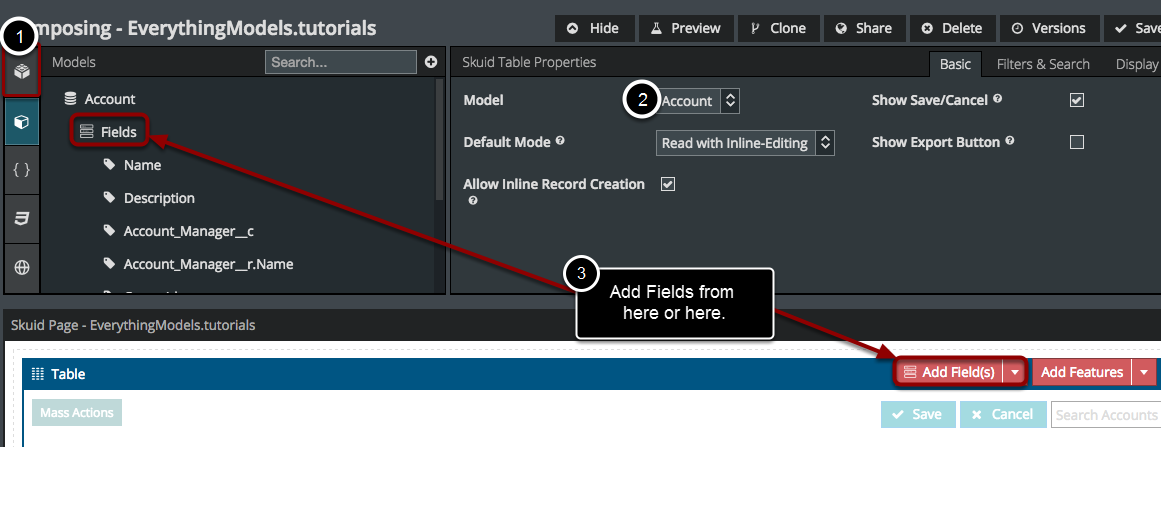
Add fields from components
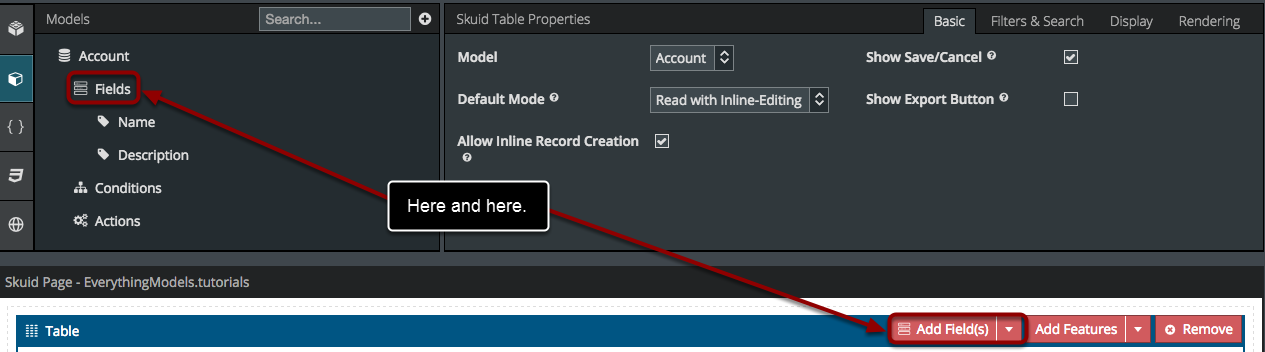
To add fields from components within your page using the Add Fields(s) button, click the red Add Fields button on the component.
Add fields to your model from the Models tab
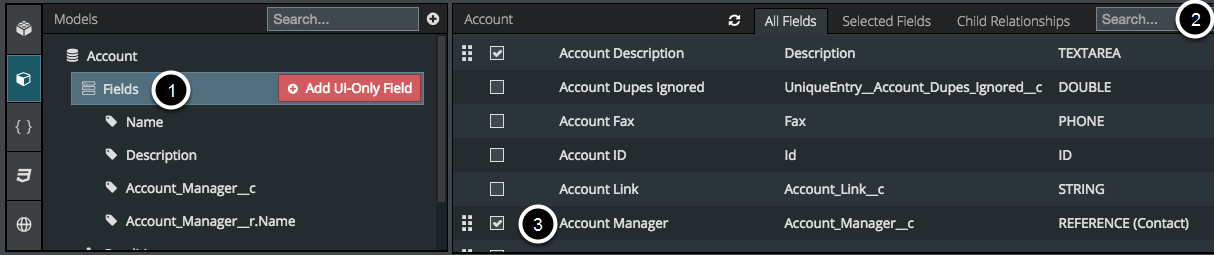
- Click Fields to pull up a list of all fields on the source object.
- You can use the Search bar to help you easily locate desired fields.
- Check a field to include it in the model. You can also uncheck fields to remove them from your model if you change your mind.
Only select the fields you need! This will help your page load faster. Each field you select will add a tiny amount of time to the page load. A handful of unnecessary fields will probably go unnoticed to you and I because we are mere mortals, but if you add all of the fields from an object, then you might notice a delay in the page response to your actions. Let’s keep things snappy and carefully choose the fields you will actually use!
Note
The fields you select are added to the Fields list (labeled No. 1 in the picture above) in the order in which you select them.
Select fields from related objects via lookup Relationships
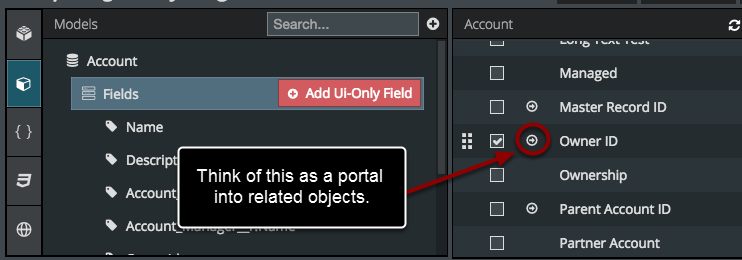
For example, on an Account model, you can click on the icon next to the Owner ID Field to view available fields on a related object. In this case, the lookup relationship is between the Account object and the User object.
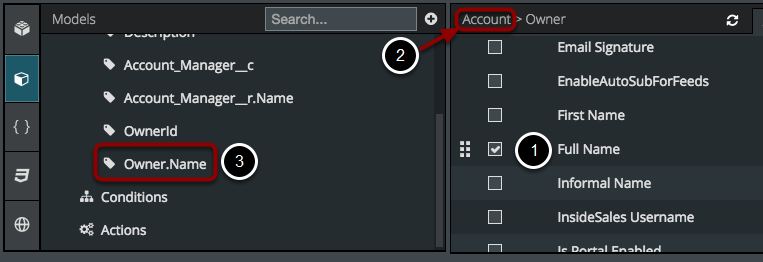
- Check the boxes next to the fields you want to add from the related object.
- Notice that you can easily navigate back to the main object you were working on by clicking on the model name in the Properties panel.
- The fields you selected from the related object will appear in your field list with the prefix of the object’s API reference name and a suffix of the related object’s field name.
View selected fields
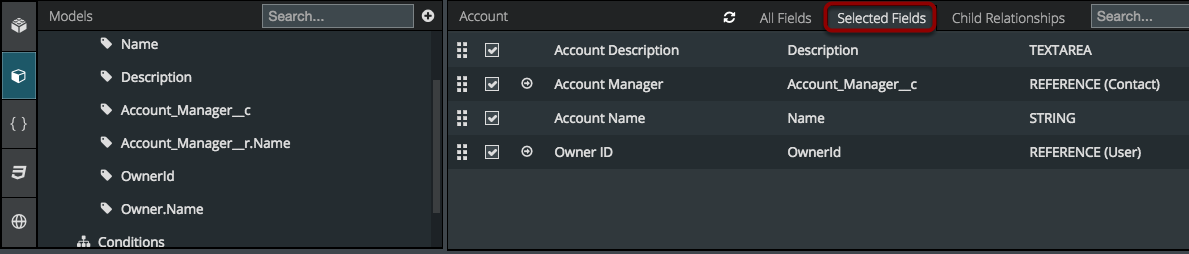
Click on the Selected Fields menu tab to bring up a list of the fields you have added to your model. This makes it easier for you to review your list, uncheck unnecessary fields, and drag-and-drop fields into your components.
Click on Child Relationships to pull in data from this Model’s child objects
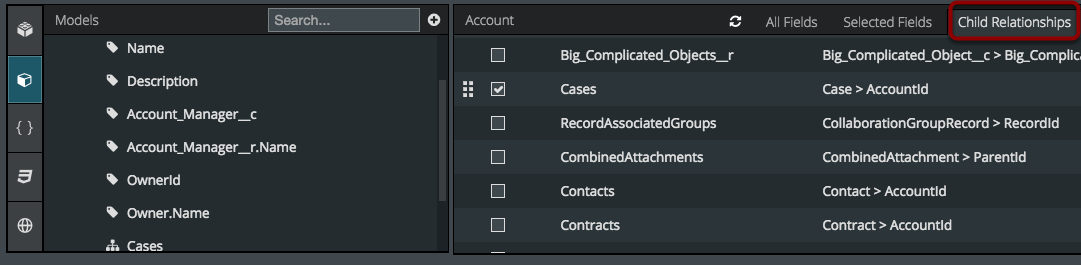
For more information, check out the tutorial on Child Relationships..
Add components and connect them to your models
- Add a Component to your Skuid page. In this example, I’ve added the Table component.
- In the Properties pane, choose a Model for this component. By default, the model you last modified will be selected.
- Click the Add Field(s) button OR you can click on the Models tab and drag-and-drop fields from the Field list.
Add Field Option 1: drag and drop
Drag and drop Fields from the Fields list in the Models tab:
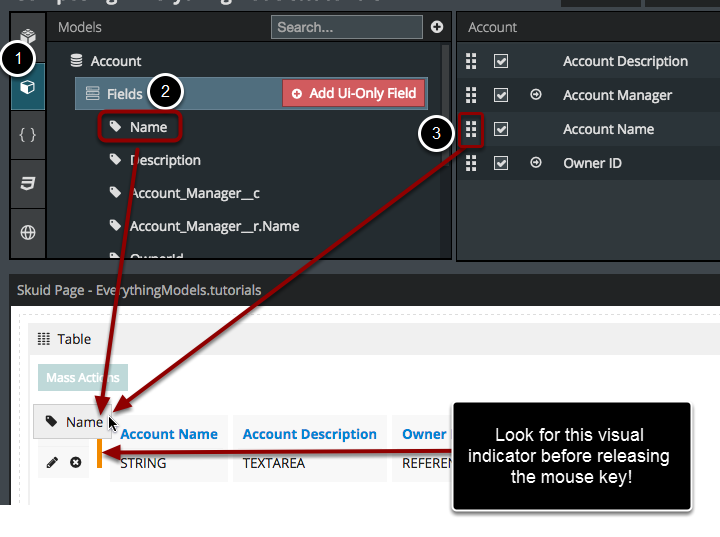
- Click on the Models tab in the Page Composer.
- Click on Fields.
- Drag and drop the Fields you want into a Component from either the list or right or the left.
Note
A component can only accept fields from the one model you’ve selected for it to recognize. If you are trying to drag and drop a field and the vertical orange line (visual indicator) does not appear, then you may be trying to add the field to a component that is connected to a different model! Make sure the model listed in the properties of the component matches the model you are pulling your fields from.
What if you want to add 20 Fields and you are not looking forward to individually dragging-and-dropping each of those 20 fields? We’ve got a solution for you. Check out Add Field Option 2 below!
Add Field Option 2: click on the Add Field(s) > Model Field(s)
Add Fields by clicking on the Add Field(s) > Model Field(s) button on the Table and Field Editor Components.

The Field Editor and Table component feature a button for adding Fields to those components. When you click on the Add Field(s) > Model Field(s) button, you get the Add Field(s) window. Most of the time, you will use this feature to add fields to your table or Field Editor components. Conveniently, you can also add fields to the model from this window! This means that you don’t have to go back to the Models tab and Fields list in the Page Composer to get those fields you just realized that you needed!

- By default, the Add Field(s) window starts you on the Selected Fields tab.
- You will see check boxes next to any Fields you added to your Model from the Fields list under the Models tab in the Page Composer. If you did not add any fields previous to clicking the Model Field(s) button, then no check boxes will appear.
Check the boxes next to any Fields you want to add to your Component.
- You can use the Search… bar to find Fields quickly without scrolling.
If you’ve added all the fields you want to your component, then click the Apply button! If you don’t see the fields you want under the Selected Fields tab, then click on the All Fields tab.
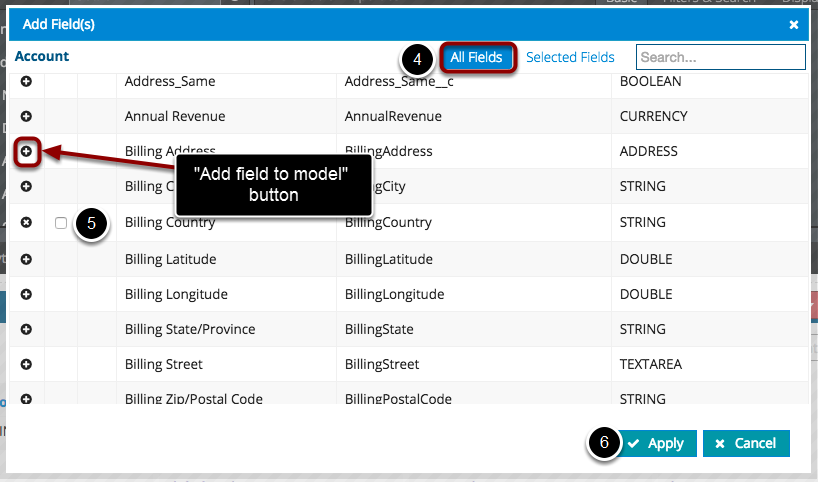
- Click on All Fields to bring up a list of all the available Fields in a Model.
- If you do not see a check box next to the field you want, then click the Add field to model button. The check box appears! Check that box; if you dare.
Just in case you were wondering, the fields you add using the Add field to model button will now be available in the Selected Fields tab of the Add Field(s) window as well as the Fields list under the Models tab of the Page Composer.
- Click Apply to add the fields to your component.
Note: Much like in the model tab, Skuid remembers the order in which you check the fields, so they will be added to the component in the order you selected them.
Model Conditions and Actions
Once the model is set up, connected to a data source and to components, and the components populated with fields from the model, the page will display the data.
That might be all that’s required—or the model might benefit from a condition (or two) or some model actions.
Model conditions
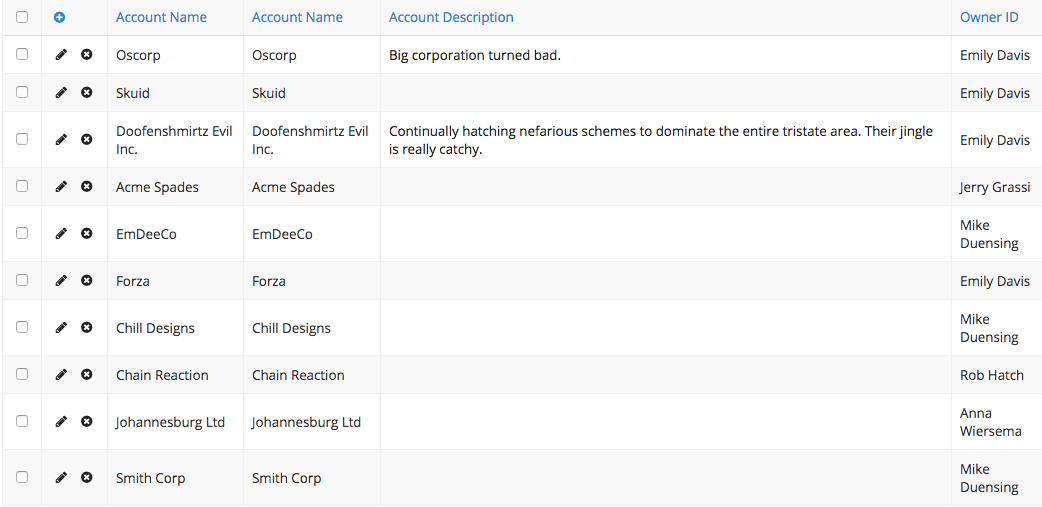
Without any conditions, your table will display data for all the records in this object, like this:
Add conditions to your Model:

Conditions help you limit the data pulled into this page and can be used to create filters that you can use on tables.
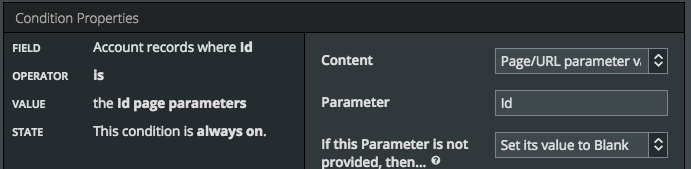
For more information, check out Conditions and Create a Filterable Table.
Model Actions
Add actions to your Model:
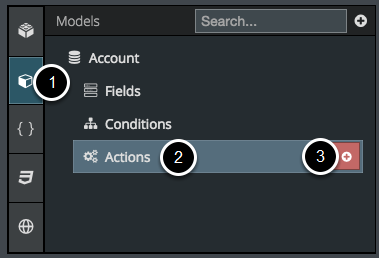
- Click on Models in the Page Composer.
- Click on Actions.
- Click the Add Action button.

Model actions give you a declarative way to interact with, respond to, and initiate actions based on Model events. Previously, many of these actions were only available through using Javascript snippets.
Tips for Faster Pages
- Set a smaller numbers as Max #. The Skuid Table Component gives you the ability to load more records as you need them, and filters automatically query the whole model. Generally, users only really need to see 10 or so records at a time, much more and it’s too much information to process.
- Whenever possible uncheck “Query on Page Load” this box and load your models only when needed. This prevents all of your page’s models from loading at the same time (during the initial page load). Unchecking the box will allow components and user action to determine when model data is loaded.
- Don’t specify order by, or if you do, only specify indexed fields. Ordering by a non-indexed field will make your page run slower.