Use Inline Javascript to Create a Slider Field Renderer
This tutorial shows you how to make a number field render as a movable slider. There is some Javascript involved, but you can copy and paste it all. In this example, we’re going to make the “Number of Employees” field on the Account Detail Page show up as an adjustable slider.
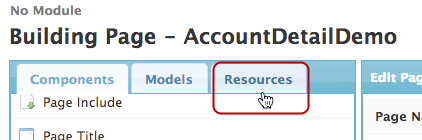
Step 1: Click on the Resources tab.
Step 2: Click Javascript and click to add a new JS Resource.

Step 3: For the new resources, choose In-Line(Snippet) as the Resource Location, and name your snippet.

- Click on the new resource.
- For Resource Location, select In-Line (Snippet).
- Name your snippet. We’ll call this one inlineSnippet.
- Click on the script icon to add the Snippet Body.
Step 4: Copy and paste the following code into the snippet body editor.
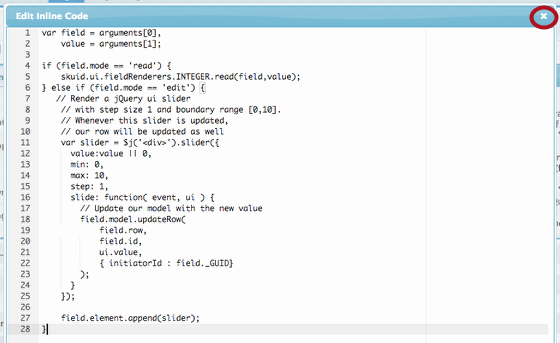
This snippet will make a field render as a slider that slides from 1-10 with step size 1. You can change the code to suit your number field (e.g. make max:100 and step:10 etc.)
1 2 3 4 5 6 7 8 9 10 11 12 13 14 15 16 17 18 19 20 21 22 23 24 25 26 | var field = arguments[0],
value = arguments[1];
if (field.mode == 'read') {
skuid.ui.fieldRenderers.INTEGER.read(field,value);
} else if (field.mode == 'edit') {
// Render a jQuery ui slider
// with step size 1 and boundary range [0,10].
// Whenever this slider is updated,
// our row will be updated as well
var slider = $j('<div>').slider({
value:value || 0,
min: 0,
max: 10,
step: 1,
slide: function( event, ui ) {
// Update our model with the new value
field.model.updateRow(
field.row,
field.id,
ui.value,
{ initiatorId : field._GUID}
);
}
});
field.element.append(slider);
}
|
Once you’ve pasted in the code, you can click to close the editor.
Step 5: Save your page.

Step 6: Select the appropriate number field and drag it into your page.
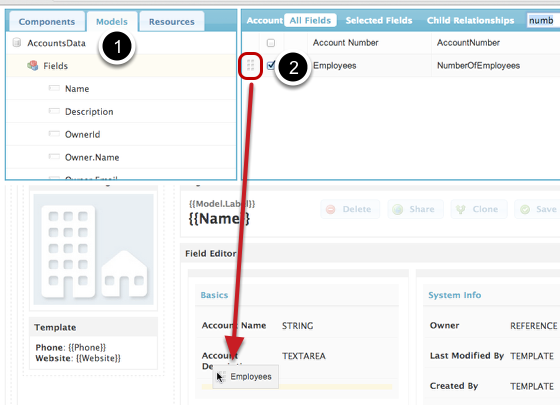
In this example, we’re using the Number of Employees field from the Account object, but you can use another number field if you want.
- Click Models > AccountData > Fields.
- Select the field you want to include and drag it into a component on your page, such as a field editor or table.
Step 7: Choose Custom as the Field Renderer.

- Click on your number field.
- Choose Custom as the Field Renderer.
- For Render Snippet, enter the exact name of the inline Snippet you created in Step 3 (e.g. inlineSnippet).
Step 8: Click Save and then click Preview.

Step 9: Click to edit the number field.

Success! Your Slider will be displayed. Just drag to the desired location and then click Save.

Note
If you have a slider-field in a component that’s in a tabset, it won’t break but it won’t look as nice.
Want to see the numbers on this slider? Check out this discussion in the Skuid community.