The App Composer
Creating an app using Skuid boils down to building a collection of pages that override the Salesforce UI. And when you build a Skuid page, you are actually editing an XML page using the handy dandy App Composer—a visual tool that houses everything you need. That means you can build the pages for your app from start to finish, all from this tool, all without code.
The power of the App Composer is that you can create pages declaratively. Set up your models, drag and drop components into the page area, and you’ve built a page! Of course, you can also do things programmatically—there are sections to input Javascript snippets and CSS resources. You can make things as simple or as advanced as you desire.
Since the App Composer is where you’ll be spending most of your time in Skuid, let’s get acquainted with the basics of its separate pieces.
A tour of the app composer
Create a page
To get to the App Composer, you first need to create a page by clicking Compose > New Page. The “Create new Page” popup will appear.
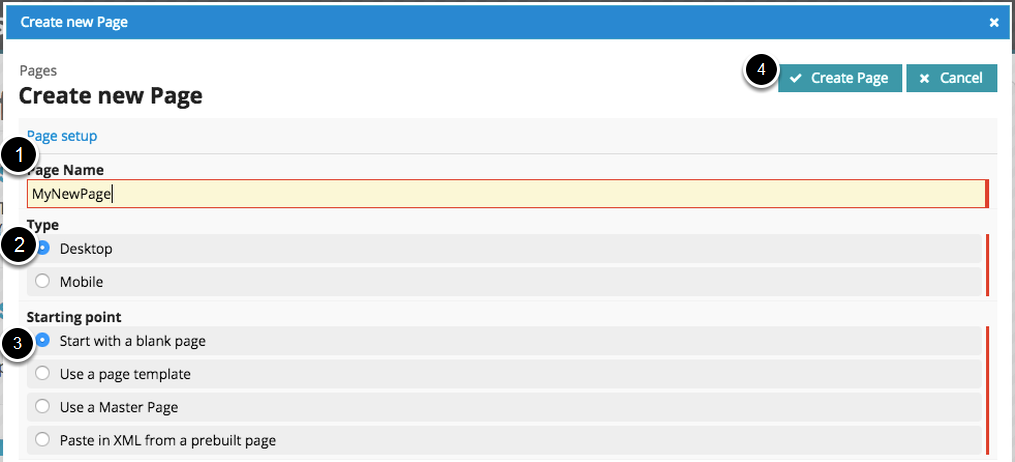
- Give your page a name without spaces.
- Select the Type of page you would like to create. Select Desktop to use the standard App Composer.
- Select the Starting point for your new Skuid page. In this example, we will select Start with a blank page.
- Click Create Page.
Notes
- If you select Use a page template as your Starting point choice, then you will be presented with template options. Check out our tutorial on using page templates to build pages for more information.
- If you’ve configured a Master Page, you can set that here. For more information on Master Pages, check out this tutorial.
- If you select Paste in XML from a prebuilt page, then a text area will render for you to input your XML. More information on using XML to build pages can be found further down in this tutorial.
- Selecting Mobile under Type will open the Skuid Mobile Builder, a deprecated tool that is different from the App Composer.
Meet the App Composer
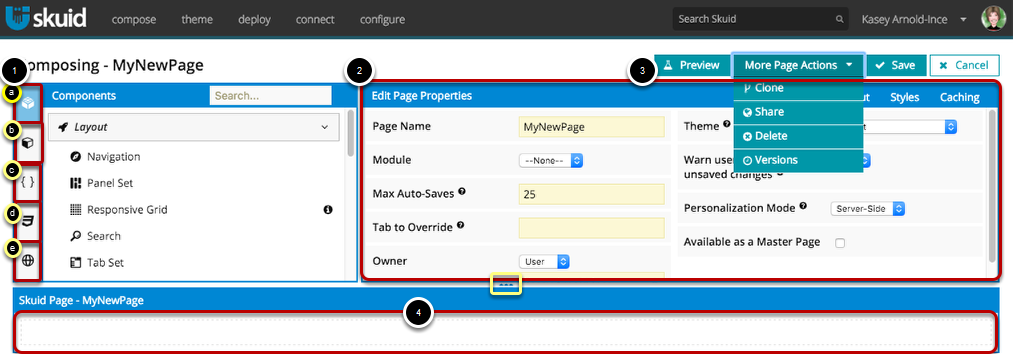
- From the App Elements pane you’ll select the components that make up your page, configure your models, and set up additional page elements. Don’t forget to use the Search box to find things faster!
- Item a: Compose the visual aspects of your page with components. They display and allow you to interact with the data in your Models.
- Item b: Models interface with your Salesforce objects and external objects and services, and they provide the fields that you will use on this page.
The three elements below Components and Models will be explored in Additional Resources in the App Elements Pane.
- Item c: Include custom Javascript or link to static/external resources.
- Item d: Add inline CSS or link to static/external resources.
- Item e: Use the Labels tab to bring in your Salesforce Custom Labels for pages that will be displayed to multi-lingual users.
The Properties Pane displays the options and settings for whatever Skuid element is currently in focus (components, models, snippets, etc.)
You can also minimize these top two panels by clicking the three triangles at the bottom of this panel (highlighted in the yellow box).
These buttons are used to preview, clone, and save your page, as well as control its versions and sharing permissions.
Preview - Click this (keyboard shortcut Ctrl+P, ⌘ +P) to open a preview of your Skuid page in a new tab.
Clone- This button will clone your Skuid page as a new, separate page. You can even clone pages from the Skuid module (like the Pages List and even the App Composer), and customize them according to your org’s preferences.
Share - Click to set the sharing permissions for this particular Skuid page.
Delete - Delete the Skuid page that you currently have open.
Versions- With Page Versions, you can name and return to previously saved versions of a page, in case you run into problems, forget what the page looked like originally, or break everything. For more information, see Page Versions.
Save/cancel - Click these butttons to save (keyboard shortcut Ctrl+S, ⌘ +S) or cancel your changes to your page.
- The canvas represents your page—drag and drop components here to arrange your page. Drag and drop fields from your models into components that are associated with them.
Expanding and collapsing the App Composer’s panes
Clicking the arrows located between the App Composer’s panes and the canvas expands and collapses the App Elements and Properties panes through three states:
- Totally minimized, with the canvas taking up the full page display
- Expanded, the standard view with the panes and the canvas sharing screen space
- Totally expanded, with the panes taking up the majority of the screen
Skuid admins can also shift between these states using keyboard shortcuts:
- S+E: Expands the App Elements and Properties panes
- S+C: Collapses the App Elements and Properties panes
Edit Page Properties
Basic tab
Your basic page properties are shown when you first open a page or anytime you click on Skuid Page - [YourPageName].
Page Name - After you’ve created your page, you can change its name any time in this field.
Module - You can add your Skuid page to a module from this drop-down list, which will show all modules registered within Skuid. You’ll be using this feature if you’re developing a managed package, or using custom Skuid components. See more info here.
Max Auto-Saves - Whenever you save your work, Skuid generates an “Auto-Save” in your page versions. To keep the clutter to a minimum, Skuid pages are set to only save 25 Auto-Saves by default. You can change this number as needed. Note that, despite the name, your Skuid pages do not automatically save as they would in a productivity app, like Microsoft Word or Google Docs. Clicking the Save button generates an auto-save that is available to you as a page version.
Note: If you are working on a child page, it will yield to its Master Page’s setting here.
Tab to Override - If you are creating a Skuid page, but still utilizing the Salesforce header UI, enter the name of your object’s tab here.
Owner - You will be set as the owner for any Skuid page you create by default, but you can change a page’s owner from this drop-down list. You can also set a group as a page’s owner.
Theme - Choose which Skuid theme should be used to style this page. All pages are initially set to the Default theme upon creation, which is set within the Theme Assignments tab of the Skuid UI.
Warn users if page has unsaved changes - Checking this option will generate a dialog box when a user attempts to navigate away from your Skuid page without saving their changes.
Personalization mode - Choose whether you want user information (like most recent tab and filter settings) to be stored Server-side, Client-side, or not at all. For more information on this see Optimize Personalization and Caching.
Enable Feedback on this page - If this property is enabled, end users may submit feedback about their experience at run time. While enabled by default, uncheck this property to disable this feature.
Available as a Master Page - If you are creating a master Skuid page where your components or models may be reused, check this option to make this page available as a Master Page. See more here.
Layout tab
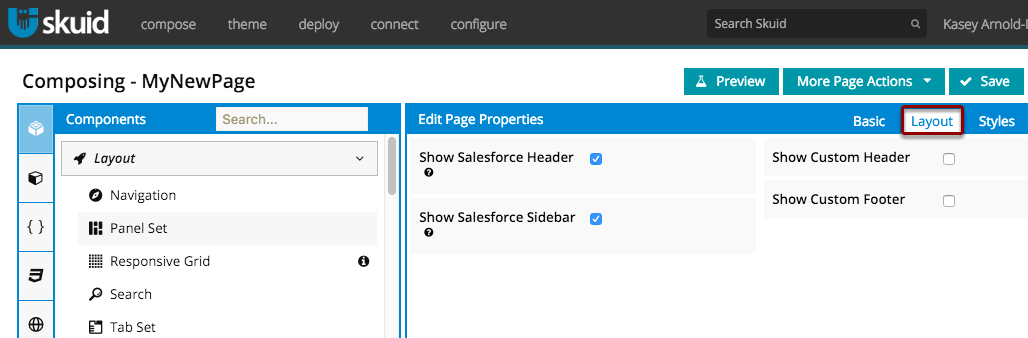
In Page Properties > Layout, you can choose to show or hide the standard Salesforce header and sidebar. You can also enable a Custom Header and Footer (like the Skuid header you see at the top of this page).
Styles tab

- Select the style attributes you wish to edit for this area. You can also add more Style Attributes to be applied to the entire page (e.g. padding, height, etc.)
- This is where you can choose the Background for the page.
Labels tab
Used to add custom labels to a Skuid page. For more information, see the Label Localization topic or the $Label global merge variable section.
Caching tab

If you enable page caching, your page will load faster, but don’t enable it until you’re done tweaking your page.
If you do enable page caching, you should set your models to be processed client-side to prevent stale data and metadata from being presented to users. For more information on this see Optimize Personalization and Caching.
Using the Composer
Drag and drop components to assemble your page

- Drag and drop components from the library into your page (Take advantage of the Search bar to find components faster!)
- In the properties pane, you can customize the selected component, column, section or field.
- Click on component areas to edit them (e.g. click on the top of a column to resize it, click on a section header to edit it).
- You can add fields to components by clicking the add button on the component or by dragging and dropping them from the corresponding models into the component.
You can read more about the specifics of different components here.
View and edit Page XML
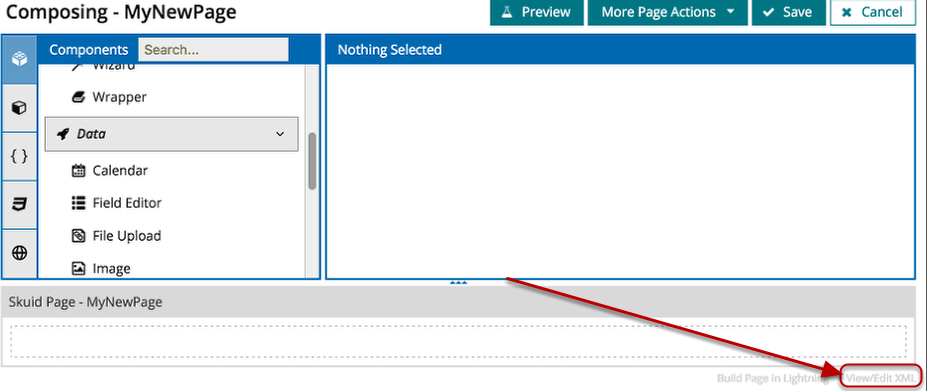
Any time after you’ve saved a page, you can click on View/Edit XML to see the XML version of the page.
Write, copy, and paste in the XML area
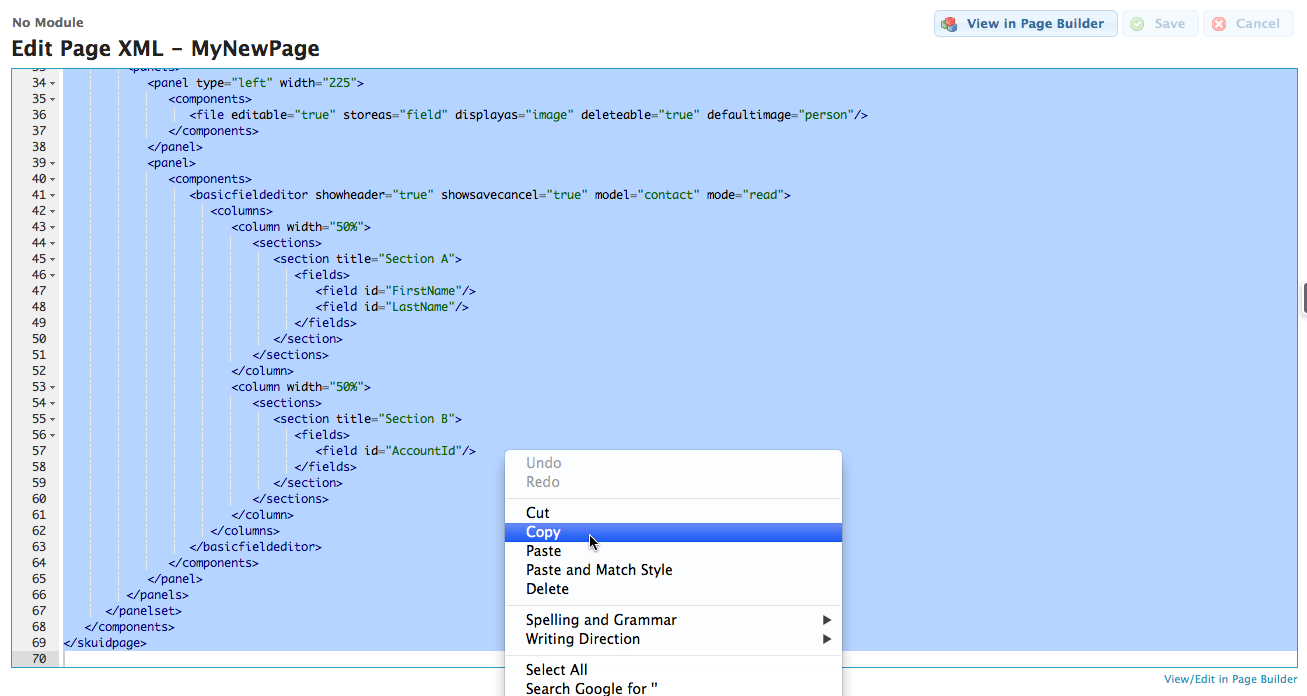
- By copying and pasting Skuid page XML, you can export your pages to other orgs or use pages that other people have created.
- When you have a question about Skuid, or if you are encountering problems, you can post an issue on community.skuid.com and share your page XML so others can recreate your page in their org and solve your problem faster.
Get pages on github.com/skuid.
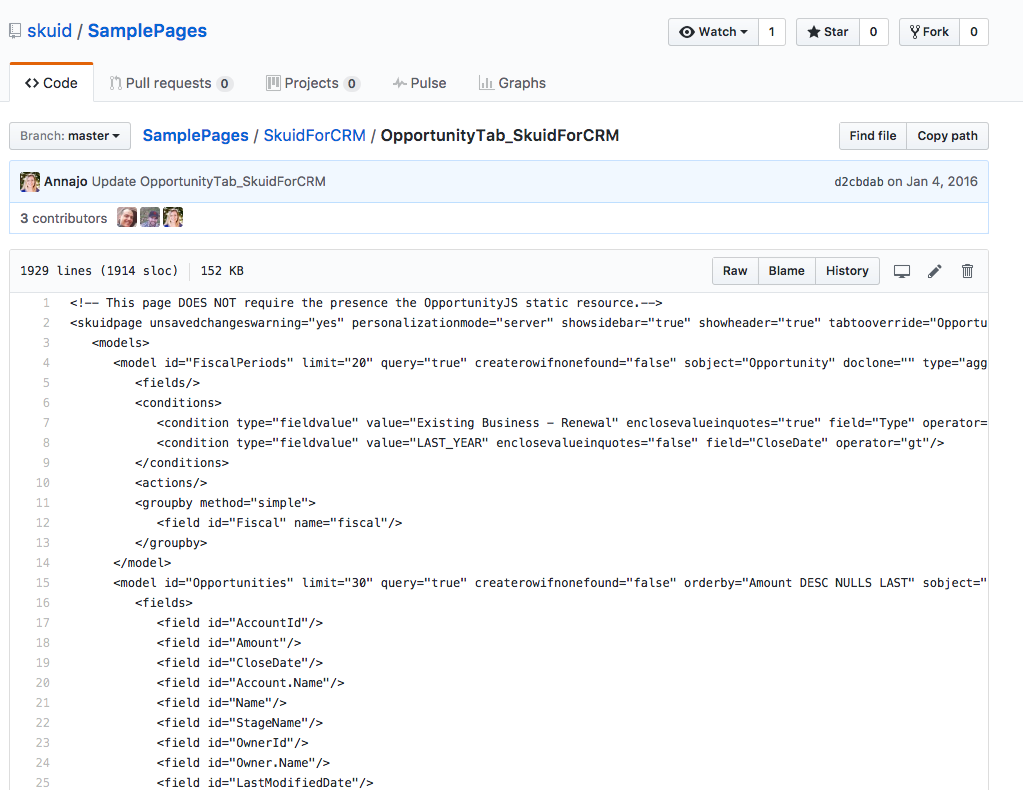
You can go directly to our GitHub repository or hop over to the tutorial article where sample pages are organized by type.
Additional Resources in the App Elements Pane
Javascript
- Click on Javascript, and click on the Add New icon that will appear. Click on the newjs to edit it.
- Select the Resource Location.
For Static Resource, you will be able to enter the Namespace of the JS resource.
For External, you will be able to enter the URL of the JS resource.
For In-Line options, you will be able to enter the Javascript by clicking on the Resource Body text editor icon.
For more information about using JavaScript with Skuid, see the Skuid and JavaScript topic.
CSS
- Click on CSS, and click on the Add New icon that will appear.
- Select the Resource Location.
For Static Resource, you will be able to enter the Name, and if necessary, the Namespace of the CSS resource.
For External, you will be able to enter the URL of the CSS resource. (Only use HTTPS).
For In-Line, you will be able to write custom CSS under Resource Body.
For more information about using CSS with Skuid, see the CSS topic.
Collaboration
Note
Collaboration features are currently exclusive to Skuid on Salesforce.
If your team collaborates on composing Skuid pages within your org, you may notice that multiple users can edit the same page simultaneously. Unfortunately, this means a user can overwrite another user’s work if they both save their changes at the same time. Wouldn’t it be handy to see real-time information about who else is in the page, so you could easily avoid overwriting each other’s edits?
Introducing Skuid collaboration notifications! For team-based orgs, these visual alerts provide critical information to streamline the collaboration process and help users adhere to the company’s agreed-upon collaboration protocols.
Note
For development groups, Skuid recommends that customers follow Salesforce® best practices and provide each engineer with their own sandbox.
Collaboration notifications
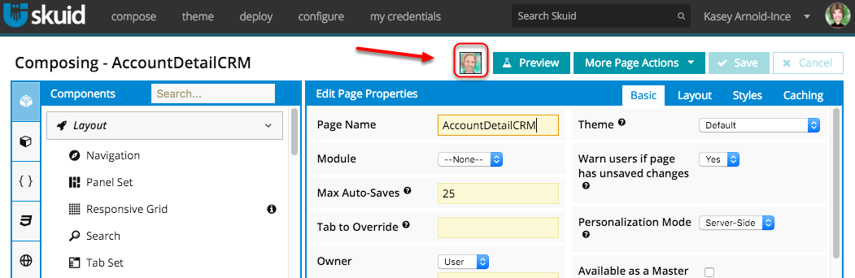
Skuid collaboration notifications appear when you are editing a page and another user opens that page at the same time. Within a few seconds, you’ll see your colleague’s profile image displayed in the Composer next to the Preview button.
Your colleague will see your profile image as well, so both of you know that another user has the page open. In fact, you can have multiple users editing each page; each user will be indicated by their profile image. When users leave the page, those profile images disappear from the Composer.
- Want to see who’s using the page? Mouse over the image to see the name of each user.

- If a collaborator has the page open but is not actively making revisions or navigating the page, their image will be grayed out.
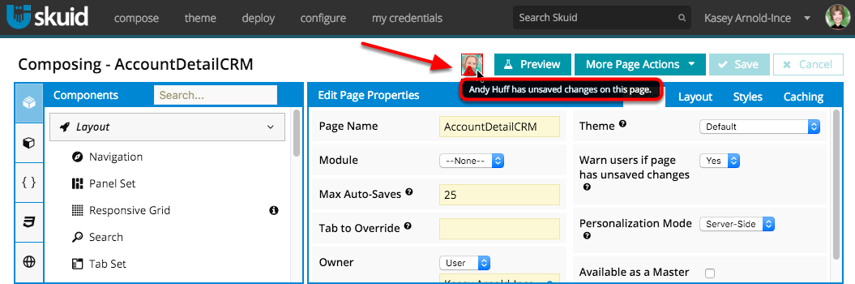
- If a collaborator has made but not saved edits on a page, their image will be framed with a red alert icon. Mouse over the image and Skuid will tell you that they have unsaved changes.
Note
This is your cue to coordinate saves with your collaborators—otherwise you could unintentionally save over one another’s edits.
Conflict detection
So, what happens if there are conflicting page edits? If you’re editing a Skuid page that has been revised and saved by someone else since you opened it, your edits are not part of that save, and you are no longer working on the most current version of that page.
If you attempt to save your own edits after another user has changed the page, Skuid prevents you from saving the page (and overwriting your colleague’s work). You’ll receive a conflict detection notice indicating that the page was already modified, the time of the modification, and by whom.
To continue editing, you must refresh the page—which means you lose any unsaved edits you recently made. (Ouch.) You must recreate those revisions and save the page to commit them.
Want to avoid this unpleasant scenario? Follow collaboration best practices:
- Check the collaboration notifications frequently to see if anyone else is using the page. If you see that the page is being viewed by another user, negotiate the editing process with them.
- Allow for a few seconds between a modification being made, and the indication of that modification displaying as a red alert on a profile image.
If you’re working in a page that has another collaborator, save your work frequently so you that if there is an edit conflict, you don’t end up losing a lot of work. Faster save option: Control+S (PC) or Command+S (Mac) will save a Skuid page.
More collaboration notification tips
- If you save edits in one tab, you must refresh the page in the other tab, or edits made there will not be saveable.
- For team org pages, the versions page can be a useful source of information about who has recently edited the page.
- Collaboration notifications are not available when working with Page Packs or from the XML Editor
Recovering lost edits
Okay: you’ve messed up. You were working on a page at the same time as a colleague, and they just saved their changes to the server. Now you’re no longer working on the most current version of the page, but you have a number of unsaved revisions that you don’t want to lose. Good news—you have options:
- Click Save. The Page Conflict popup notifies you when the page was modified and by whom.
Note
the Page Conflict popup will not be triggered by revisions to the following page properties:
- Page Name
- Module
- Max Auto-Saves
- Tab to Override
- Owner
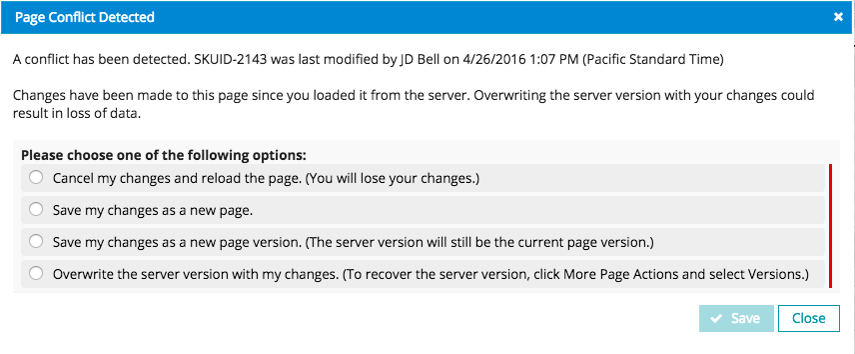
The popup offers four choices
Cancel my changes and reload the page (You will lose your changes.)
Select this option, then click Cancel and Reload to reload the saved page from the server. You’re now working in the most current version of the page—the one your colleague just saved. (Time to recreate those revisions you just lost!)
Save my changes as a new page.
Select this option, then click Save as a New Page.
In the Create New Page dialog, give the page a name. Click Create Page.
Confirm that you want to open the new page by clicking Leave this Page.
Now there’s the original page, which your colleague saved to the server, and the new one you just created.
Save my changes as a new page version. (The server version will still be the current page version.)
Select this option, then click Save as Page Version.
In the Create New Page Version dialog, give the version a name that will help you identify it. Click Create Page Version.
Your colleague’s changes are still the ones saved to the server, but now there’s also a new version of the page with only your changes.
To open this new version, click More Page Actions > Versions.
In the list, click the clock (Restore This Version) next to the version you want to open.
Overwrite the server version with my changes. (To recover the server version, click More Page Actions and select Versions.)
Select this option, and click Save. Your changes overwrite the version on the server.
To recover that earlier version, click More Page Actions > Versions > Restore this Version.