Install and Upgrade Skuid on Salesforce
When you install Skuid, you’re placing a managed package on your Salesforce org, and within that managed package are all of the tabs, objects, and other resources required to run Skuid.
The actual installation process is very simple, thanks to the Salesforce AppExchange. Click a few buttons, and you’ll be ready to go. No need to worry about any downloading, uploading, org tweaking, etc.
After you’ve installed Skuid, you can expect to receive emails from our team that will contain more information about Skuid and how to fully utilize it for your business needs. Don’t be shocked when we say hello!
Note
To deliver the best possible feature set when designing in Lightning, Skuid releases v11 (and above) make extensive use of Salesforce’s Platform Events framework. Unfortunately this framework is not supported in Group or Professional editions of Salesforce.
If using either of these Salesforce editions, installing the latest release of Skuid Brooklyn (v10.x.x) is recommended. You may also consider contacting Salesforce support about upgrading your Salesforce edition.
Warning
As you may have guessed, you’ll need to be logged into a Salesforce account to install Skuid, so make sure you’re logged into the appropriate account for the org you wish you use Skuid on. If you want to try Skuid in an org separated from your business data, you can register for a developer org at developer.salesforce.com/signup.
Once you’ve decided which org to skuidify, log in to the Salesforce AppExchange!
Note
If you are upgrading Skuid and you are not familiar with the best practices for doing so, read the upgrade best practices guide.
Click “Get It Now” on Skuid’s AppExchange page.

Click here to go directly to Skuid on the Salesforce AppExchange.
Choose your installation type.
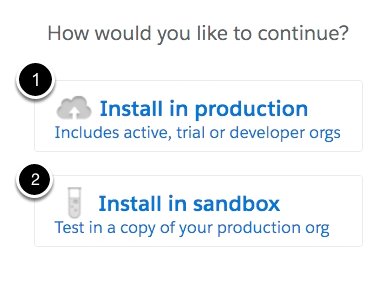
- If you are trying Skuid within a personal dev org, or if you’re ready to install Skuid in your company’s org, choose “Install in Production.”
- If you would like to see how Skuid could work with your company’s data before installing in production, choose “Install in sandbox.”
Choose who can use Skuid and click Install.

Note: Within the Salesforce universe, the term “Skuid license” refers to a user’s ability to interact with Skuid. While the Skuid UI reflects this terminology to avoid confusion, the “number of Skuid licenses” you have refers to purchased Skuid subscriptions.
This page configures your permission sets and Skuid license allocation for who can view/edit Skuid pages by default. You can always change these permission sets later.
- When you install a free trial of Skuid, you receive 5 licenses to assign within Salesforce.
- You can purchase Skuid subscriptions by contacting a Skuid sales rep.
The number of Skuid users on your org cannot exceed your number of subscriptions, so allot your permissions appropriately.
1. This option will only enable Skuid permissions for your Salesforce admins. Most users should select this option.
2. If you want all users to have access to your Skuid pages by default, select this option. This is not recommended if you have more than 5 users in your org, as you only receive 5 licenses to assign!
3. Self-explanatory, but do not exceed your number of subscriptions.
After you’ve selected an option, click Install.
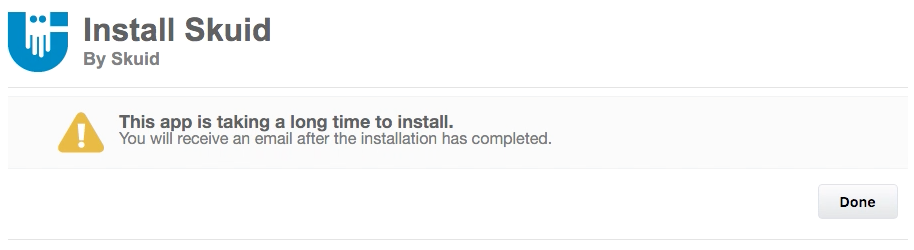
If your installation takes too long, don’t panic!
This is normal. You’ll receive an email when Skuid finishes installing on your org.
Upgrade Skuid
Warning
- While we do our best to ensure conflicts do not occur when updating Skuid, regression testing is still an essential part of the upgrade process.
- Salesforce does not support reverting back to prior versions of managed packages. To ensure the best possible outcome, Skuid recommends installing new versions of the product in a non-business critical sandbox environment to test all critical functionality before installing into a production environment.
It is highly recommended that you follow this upgrade best practices guide each time you upgrade Skuid within your org.
If you would like to upgrade Skuid, then you may do so at the Skuid Releases page. Here you’ll see the changelogs for each version of Skuid, as well as download links for the most recent, supported versions.
After reviewing the upgrade best practices guide, follow these steps to upgrade:
Make sure you’re logged into the appropriate Salesforce org
Click on the link icon to install your chosen version of Skuid.
Select whether you wish to Install into a Production Org or Install into a Sandbox org.
Note
Developer orgs are considered production orgs.
Considerations:
- If you are installing Skuid on a personal dev org, you can extend your license indefinitely by filling out the form on this page.
- If your business has already signed up for Skuid, and you install Skuid through an email address that is not associated with your business’s licenses, you will also receive our onboarding emails. This isn’t a glitch! We just want to make sure each person gets the info they need to get the most out of Skuid. To stop receiving these emails, just hit the “Unsubscribe” link at the bottom of the email.