Styling Best Practices
When it comes to styling, Skuid offers many different granularities. This article explains the options available in Skuid and lays out some ground rules for what we think is the best way to take advantage of these capabilities.
Best Practice: Use the Theme Composer first.
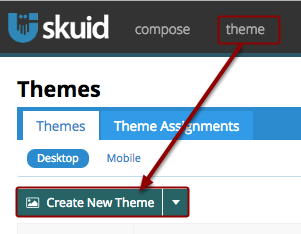
We suggest you use the Theme Composer early and often, especially for any styles that are going to be applied to multiple pages. Not only is this more efficient for you (because you don’t have to repeat your work), but it also helps your pages load faster because all the styles in a Theme can be cached by the web browser (whereas page-level CSS cannot and has to be loaded every time you open the page).
Compose your own themes and assign them as defaults by organization, user, and/or profile

- Click Theme to compose and assign Themes.
- In the Theme Composer, you can declaratively configure the look and feel of your pages, expand these capabilities with inline CSS, and even link to static/external CSS resources if needed.
Then, Configure Styling at the Page Level.
Assign a theme to the page
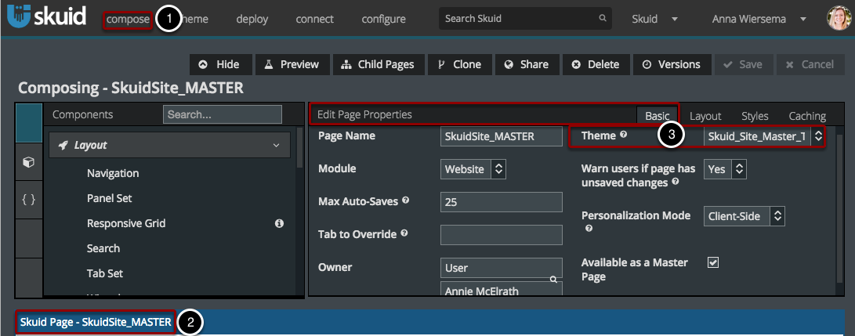
The Page Theme will override the default theme for your org/user/profile.
- Click on Compose to go to a specific page. When you initially open the page, Page Properties will be displayed.
- If your page is already open, click on the Page Name to open Page Properties.
- In Basic Page Properties, choose the Theme for this page.
Set up a Custom Header and Footer
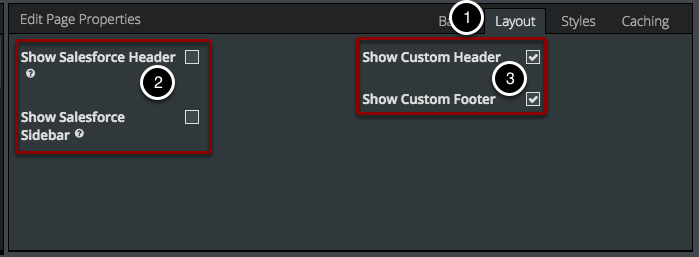
- In Page Properties, click on the Layout tab. (See the step above for how to open Page Properties.)
- Check or uncheck these boxes to show or hide the Salesforce® Header and Sidebar as desired.
- Check these boxes to show a Custom Header and Footer.
Edit and Add Page Style Attributes

- In Page Properties, click on the Styles tab. (See the step above for how to open Page Properties.)
- This is where you can choose the Background for the page.
- Click to add more Style Attributes to be applied to the entire page (e.g. padding)
As a flexible, final resort add CSS Resources
Use inline CSS for small, one-off bits of CSS that you want to apply to multiple Wrappers, Components, and/or elements on your page.
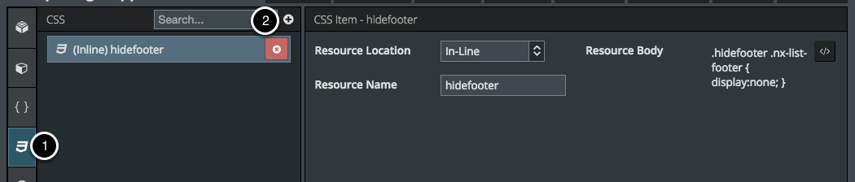
- Click CSS.
- Click to add a new resource.
Other Considerations
- Each component has a CSS class option, so you can create custom classes (aka hidefooter) and only apply them to some of your components.
- See below for more details about style options on the Wrapper and Component level.
- Don’t even THINK about including your CSS stylesheet as an inline resource. It will make your page load super-duper slow. This is because inline CSS can’t be cached by the browser, so it’s not fit for large segments of CSS. You can, however, link to static or external CSS resources that aren’t already included in this Page’s Theme.
Once you’ve created an awesomely styled page, make it a Master Page.
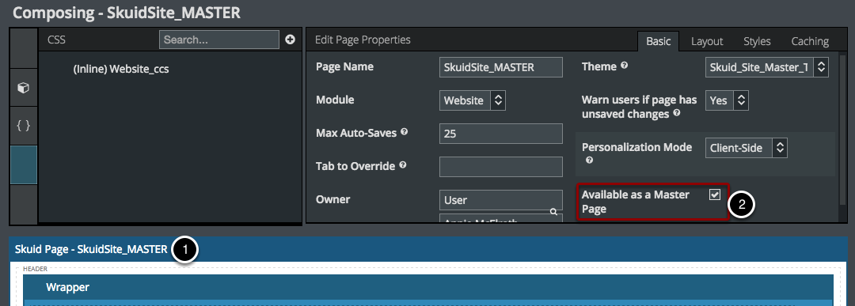
When you make a page a Master Page, you make it a template and share its layout (including custom headers and footers, models, and resources) with its Child Pages. For more details on Master Child Pages see this article.
- Click on the Page Name to open Page Properties.
- In Basic, check to make this page Available as a Master Page.
For a detailed use case, see the tutorial Build your own branded header & nav bar..
Next, Add Style Attributes at the Component Level
Use the Wrapper Component to set the Styles for multiple components.
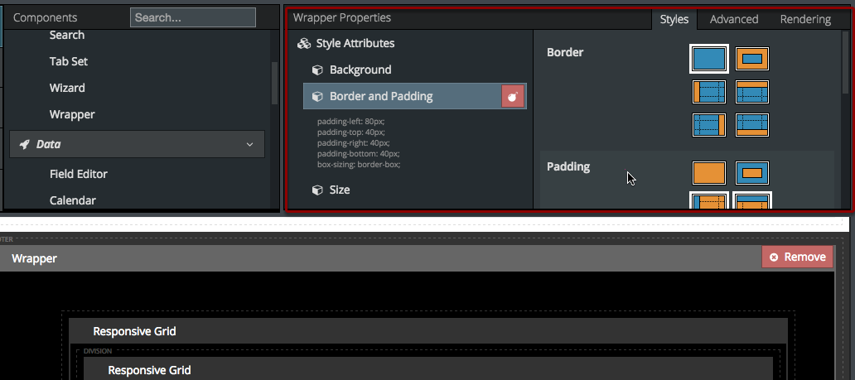
The Wrapper component is a great way to style sections of your pages. With the Wrapper you can package Style Attributes and apply them to all the components within the wrapper.
Set Styles at the Component level.
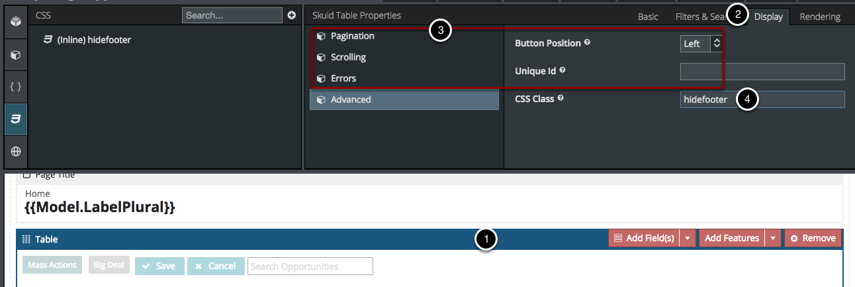
You can also set Styles at the individual component level.
- Click on a component to view its properties.
- Each component has properties that you can edit, in the Basic, and Display tab. (Also, for example, in the Table’s Filters & Search tab you can choose to show/hide the Search box).
- Additionally, in Advanced, you can specify the CSS Class for this component.
Hierarchy of CSS Style Overrides
Want to know in which order all of these style settings will be applied? See the list below for the order of priority.
Style Attributes
- Component. Configure Style Attributes on the individual Component.
- Wrapper. Set Styles for a Wrapper and its included Components.
- Inline Resources. Add short CSS resources at the page level.
Themes
- App Composer. Select on the Page Properties section in the App Composer.
- User. Set under Skuid Settings > Preferences > Profile/User overrides.
- Profile. Set under Skuid Settings > Preferences > Profile/User overrides.
- Organization. Set under Skuid Settings > Preferences > Organization Defaults.
The more specific overrides the least specific, so Page Composer overrides User overrides Profile overrides Organization.