Filters

Filters are a powerful tool that help you analyze information quickly by narrowing down to what is relevant.
Elements of a Filter
Skuid uses two basic elements interacting together to create a working filter: model conditions and the Filter Feature.
Model conditions

A model condition is a behind-the-scenes query statement that narrows the data set displayed on your Skuid page. Some Model Conditions are always on, but others may be used as Condition Properties to interact with the Filter Features added to table, queue or day scheduling calendar components.
Some conditions will be auto-generated by filter (see “Automatic” use cases below), and some you can create yourself and configure how the filters interact with them.
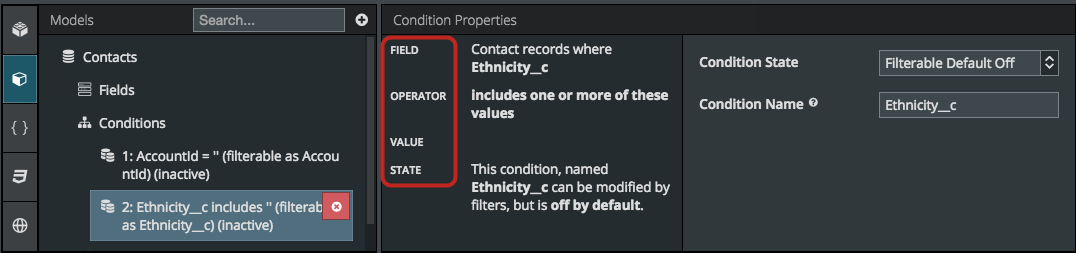
Each Model Condition has Condition Properties. These appear in the Condition Properties panel when you select a Condition in the Models panel.
Condition Properties:
- Field
- Operator
- Value
- State
Filter Feature
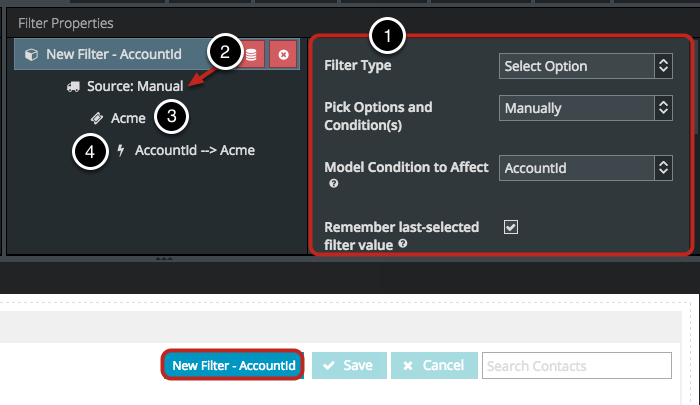
A Filter Feature is a toggle button, drop-down, or other Ui feature added to the Table or Queue Component that allows you to interactively filter your data. When you create a new Filter Feature it may include four types of Filter Properties:
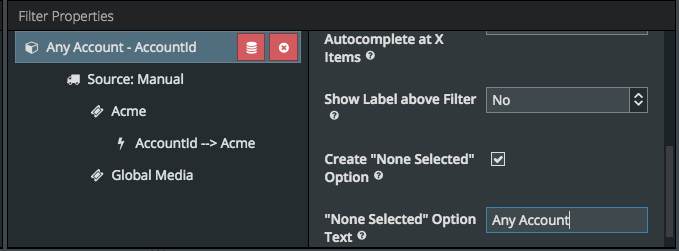
- Filter Properties. Define Filter Type, how to Pick Options and Condition(s) (automatically or manually), which Model Condition or Field to affect, the label for a “none selected” option, and more.
- Source. A Source defines where you will get the values for your Filter.
- Label. A Label defines the the name of a specific filter option, if not using those provided in field metadata or model data.
- Effect. An Effect specifies some additional interaction with your Model Condition.
To view the Filter Properties panel, select the Filter Feature on the component you are building.
The left side of the Filter Properties panel displays your Filter, Sources, Labels and Effects. The right side of the Filter Properties panel displays the properties of whatever Filter, Source, Label or Effect you select in the left panel.
Note
You do not always need a Source, Label or Effect.
Putting it all together
To create a filter you must first create a Model Condition and then create a corresponding Filter Feature. When creating a new Filter, at minimum, you must select a Filter Type and a Model Condition or Field to affect in the Filter Properties panel. Sources, Options and Effects are optional, depending on your use case.
Filter Use Cases
Automatic Filter based on picklist or multi-picklist field
Set your filter to display all possible values of a picklist, multi-picklist, or reference field in a filter drop-down menu. Typically these values have already been defined when creating the field. Examples include: Opportunity Stage Name, Account Id, or Activity Status.
Model Condition. Not Required (auto-generated by the filter)
Filter.
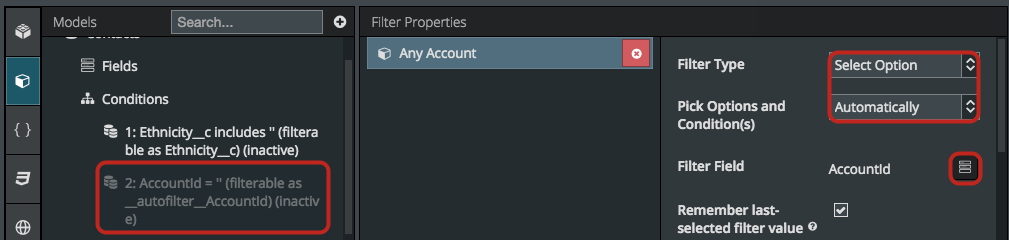
- Set Type to “Select Option.”
- Choose to Pick Options and Condition(s) Automatically.
- Click to choose the Field. Note that only Multi-select Picklist, Picklist, and Reference type fields are available for automatically generated options.
- This will automatically create a condition on the appropriate field.
Source. Not Required
Options. Not Required
Effects. Not Required
Notes.
- Data imported into the table may have other values that will not be selectable in the drop-down.
- Drop-down selections may not correspond with any records in the data.
Automatic Filter based on date field or date time field
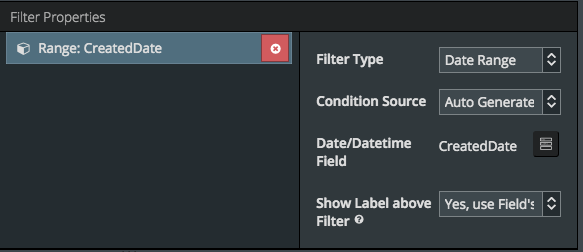
Set your filter to display a series of relative date ranges. The filter will display a start date and an end date where users can select date limits. Example: Leads added between January 1, 2014 and December 31, 2015.
Model Condition. Not Required (auto-generated by the filter)
Filter.
- Set Type to “Date Range.”
- Set Condition Source to “Auto Generate Conditions.”
Source. Not Required
Options. Not Required
Effects. Not Required
Automatic Filter based on numeric range.
Set your filter to display records that fit within a set of numeric values. The filter will display “minimum” and “maximum” fields, where users can select the values. Example: Opportunities whose amounts fall between $50,000 and $150,000.
Model Condition. Not Required
Filter.
- Set Type to Numeric Range
- Set Condition Source to Auto Generate Conditions
- Select a numeric field
Source. Not Required
Options. Not Required
Effects. Not Required
Filter based on a list of date options

Set your filter to display a series of relative date ranges. Examples include: accounts created this week, this month, this year. Or leads added today, this quarter, this fiscal year.
Model Condition.
- Set Field to be any date or datetime field.
- Don’t set Value.
- Set State to be Filterable Default Off
Filter.
- Set Type to “Select Option.”
- Choose to “Pick Options and Condition(s)” Manually.
- Set Model Condition to Affect to “[YourModelCondition].”
Source.
- Add one Source.
- Set to “Manual.”
Options.
- Add as desired. Each must impact the default Condition.
- The label will display as an option in a drop-down list.
- The values must be the corresponding literals from this document.
Effects. Not Required.
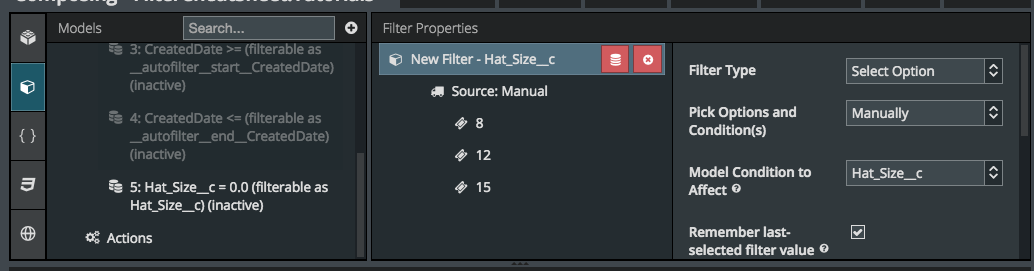
Filter based on a limited set of numeric ranges
If the automatic numeric range filter does not meet your needs, you can set your filter to use a single drop-down that presents a specific set of numeric ranges that are controlled by different model conditions.
Example: On an Opportunity model, a drop-down for specific value ranges ($50,000 to $100,000, $100,001 to 200,000, etc.)
Model conditions
Create pairs of conditions for each selectable range (for example $100 to $500).
For the lower part of the numeric range (e.g. $100), the condition should:
- Set a numeric field.
- Set the Operator to “Greater than/equal to” (>=).
- For Value, set a single specified value to the numeric amount that represents the lower part of the range.
- Set State to Filterable Default Off.
- Give the condition a recognizable name. This will be useful later when building the filter.
For the higher part of the numeric range (in the example above: $500), the condition should:
- Set the same numeric field from the previous condition.
- Set the Operator to “Less than/equal to” (<=).
- For Value, set a single specified value to the numeric amount that represents the lower part of the range.
- Set State to Filterable Default Off.
- Give the condition a recognizable name distinct from the first condition. This will be useful later when building the filter.
When setting the values, avoid creating overlapping ranges—which may cause some records to be displayed via more than one filter—by incrementing the next set of values by “1.”
Not:
| First range | $100 to $500 | |
| Second range | $500 to $1000 | Records with amounts that equal $500 will be displayed by both the first filter range and the second. |
| Third range | $1000 to $1500 | Similarly, records with amounts that equal $1000 will be displayed by both the second filter range and the third. |
Instead:
| First range | $100 to $500 | |
| Second range | $501 to $1000 | No overlap between the first filter range and the second. |
| Third range | $1001 to $1500 | Similarly, no overlap between the second filter range and the third. |
Filter
- Set Type to Select Option.
- Choose to Pick Options and Condition(s) Manually.
- Set Model Condition to None
Source.
- Add one Source and set to Manual
Options.
- Add an Option for each Range to be displayed in the filter’s picklist.
- Each should be set to Affect Other Condition(s)
- For the label, provide the range of values that will appear on the filter’s picklist. (These should correspond to the values sent in the conditions.)
Effects.
Each filter option should activate a pair of model conditions. Do this by adding two effects to each option.
One effect to activate the condition for the lower value of the range—do not use Activate and Set.
One effect to activate the condition for the higher value of the range—do not use Activate and Set.
Note
Be sure these effects happen on the same option.
Add effects to de-activate any other filterable model conditions that use the same field.
Filter based on limited number of values for a picklist or string field.
Set your filter to display a limited number of values in the drop-down. Selecting a value in drop-down will filter records to that specific value. Examples include opportunities just in stage Invoiced. Or leads specifically in New York.
Model Condition.
- Set Field to be any picklist or string field
- Don’t set Value.
- Set State to be Filterable Default Off
Filter.
- Set Type to “Select Option.”
- Choose to “Pick Options and Condition(s)” Manually.
- Set Model Condition to Affect to “[YourModelCondition].”
Source.
- Add one Source.
- Set to “Manual.”
Options.
- Add as desired. Each must impact the default Condition.
- The label will display as an option in a drop-down list.
- The value must be the exact text string or picklist to inject into the condition.
Effects. Not Required
Notes.
If you want one of the items in your drop-down list to return options based on multiple conditions/fields follow the instructions in 8. Filter where each value is a different condition
Toggle filter based on one field.
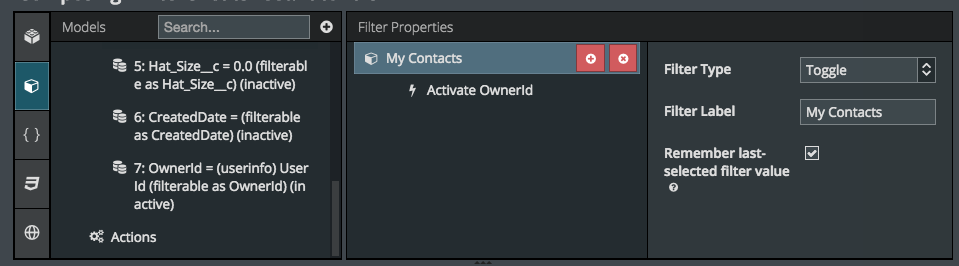
Set your filter to display a single value that is true (on) or false (off). Examples include: All contacts I own, or all leads submitted this week.
Model Condition.
- Set Field to be any field
- Set Operator so that it satisfies your criterion
- Set Value to be specific value that satisfies your criterion (This can be a single value or multiple values)
- Set State to be Filterable Default Off
Filter.
- Set Type to “Toggle.”
- Add a Filter Label
Source. N/A
Options. N/A
Effects.
- Click on the plus sign to add an Effect
- If condition has a specific value, select “Activate” and choose your Condition.
- If condition has a blank value, select “Activate and pass value” and provide the value to be injected into the Condition.
Notes.
One toggle filter can affect multiple conditions on multiple fields. Just add a new condition for each field, and an effect for each condition.
Filter based on a string field.
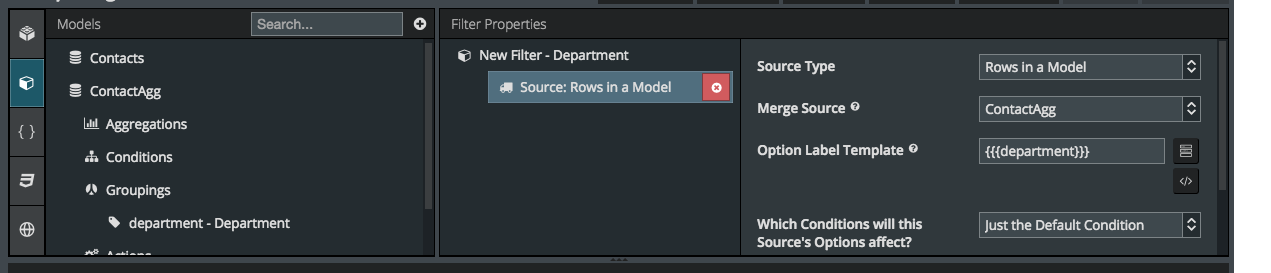
Set your filter to display all the unique values entered in a string field. Example: Filter leads by “City” displaying a list that shows the cities that have been entered in your data.
Note
Salesforce will not let you filter on a formula field, but if you create a workflow rule where whenever that formula is updated it updates a text field on the object with the text value of that formula, then you can follow this process to filter by values of that text field.
Model Condition.
- Set Field to be any string field
- Don’t set Value.
- Set State to be Filterable Default Off
Filter.
- Set Type to “Select Option.”
- Choose to “Pick Options and Condition(s)” Manually.
- Set Model Condition to Affect to “[YourModelCondition].”
Source.
Create a new Model on the same object you want to filter.
- Select “Aggregate” for Model Type and delete the “Max # of Records” number.
- Optionally, create Conditions to limit the number of values.
- In the “Groupings” section, select the field you will use for your Filter values.
- Copy the “Alias Name” of the Groupings Field from the Properties area.
Return to the Filter Feature.
- Add one Source.
- Set to “Rows in a Model” and choose the Model you created to display the Filter options.
- In the Option Label Template paste the “Alias Name” from the Model Groupings field and make sure it has double (or triple) curly brackets around it, like this {{AliasName}}. This will determine what is seen in the filter drop-down box
- Paste the same Alias Name with double curly brackets into the “Value to inject into Default Condition” property.
Options. Not Required.
Effects. Not Required.
Note.
- You cannot group formula fields in aggregate models.
- You can use this “Rows in a Model” sourced conditions to limit options in other scenarios e.g. when creating an “Opportunity Owner” filter you can create a “User” model with conditions to limit the options returned to active users with a certain profile, or users who’s Id is found in the Opportunity Owner Id field (result of subquery condition). You could also do this by creating an aggregate model on Opportunity and grouping by Owner (as described above). So many options!
Filter based on a junction object membership.
Set your Filter to display all the possible values of related information where a many-to-many relationship (using a junction object) has been used. Example: Filter your contacts by the campaigns of which they are members (using the campaign membership junction object). This example will be used below to clarify the instructions.
Model Condition.
Create a Condition
- Set Field to be Record ID of the primary object to be filtered (Contact Id)
- Set Value to be Result of Subquery
- Join Object = object holding the related information (Campaign Member)
- Join Field: Set Field to be ID of the object to be filtered (Contact Id)
- Set State to be Filterable Default Off, and choose a name (CampaignMember)
Add a Subcondition.
- Set Field to be ID of the object that provides the filtering values. (Campaign Id)
- Don’t set Value.
- Set State to be Filterable Default Off, and choose a name (CampaignId)
Filter.
- Set Type to “Select Option.”
- Choose to “Pick Options and Condition(s)” Manually.
- Set Model Condition to Affect to “[YourModelSubCondition].” (CampaignId)
Source.
Create a new model on the object that will provide the filtering values for the drop-down. (Campaign)
- Ensure that the Name and Id fields are in this model.
- Include any filters that you want to limit the options returned by this model.
Return to the Filter Feature.
- Add one Source
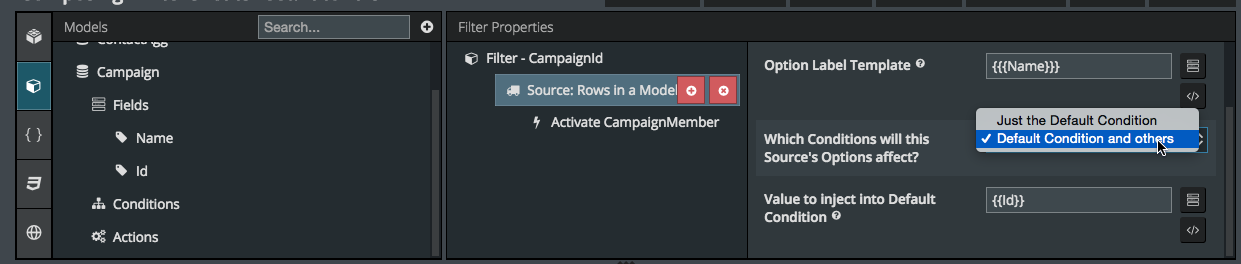
- Set to “Rows from a Model” and choose the Model you created to display the Filter options.
- Use the field picker to select the fields to display in the Filter. {{Name}} is prepopulated.
- Scroll down to make sure the {{Id}} Field is in “Value to inject into Default Condition.” (If this property is blank - it will default to {{Id}}.)
Set “Which conditions will this Source Options affect” to “Default Condition and Others.” This will expose an add icon next to the Source - click to add an Effect.
Effect.
- Set Action to “Activate” the primary Model Condition. (CampaignMember).
Note:
In this use case the filter property “None Selected Option” does not work because it does not dis-activate the additional condition. A solution to this is to leave it unchecked, and add an additional Manual Source entry to the filter that de-activates both conditions. Move this Source to the top of the list of sources for it to be the default.
Filter where each value is a different condition.
Set your Filter to use a single drop-down to present options that are controlled by different model conditions. Example: One drop-down on Leads table with values: “Records I Own”, “Records I Modified”, “Recent modifications.”
Model Condition.
Create a separate condition for each option. Each should:
- Set Field.
- Set Operator so that it satisfies your criterion
- Set Value to be a specific value that satisfies your criterion
- Set State to be Filterable Default Off
Filter
- Set Type to “Select Option.”
- Choose to “Pick Options and Condition(s)” Manually.
- Set Model Condition “None.”
Source.
- Add one Source and set to “Manual.”
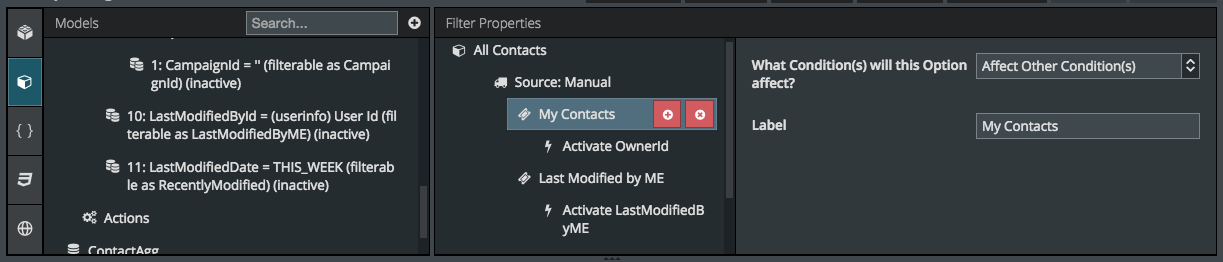
Options.
- Add an Option for each Model Condition.
- Each should be set to “Affect Other Conditions.”
- Provide a value name that will appear in the filter.
Effects.
- Add Effects to to each Option to Activate the appropriate Model Condition.
- Add Effects to De-activate other filterable Model conditions that use the same Field.
Notes.
- If you want a “Filter Off” option that shows all the records, set that property in the Filter Type section.
- If you want the filter to always be on, ensure that “Filter Off” option is not checked in the Filter Type, make one of your Model Conditions “Filterable Default On,” and add new Effects to each Tag in the Filter Source section that “deactivates” the opposing conditions.
- This method can also be used to add specific options to other filters. If a picklist field filter needs an extra specific option - an additional Source can be added to the Filter Feature calling that specific Model Condition.
Tips and Tricks
I don’t see all my values in my drop-down.
This is common when using a model as the source for your filter values, to find that values are missing. “I know there are users that should be in that drop-down. Where are they?” When you create the model to source these options, take care to remove the “Max # of Records (Limit) from the Advanced tab.
We do recommend however, using some condition to limit the number of rows returned by the model. If you want all users to show up in the drop-down, create a condition that only retrieves active users.
How do I sort my drop-down values?
Applying a sort order to drop-down values is possible, but it is done differently based on the type of filter source used.
1. Source - Metadata. Picklist entries will be shown in the order designated in field setup. To reorder the pick list values go to Setup -> Create -> Objects -> (Choose your object) -> Select the field -> Look for the picklist values and select Reorder.
2. Source - Model. drop-down values will appear according to the default order provided in the model. Go to the model you set up to provide the filter source. Type the field name you want to order the model into “Fields to Order Records By” property. (You can copy the field API name from the field list). Add ASC or DESC to get exactly the order you want.
3. Source - Manual. Drag and drop manual filter source entries to reorder them.
More than 25 values? You get auto-completes!
- Filters with less options than 25 options will display as Picklists, while filters with more options will display as autocompletes, where a user can start typing and then select the appropriate option from a list.
- In Filter Properties, you can choose for each filter the number at which the pickilst will become an autocomplete. 5? 10? 30? You pick. (Note: If you pick a large number, like 100 and there are that many options, it will basically be impossible for users to find the option we want. It’s better to keep this number lower, and users can use the autocomplete to retrieve the desired value, or even type it in the search box.)
Other Filter Use Cases
If there are filter use cases that are not represented in this list that you have questions about let us know. Post a idea or question on our Skuid community.
Troubleshooting
The following common problems have tripped us up more than once.
Javascript Errors
Use the Web Developer Console to check errors. In Chrome, you can right click and choose Inspect Element > Console. In Firefox, it’s in menu bar under Tools > Web Developer. If there’s an error, it may make no sense to you. But if the error has “Id” in it, than it probably means there’s something wrong with your models.
Review your SOQL
In the Developer Console you can also get a “behind the scenes” look at what Skuid is doing using our Javascript API commands.
- In the console type “skuid.model.map()” to get a list of the models building the page.
- Type “skuid.model.getModel(‘<<ModelName>>’).debug” to see if any salesforce errors have been created. Note - the <<ModelName>> text needs to be replaced, and wrapped in the single quote marks.
- Type “skuid.model.getModel(‘<<ModelName>>’).soql” to see the query that is actually getting executed.
- Change your filter and then enter run that code again (hint - push the up arrow key and the last executed command will appear). Look for changes in “Where” statements that have been introduced into your model code. These can help point out what is failing.
Condition Grouping Logic
If you have Grouping Logic on your conditions, it must include the Model Conditions that you created for your filters. Even though these conditions are only executed with the Filter Features, they have to be included in the Grouping Logic statement or Skuid will ignore them completely. Use “AND” statements to add them to your Grouping Logic.
Cookies On
Originally Skuid used cookies to remember the open values in your picklist. That way, when you came back to this page, it would remember the exact results you were viewing. But, if you were previewing this page when you were building it and your filters weren’t set up correctly, then your cookies could be storing the incorrect/non-existant filter values.
The default is for Skuid to remember filters and other Personalization Settings server side (on the user record) rather than client-side (browser cookies).