Table Component: Custom Global Actions
Unlike Field Renderers or Row and Mass Actions, Global Actions are used for activities that are not necessarily bound to existing data or data that is visible on the screen (such as selected rows). They are meant to provide a hook on which you can hang any custom behavior you need.
New Skuid Tables created from the Page Composer do not start out with any default Global Actions, but users commonly add Global Actions to do things such as: a URL Redirect to the “create new” page for the object type, a URL Redirect to an Import Wizard for the object, opening a popup that lets you create a new record and related records all at once, or opening a popup that lets you pick from a “catalog” of related records and adding them to your table via Row Actions or Mass Actions in that popup table.
If you have a more advanced use case for a Table Global Action, Snippets offer a completely open-ended solution.
Global Action Snippet Reference
A Global Action snippet is run when a user clicks on the associated global action button located at the top of a Table.
A Global Action snippet receives a single argument with the following properties:
- arguments[0].component (
skuid.component.Component()): The Component defining the Table to which the Global Action belongs. - arguments[0].list (skuid.ui.List): The List representing the collection of items within the Table to which the Global Action belongs.
- arguments[0].model (skuid.model.Model): The Model from which the Table’s data is derived.
Example: Working with the entire dataset
For this example, we’ll query and work with the entire dataset in a single click. Specifically, we’ll query the Product2 sObject and create a slideshow of product images. (This example uses the skuid__Image__c sObject , which comes with Skuid, and a custom lookup field created on the Product2 sObject named “Image.”)
Because this example will work with the entire data set, and not just a single row or data displayed on the screen, we will work with some of the more advanced aspects of the Model, such as asking Skuid to “load more data.”
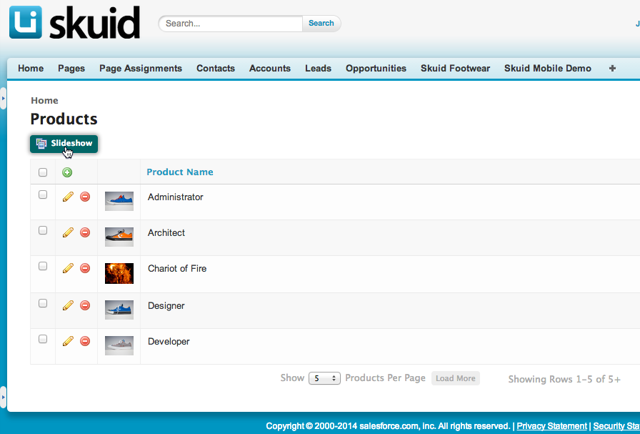
To begin, create a new Skuid page with the following properties:
- Page Name: SkuidSample_CustomGlobalAction
- Type: Desktop
- Template: Object list / tab page
- Select Primary Object: Product2
On the new page, ensure that the “Name,” “Description,” and “Image__r.skuid_AttachmentId__c” fields are included in the Product2 Model.
To make things more interesting, go to the Model’s Advanced properties and set the “Max # of Records (Limit)” to something relatively low. This example uses “5.” Loading records asynchronously, only as needed, helps to ensure the page loads quickly and avoids hitting Salesforce SOQL limits. Note, though, that pagination and asynchronous loading is only supported for models containing up to 10,000 records. If your model has more records than that, then you may encounter problems.
Select the Table component and click “Add Features” and then “Add Global Action.” This will add a new Global Action, labeled “Go to Home Page” by default. Click that Global Action and change the following properties:
- Action Type: Custom
- Action Label: Slideshow
- Action Icon: ui-silk-images
- Snippet Name: SkuidSample.Slideshow
Now open the “Resources” tab and create a new Javascript resource with the following properties:
- Resource Location: In-Line (Snippet)
- Snippet Name: SkuidSample.Slideshow
Replace the placeholder code with the following variable declarations:
1 2 3 4 5 | var $ = skuid.$,
args = arguments[0],
component = args.component,
list = args.list,
model = args.model;
|
The code above makes the snippet parameters a bit easier to get to. We’ll make heavy use of the model object later on, but first we need to build out the UI using the component object.
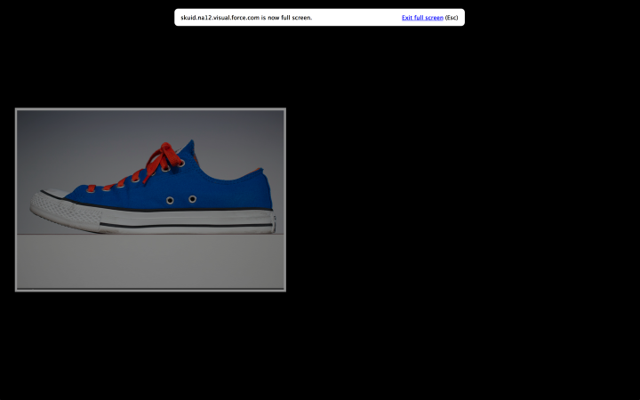
The following code uses jQuery to create a “pocket,” a zero-width, zero-height DIV that we can hide UI elements within. We’ll be using the browser’s fullscreen API and the target HTML Element must be “attached” to the DOM, meaning we have to put it somewhere on the page. A pocket ensures that the root element for our slideshow is part of the DOM but is invisible except when viewing it in full-screen mode. The remaining two statements add HTML elements to the pocket.
1 2 3 4 5 6 7 8 9 10 11 12 13 14 15 16 17 18 19 20 21 22 23 | // The DIV in which the slideshow hides when not in use
var pocket =
$( '<div>' )
.css( { overflow: 'hidden',
height : '0px',
width : '0px' })
.appendTo( component.element );
// The all-black container which acts as the background when full-screen
var container =
$( '<div>' )
.css( { height : '100%',
width : '100%',
'background-color' : 'black' } )
.appendTo( pocket );
// The white rectangle which contains the image, etc, and gives everything a
// nice white border
var lightbox =
$( '<div>' )
.css( { margin : 'auto',
'background-color' : 'white',
padding : '4pt',
position : 'relative' } )
.appendTo( container );
|
Next, we create a reference to the current browser’s fullscreen API. Note that this will not work in some browsers, most notably IE8.
// Code to fetch the full-screen function...
var lightboxEl = lightbox[0],
    requestFullScreen =
        lightboxEl.requestFullScreen ||
        lightboxEl.webkitRequestFullScreen ||
        lightboxEl.mozRequestFullScreen ||
        lightboxEl.msRequestFullScreen;

// if the browser does not support full-screen, then exit gracefully
if( typeof requestFullScreen === "undefined" )
{
    alert( 'Fullscreen is not supported by the current browser.' );
    return;
}
The loadSlideshowData function is responsible for extracting data out of the Model and preparing it for use with the Slideshow. The code iterates over all data currently loaded into the Model and builds an array for later use. There’s also a parameter to allow the function to start from somewhere other than the first row. This will be useful when we later add records to the Model and need to load just the new records (so as not to create duplicates or require the entire array to be recreated). Notice that if a product does not have an image associated with it, it will not be included in the slideshow. We will use the skuid.utils.getUrlFromAttachmentId() function to get the URL for each image.
// image data cache (stores data between calls to loadSlideshowData)
var slideshowData = [],
    slideshowCount = 0;
function loadSlideshowData( startIndex )
{
    startIndex = startIndex || 0;
    for ( var i = startIndex; i < model.data.length; i++ )
    {
        var row = model.data[i];
        var imageId = row.Image__r ? row.Image__r.skuid__AttachmentId__c : false;
        if ( imageId )
            slideshowData.push(
                {   img : $( '<img>' ).attr( 'src',                 skuid.utils.getUrlFromAttachmentId( imageId ) ),
                    name : row.Name,
                    description : row.Description } );
    }
    slideshowCount = slideshowData.length;
}
loadSlideshowData(0);

// if there image data array is empty, then there is no need to continue...
if ( slideshowCount <= 0 )
{
    alert( 'There are no images to display.' );
    return;
}
Next, look carefully at the top of the loadNextSlide function. When we reach the end of the slideshowData array (the slideshowIndex is greater than or equal to slideshowCount, after adjusting for 0-based indexing), we check the canRetrieveMoreRows property to determine if more rows exist in the database. If that’s true, then we call the loadNextOffsetPage function, asking Skuid to go query for more rows to add to our Model.
There’s an optional callback parameter which allows us to execute some code when Skuid has finished loading the data into the Model. In this case, the slideshow is paused until the data is loaded. When the data is available, we call loadSlideshowData to add the new records to our slideshowDataarray and then immediately resume the slideshow by calling loadNextSlide. When we actually reach the end of the dataset, we loop around back to the first record. Here’s the relevant piece of code:
1 2 3 4 5 6 | return model.loadNextOffsetPage(
function()
{
loadSlideshowData( oldModelDataLength );
loadNextSlide();
});
|
The rest of the code deals with the jQuery UI animations that make the transition from one image to the next more interesting.
Note
Salesforce supports pagination over a dataset of up to 10,000 records. If your dataset has more than 10,000 records, pagination may not function correctly.
1 2 3 4 5 6 7 8 9 10 11 12 13 14 15 16 17 18 19 20 21 22 23 24 25 26 27 28 29 30 31 32 33 34 35 36 37 38 39 40 41 42 43 44 45 46 47 48 49 50 51 52 53 54 55 56 57 58 59 60 61 62 63 64 65 66 67 68 69 70 71 72 73 74 75 76 77 78 79 80 81 82 83 | // the main logic (and loop) for the slideshow
var slideshowLoop;
var slideshowCanceled = false;
function loadNextSlide()
{
if ( slideshowIndex + 1 >= slideshowCount )
// if we get to the end of the loaded data and there's still
// more in the database, then load the next set of data. When
// it's been loaded, continue the presentation.
// (There may be a noticable delay as additional records are
// fetched from the database)
if ( model.canRetrieveMoreRows )
{
var oldModelDataLength = model.data.length;
return model.loadNextOffsetPage(
function()
{
loadSlideshowData( oldModelDataLength );
loadNextSlide();
});
}
else slideshowIndex = -1;
slideData = slideshowData[++slideshowIndex];
var effectLength = 1000;
slideshowCaption.slideUp( effectLength );
lightbox.animate(
{ 'margin-left' : -lightbox.outerWidth(),
opacity : 0 },
effectLength, 'easeInExpo',
function()
{
slideData.img.replaceAll( slideshowImage );
slideshowImage = slideData.img;
slideshowTitle.text( slideData.name );
slideshowDescription.text( slideData.description );
lightbox.css( { 'margin-left' : window.outerWidth } );
if ( slideshowCanceled )
return;
slideshowCaption.slideDown( effectLength );
lightbox.animate(
{ 'margin-left' :
( window.outerWidth - lightbox.outerWidth() ) / 2,
opacity : 1 },
effectLength,
'easeOutExpo',
function()
{
slideshowLoop = window.setTimeout( loadNextSlide, 3500 );
});
});
}
// slideshow variables
var slideData = slideshowData[0],
slideshowIndex = 0;
// slideshow HTML elements
var slideshowImage =
slideData.img
.appendTo( lightbox ),
slideshowCaption =
$( '<div>' )
.css( { position: 'absolute',
bottom : '4pt', left : '4pt', right : '4pt',
padding : '8pt',
color : 'white',
'background-color' : 'rgba(0,0,0,0.5)'
} )
.appendTo( lightbox ),
slideshowTitle =
$( '<div>' )
.css( { 'font-size' : '16pt', 'padding-bottom' : '6pt' } )
.text( slideData.name )
.appendTo( slideshowCaption ),
slideshowDescription =
$( '<div>' )
.css( { 'font-size' : '11pt' } )
.text( slideData.description )
.appendTo( slideshowCaption );
|
If the user exits fullscreen mode, then the slideshow should stop (otherwise the loop will continue running, even though nothing can be seen):
function stop()
{
    // If the element is in full screen mode, then don't do anything...
    if ( document.fullscreen || document.mozFullScreen ||
        document.webkitIsFullScreen || document.msFullscreenElement )
        return;

    // ...otherwise, cancel the presentation (so that the slideshow does not
    // continue consuming resources while it is hidden)
    slideshowCanceled = true;
    window.clearTimeout( slideshowLoop );
}
$(document)
    .on( 'webkitfullscreenchange mozfullscreenchange msfullscreenchange fullscreenchange', stop );
Finally, the code which actually starts the slideshow…
1 2 3 | // start the show...
requestFullScreen.call( lightboxEl );
window.setTimeout( loadNextSlide, 3500 );
|
The result: