REST
While Skuid’s pre-configured data source types allow you to easily connect to a variety of systems, the REST data source type allows advanced users to connect to almost any REST API. REST is web service architecture that typically uses the HTTP protocol, identifies resources with a URL, and represents actions with HTTP verbs such as GET, POST, PUT, DELETE.
Skuid extends the capability to a wide range of REST services, but REST standards such as Swagger can be very helpful in creating services that are easy to use and understand.
Note
Only REST services that return JSON payloads are supported. Services that only respond with XML-formatted payloads will not work.
Configuring a REST data source
To begin creating a new data source, click Configure > Data Sources > New Data Source.
Inside the New Data Source popup,
- Select an appropriate option under Data Source Type
- Give your data source a unique name.
- Click Next Step.
Configure your data source’s connection and authentication settings
URL / Endpoint: This is the base URL of the data source. For REST services, this will be the first part of the URL—which should be the same for all endpoints in this data source’s models.
As with the example above, this value will look similar to
http://www.example.com/api/v1/for most REST data sources.Use Apex Proxy : Choose whether or not to use the Apex Proxy. By default, this option is checked. See here for more information on the implications of using the proxy.
Authentication Method, Provider, and Credential Source: Configure the appropriate authentication settings for this particular data source. Click here for more information about authentication in Skuid.
URL Parameters to send with every request: The request URL will append these parameters for each request. This is typically used for API keys and access tokens.
Client Certificate: An optional piece of data Skuid would present with all requests to positively, uniquely identify the sender of the request.
Create a Remote Site Setting (Skuid on Salesforce)
Data sources that use the Apex proxy must have a remote site setting configured for the domain of the service being accessed. By selecting “OK,” Skuid will attempt to create this remote site setting for you. If you select “Cancel,” your data source will be created, but the remote site setting will not. You can create and edit remote site settings from Administer > Security Controls > Remote Site Settings in Salesforce setup.
Using API Endpoint URLs with Skuid
When using a REST data source, you’ll need to have a basic familiarity with how to format REST endpoints and request bodies. See the below examples:
Get a list of records
Request
GET http://www.example.com/api/v1/contacts
Response
200 OK
1
2
3
4
5
{
 "id": 0,
 "firstname": "Leroy",
 "lastname": "Jenkins"
}
Create/insert a record
Request
POST http://www.example.com/api/v1/contacts
1
2
3
4
{
 "firstname": "Leroy",
 "lastname": "Jenkins"
}
Response
201 Created
1
2
3
4
5
{
 "id": 12,
 "firstname": "Leroy",
 "lastname": "Jenkins"
}
Update a record
Request
PUT http://www.example.com/api/v1/contacts/12
1
2
3
{
 "firstname": "Leeeroy"
}
Response
200 OK
1
2
3
4
5
{
 "id": 12,
 "firstname": "Leeeroy",
 "lastname": "Jenkins"
}
Delete a record
Request
DELETE http://www.example.com/api/v1/contacts/12
Response
204 No Content
Skuid data sources and models use these API endpoints to create REST API requests declaratively, but this interaction between Skuid REST data sources and their models is important to keep in mind.
The first part of the URL—which should be consistent for all functionality provided by the API—is configured in the data source, while the last portion of the URL will be configured in each model that connects to the service.
Let’s break down some example endpoints:
http://www.example.com/api/v1/contactshttp://www.example.com/api/v1/accountshttp://www.example.com/api/v1/opportunities
For this particular API, enter http://www.example.com/api/v1/ in the data source, and each model would handle the unique portions of the endpoints.
URL / Endpoint for the Skuid data source: http://www.example.com/api/v1/
Data Source URL for Model 1: contacts
Data Source URL for Model 2: accounts
Data Source URL for Model 3: opportunities
Configuring REST models
Create a New Model
- Navigate to an existing Skuid page or create a new one.
- Click Models.
- Add a new model.
- Choose REST as the Data Source Type.
- Select the data source you configured for the Data Source field.
- For Model Behavior, choose whether this model should be Read-Only or Read/Write.
- Enter a Model Label and a Model Plural Label.
Add Methods
If you choose Read-Only as the Model Behavior, then you can specify the Data Source URL and the Data Source HTTP Verb in the Basic model properties screen.
However, for Read/Write REST models, you need to specify which type of methods (query, insert, update, delete) you will be using.
- Query Method: Models use the URL configured in this method to retrieve records from your service.
- Insert Method: Models use the URL configured in this method to create records on your service.
- Update Method: Models use the URL configured in this method to update existing records on your service.
- Delete Method: Models use the URL configured in this method to delete existing records on your service.
When configuring these methods, you’ll see some common fields among them
Type: The type property specifies the sort of method you’ll be using. Typically for update and delete operations, an ID is merged into the URL for the service.
Data Source URL: The relative path that points to the data you are accessing, and you’ll find the appropriate URLs for your data within your data source’s API documentation. The Data Source URL you enter in this field will be appended to the URL you’ve specified for this data source in its configuration. You can use {{Merge Syntax}} to include fields from other models, or values that you want to reference from URL Merge Conditions. Consult the documentation for your service to determine the correct URL to retrieve records.
Data Source HTTP Verb: Select the specific HTTP verb you’ll be using for your method here.
- Query: The Data Source HTTP Verb can be GET or POST for queries. The most common method is GET.
- Insert: POST is the only supported HTTP verb.
- Update: PUT, PATCH and POST are supported HTTP verbs.
- Delete: DELETE is the only supported HTTP verb.
But there are some method-specific fields you will see as well:
Path to Contents (Query method): This field lets you specify the model’s starting point within the payload that’s returned from the service. Since models need a list of items, but REST payloads can be any valid JSON file, we must specify where in the JSON file to get records for the model. For example, your service could return a payload like this…
1 2 3 4 5 6 7 8 | {
"records" : [
{
"Id" : 1,
"Name" : "Leeroy Jenkins"
}
]
}
|
In this case, the Path to Contents would be “records” since Skuid must locate the records property within the payload before it can find the data for the model.
Send New Field Values (Insert, Update methods): Choose how Skuid will send the new record data to your service: JSON in request body, request headers, or URL parameters. If you are sending field values as request headers or URL parameters, Skuid allows you to add a prefix to the names of the fields being sent. Consult your service’s documentation to see how it expects to receive data.
Method Succeeds If (Insert, Update methods): Based on the success field in the response body, or the response body itself, you can specify what condition determines your insert/update request’s success.
Response Handling (Insert method): This lets you specify whether Skuid will receive any feedback about the newly-created record. This especially important for services that create unique IDs for newly-created records. With this property, you can specify the format of the response.
Adding fields
Once you have configured your query method URL and path to contents, you can select which fields from the REST response to include in your model. Skuid asks you to provide sample values for any URL merge conditions and then makes a sample request to your service. Once a response is returned, Skuid generates a list of available fields and predicts the datatype of each field as well as other metadata.
Since this first attempt at determining metadata about your fields is just a prediction, it’s a good idea to check the metadata for each field and correct any issues as well as fill in any gaps.
URL Merge Conditions
In REST models, URL Merge Conditions allow you to merge values from these conditions into the query URL for your data source. For example, you could create a filter on a table that merged that filter’s value into a parameter in the query URL whenever that filter is set.
For an example of creating a URL merge condition, see here.
Searching
The simplest way to search REST models is to do client-side search. However, if you need to pull in more data from your REST service based on a search, then server-side search is possible. When configuring server-side searching, you can specify a URL Merge Condition to populate with the value of a search string.
URL Merge Condition Example
This tutorial shows how to use URL Merge Conditions to limit the data returned by your REST models. In this example, we’re going to use to show the local time for a given Account based on its latitude and longitude.
For this example, we’re using a free web service called Geonames.
Before you begin, you’ll need to create an account here.
Step 0: Set up your REST data source.
- Navigate to Configure > Data Sources > Data Sources.
- Click New Data Source.
- Select REST for the Data Source Type.
- Enter a unique name.
- Click Next Step.
- Enter the following URL:
http://api.geonames.org
The Geonames service requires your username be sent with every request. To do this, add your username as a URL parameter.
- Click URL Parameters to send with every request to expand the section.
- Click the first row’s box, and click Append.
- Create the parameter:
- Field:
username - Value: Your Geonames username
- Field:
Finally, click Save.
Step 1: Compose a new page, or open a previously built page.
Step 2: Create a model on the REST service you want to use and enter merge templates in the Data Source URL.

- Create a new model.
- Pick the appropriate REST Data Source.
- Important: In the Data Source URL area, enter merge templates for the parameters that you’ll want to populate via a model condition. In this case we’re using {{Latitude}} and {{Longitude}} so we can create conditions to pull in the Latitude and Longitude fields from our Account Model.
A. If you are planning on populating these areas with fields from another model, make sure that model contains the appropriate fields.
B. It’s also a good idea to make sure these fields are populated for your example record.
It’s the little things.
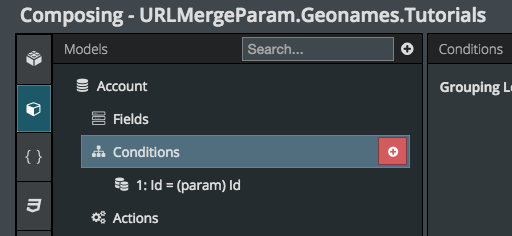
Step 3: Create URL Merge Condition(s).
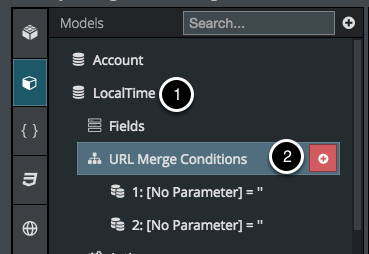
- Click on your REST model.
- Click to add URL Merge Conditions.
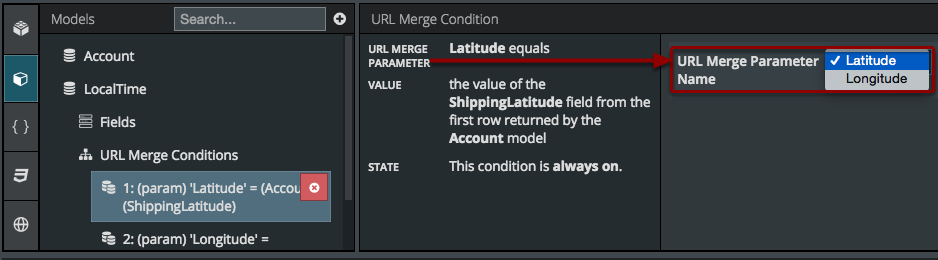
A. The merge templates you specified in the Data Source URL will come up as options.
- No Parameters available in this list? Make sure you entered merge templates in your Data Source URL in Step 2.
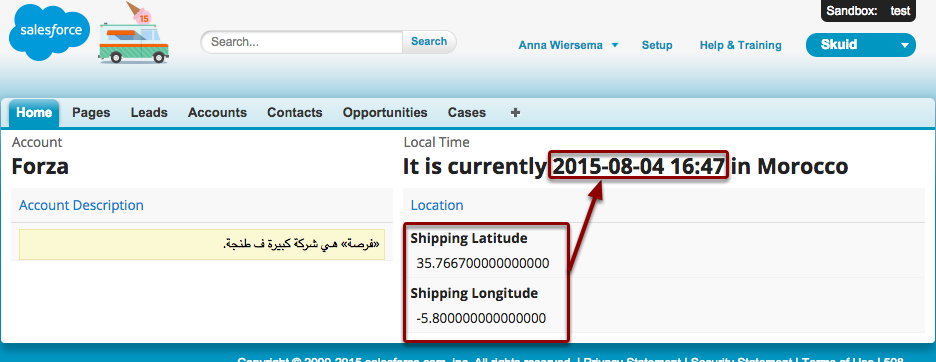
- In this example we’re setting Latitude to the shipping Latitude field form the Account Model, and Longitude to the Shipping Longitude field from the account model. In Steps 2A & B we made sure we included these fields in the Account model, and that they actually had data in them.
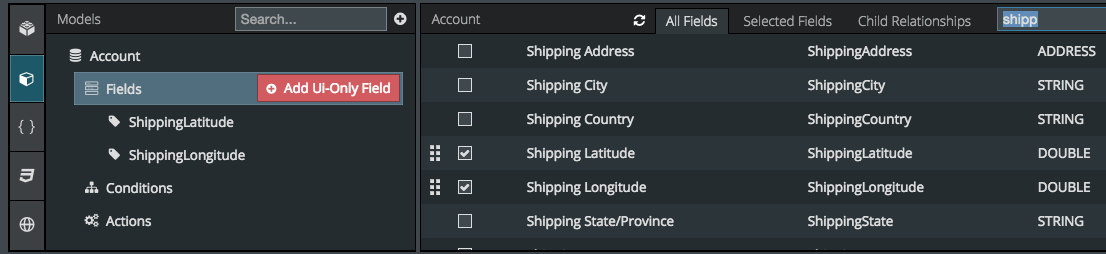
Step 4: Add the fields you want to include from this REST service
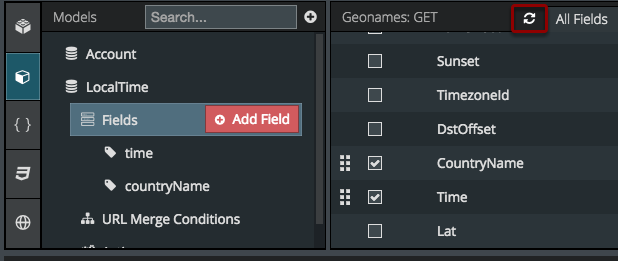
- To get fields, you may have to enter sample parameters (in this case Latitude and Longitude).
- Make sure your test parameters will return the fields you want. For example, if my test latitude and longitude happens to be in the middle of the ocean, then this service won’t return the Time field, which is one of the fields I want. So I made sure my test lat and long were for a city (and not the Lost City of Atlantis).
- If you accidentally enter test parameters that don’t return the fields you want, you can click the refresh icon next to All Fields and enter new ones.
Continue composing your page, including fields from your REST model as desired.
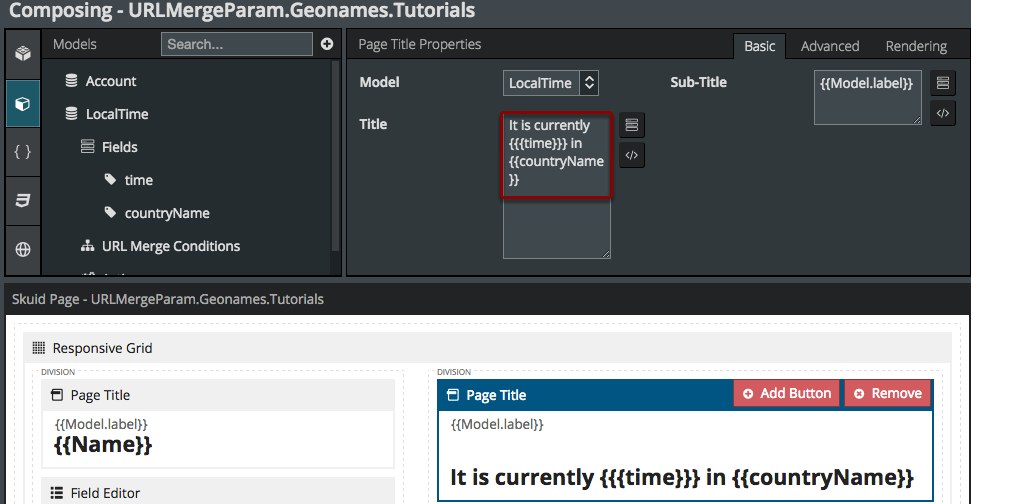
In this case we’re using a Page Title to display these fields. Put time in {{{triple curly brackets}}} so it will come out unformatted.
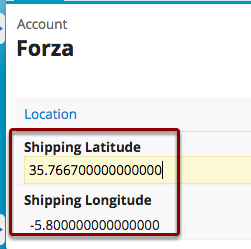
Step 5: Click Save, then click Preview to open your page in a new tab.

Success! Thanks to our URL Merge Conditions we can see the date and time for this Account!
Let your imagination go wild.
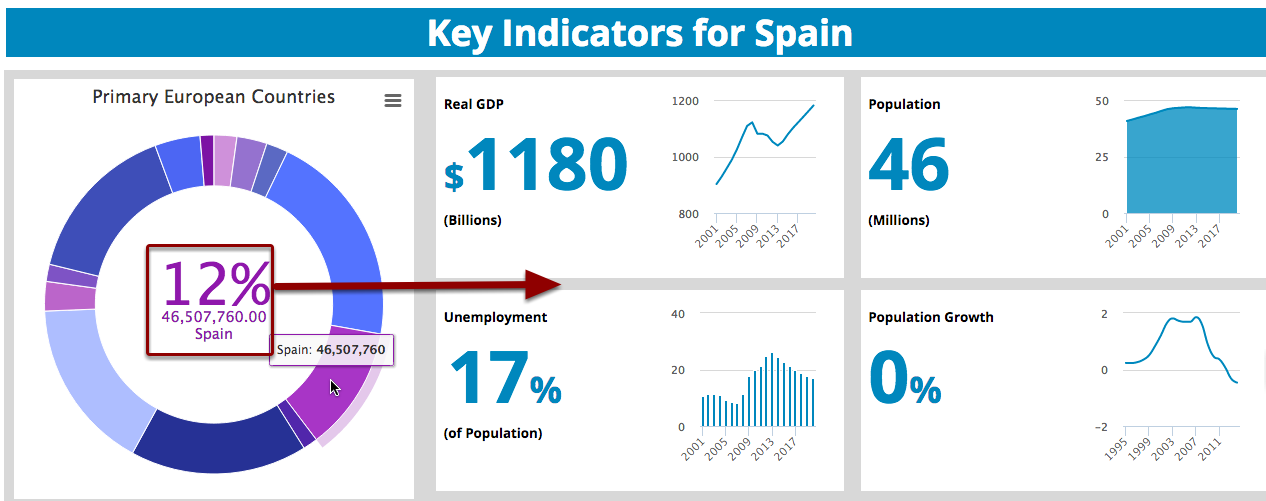
For example, this page uses URL Merge Conditions and Chart Drill-downs/ On-Click Actions to dynamically show key indicators based on the country selected in the pie chart. (Oh and those swanky big summaries, aka $1180 (billions) are totally Rich Text Components.)
You can get this page in your org by copying it from our GitHub repo and pasting it into your org. (Note: for the page to work, you need to configure 2 data sources, explained in more detail at the top of the page XML.) Learn more about copying and pasting pages.