Table Component: Custom Row Actions
The Table component provides a baseline set of row actions “out of the box” that meet the most common needs for inline editing. Using snippets, you can expand on this baseline to add customized and advanced tools for your users.
Row Action Snippet reference
Row Action snippets are run when a user clicks on the associated icon of a table row.
Each Row Action snippet receives a single argument with the following properties:
- arguments[0].item (skuid.ui.Item): The Item represented by the row.
- arguments[0].list (skuid.ui.List): The List to which the row’s Item belongs.
- arguments[0].model (skuid.model.Model): The Model from which the Table’s data is derived.
Example 1: Read-Only action based on row data
In this example, we’ll read in the address data for a Lead and provide a row action which opens the address in Google Maps.
To begin, create a new Skuid page with the following properties:
- Page Name: SkuidSample_CustomRowAction
- Type: Desktop
- Page Template: Object list / tab page
- Primary Object: Lead
On the new page, add the “Street,” “City,” “State/Province,” “Zip/Postal Code” and “Country” fields to the “Lead” Model.
In order to see that the Row Action is working, add a Template component to the table with the following Template code:
1 2 3 | {{{Street}}}
{{{City}}}, {{{State}}} {{{PostalCode}}}
{{{Country}}}
|
Set the Template’s Label property to “Address.”
It is not necessary to actually render the fields used by the Row Action with this Template component, but it is a handy way to make sure that the correct address is loaded.
Now, select the Table component and click “Add Features,” then “Add Row Action.”
This will add a new Row Action labeled “Run multiple actions” (this is a default value). Click the Row Action and change the following properties:
- Action Type: Custom
- Action Label: Get Directions
- Action Icon: fa-map-marker
- Snippet Name: SkuidSample.GetDirectionsRowAction
Go ahead and save the page and open a preview. It should look something like this:
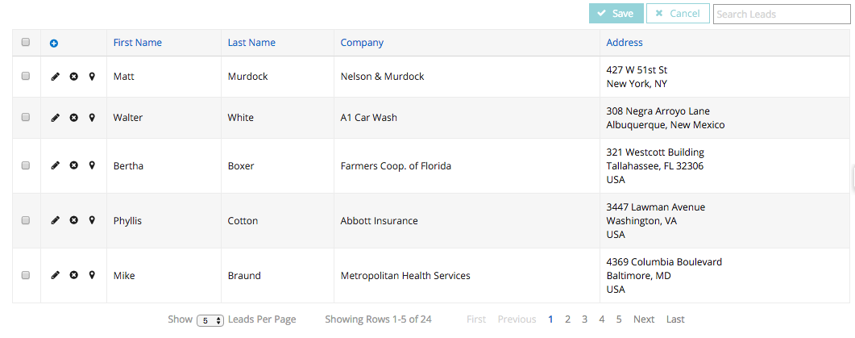
Obviously, clicking the location icon at this point doesn’t do anything—the snippet must still be defined.
Open the “Resources” tab and create a new Javascript resource with the following properties:
- Resource Location: In-Line (Snippet)
- Snippet Name: SkuidSample.GetDirectionsRowAction
First, define variables to access the snippet’s arguments:
1 2 3 4 | var item = arguments[0].item,
list = arguments[0].list,
model = arguments[0].model,
leadRow = item.row;
|
Next, define a function which is able to extract the appropriate fields from a row and build an address string appropriate for Google.
1 2 3 4 5 6 7 8 9 10 11 12 13 14 15 16 17 | function buildAddress( row )
{
// Assemble the address from most specific to least
var address =
( row.Street ? ', ' + row.Street : '' ) +
( row.City ? ', ' + row.City : '' ) +
( row.State ? ', ' + row.State : '' ) +
( row.PostalCode ? ', ' + row.PostalCode : '' ) +
( row.Country ? ', ' + row.Country : '' );
// If the address is not defined, try the company name instead
if ( !address )
return row.Company;
// If the address is defined, then return it (after removing the leading ", ")
return address.slice( 2 );
}
|
Finally, pass in the current row, build the Google Maps URL and then open a new window:
1 2 3 4 | var leadAddress = buildAddress( leadRow );
var mapsUrl = 'https://www.google.com/maps/place/' + encodeURI( leadAddress );
window.open( mapsUrl );
|
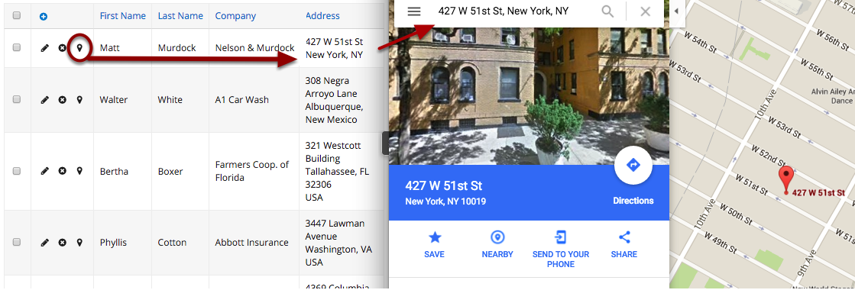
Save the changes and reload the preview. Clicking the map icon will now result in a new window opening with the address visible in Google Maps:
Example 2: Pulling data from multiple models
Sometimes knowing “what to do” with a row involves comparing or otherwise associating it with data from another source. In this tutorial, we’ll explore pulling data from another Model and using it to change the behavior of our action. Specifically, we’ll expand on Example 1 by displaying the directions from the currently logged-in user’s Address to the Lead’s address. (For this example to work, you must update your Personal Information with your Address.)
First, add a new Model to the page with the following properties:
- Model Id: CurrentUser
- Salesforce Object Name: User
Then add a new condition to the Model with the following properties:
- Field: Id
- Operator: =
- Value - Content: Running user attribute
- Value - UserInfo Property: User Id
- State - Condition State: Always On
Add the following fields to the Model:
- Street
- City
- State/Province
- Zip/Postal Code
- Country
The “CurrentUser” Model will automatically pull in the address fields for the currently logged in user. To access it from JavaScript, call the skuid.model.getModel( )() function like so:
1 | var currentUserModel = skuid.model.getModel( 'CurrentUser' );
|
This will return a skuid.model.Model, from which the query results can be retrieved. In this example, only one row is expected (since the query is based on the row Id field). The getFirstRow( ) function provides a useful shortcut to get at this single row:
1 | var userRow = currentUserModel.getFirstRow();
|
From this point forward, dealing with the logged in user is no different from dealing with the Lead - the relevant field names are the same, so the buildAddress( ) function can be reused. All that remains is to modify the URL to request directions (rather than just a single location). Your complete snippet will look like this:
1 2 3 4 5 6 7 8 9 10 11 12 13 14 15 16 17 18 19 20 21 22 23 24 25 26 27 28 29 30 31 32 33 | // Code from Example 1 (minus the last three lines) ...
var item = arguments[0].item,
    list = arguments[0].list,
    model = arguments[0].model,
    leadRow = item.row;
function buildAddress( row )
{
    // Assemble the address from most specific to least
    var address =
        ( row.Street ? ', ' + row.Street : '' ) +
        ( row.City ? ', ' + row.City : '' ) +
        ( row.State ? ', ' + row.State : '' ) +
        ( row.PostalCode ? ', ' + row.PostalCode : '' ) +
        ( row.Country ? ', ' + row.Country : '' );

    // If the address is not defined, try the company name instead
    if ( !address )
        return row.Company;

    // If the address is defined, then return it (after removing the leading ", ")
    return address.slice( 2 );
}
var leadAddress = buildAddress( leadRow );
// New code...
var currentUserModel = skuid.model.getModel( 'CurrentUser' ),
userRow = currentUserModel.getFirstRow(),
userAddress = buildAddress( userRow );
// Build a URL to get direction FROM userAddress TO leadAddress
var mapsUrl = 'https://www.google.com/maps/dir/' + encodeURI( userAddress ) + '/' + encodeURI( leadAddress );
window.open( mapsUrl );
|
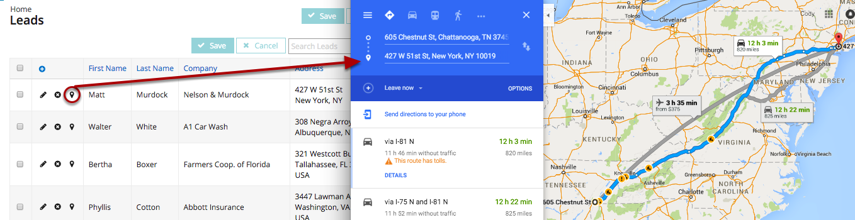
And the results:
Example 3: Updating data via row action
The examples so far have only demonstrated reading data from the row and performing some action based on it. Using the Skuid API, however, you can also update data.
In this example, we’ll automate the process of updating the Status of a Lead to “Qualified.” Normally, the user would need to bring the row into “edit” mode (for example, by clicking the edit button), then pick a value from the picklist, then commit the changes by clicking the “save” button. We’ll introduce a new custom Row Action that will perform all of these steps with a single click.
First, add the Status field in the Lead Model, then add the Status field to the table component.
Next, create a new Row Action with the following properties:
- Action Type: Custom
- Action Label: Mark as Qualified
- Action Icon: sk-icon-personal-info
- Snippet Name: SkuidSample.QualifyRowAction
The snippet itself will contain relatively little code. First, create variables for the snippet’s arguments:
1 2 3 4 5 | var $ = skuid.$,
args = arguments[0],
item = args.item,
list = args.list,
model = args.model;
|
To update a value in the Model, use the Model’s updateRow( ) function. Pass in the row (available via item.row), the field name (in our example, “Status”) and the value (“Qualified”).
1 | model.updateRow( item.row, 'Status', 'Qualified' );
|
To commit the change, call the Model’s save( ) function.
1 | model.save();
|
Note
Under normal circumstances it is best to let the user of your application save values explicitly. This gives the user a chance to cancel a mistaken click, etc, before the value is committed to the database.
Now, clicking the “Mark as Qualified” button on the table will change the Status and commit the changes to the database in a single step:
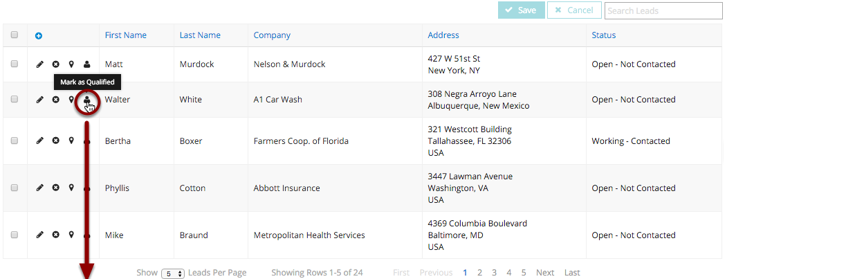
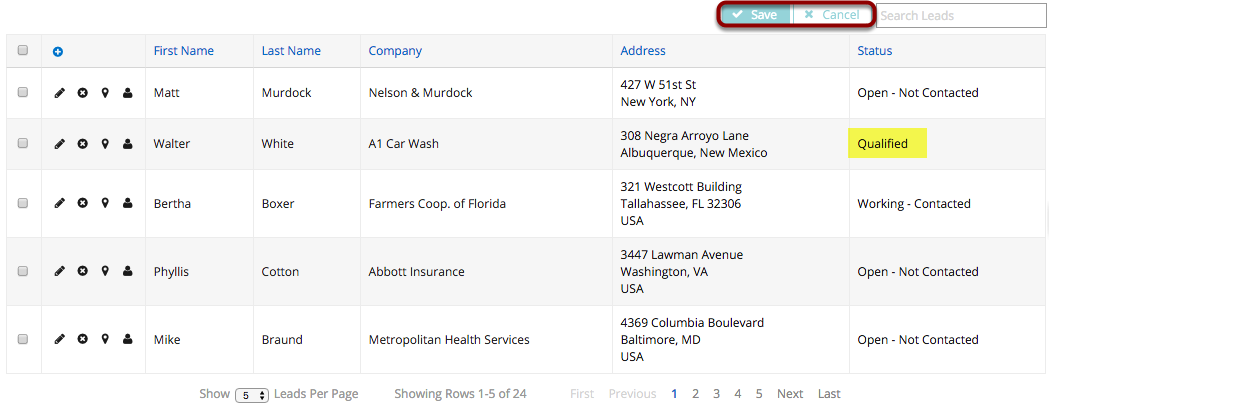
After clicking, you’ll see a momentary flicker of the Save and Cancel buttons as the change notification propagates through the Skuid system, immediately followed by a command to commit the Model (thus disabling the Save and Cancel buttons). All of this happens in about a second, shaving several seconds off of the user’s workflow.