Conditional Rendering of Components
Skuid now includes tools that allow admins to show or hide most of our components based on data conditions. Examples include:
- If preferred contact = email, hide the phone fields.
- If account type = partner, show the partner information tab.
- If user profile = management show account profitability table.
- If no records are available, hide the table and show a template that says “Sorry, there is nothing here for you to see.”
This tutorial will show how this is implemented and where it is available in Skuid today!
Rendering Tab now on most Components

Look for the “Rendering” tab on many components. Select the “add block” icon to add one or more conditions that will determine if the component should appear on the page. If the data makes all the conditions true - the component will appear. If the data makes any condition false - the component will not appear. Conditions are evaluated as “and” statements.
Build a Condition that must be True for Component to Render
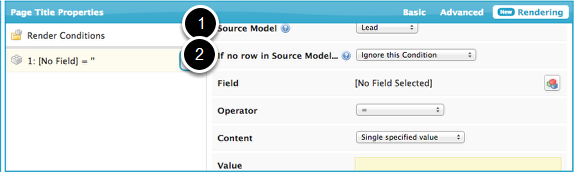
The following properties are available for establishing conditions.
- Source Model: This property allows you to select which model you want to be evaluated to determine if the component should display. Most components are tied to a single model. You do not have to use data from that model to determine whether the component should display or not.
- If no row in Source Model…: This property allows you to specify what happens when the selected model has no rows. options include:
- Ignore this Condition. The condition is not evaluated (assumed to be true) and other conditions are considered.
- Skip Other Conditions and Render: No other conditions are evaluated - and the component is shown.
- Skip Other Conditions and Don’t Render: No other conditions are evaluated - and the component is hidden.
The next four properties of the conditions builder will be familiar if you have build Model conditions. They are the same.
- Field: Choose a field from the model that should be evaluated.
- Operator: Choose the operator
- Content: Choose what type of content is to be evaluated.
- Value: Enter the value that should be true for content to show.
Components Available for Conditional Rendering
Conditional rendering has been implemented in the following components.
- Calendar
- Custom
- Field Editor. You can also control the rendering of individual columns, sections and fields.
- File
- Page Include
- Page Title. You can also control the rendering of actions in the page title.
- Panel Set
- Queue List
- Tab Set. You can also control the rendering of individual tabs.
- Table. You can also control the rendering of row actions.
- Template
- Wizard. You can also control the rendering of wizard action buttons.
An Example.
In this example we will only show the partner tab if the account type includes the word “partner.”
Create Account Detail Page - with a Tab set.
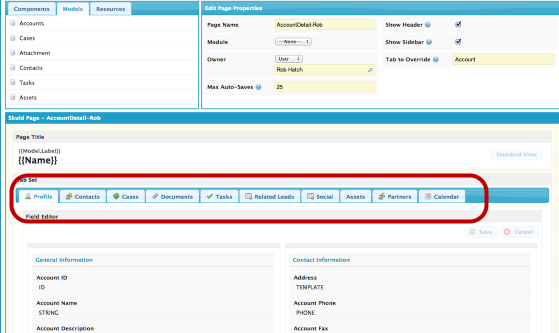
For more help with building out this kind of page, see building master and child pages.
Make sure the “Account Type” field is on the profile page.
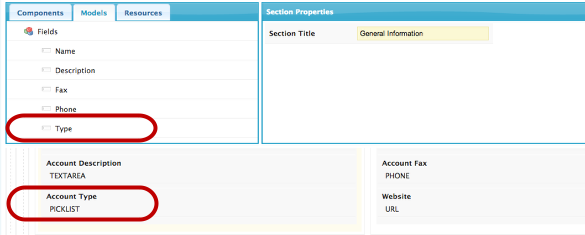
- Make sure the field is in the model.
- Add the field to the profile tab so you can make sure the rendering is correct. (Fields evaluated in rendering conditions do not need to be in the page layout. Only in the model.)
Select Partner Tab in Tabset - and select “Rendering” property tab.
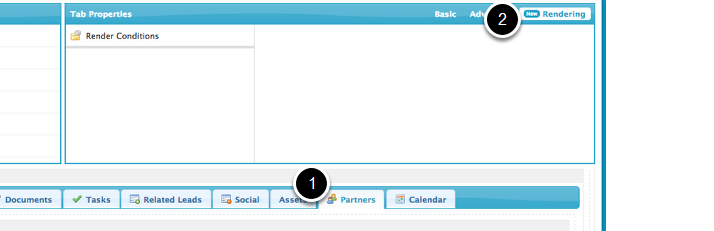
- Select Partner Tab from tabset.
- Select Rendering Tab in properties
Build the Condition
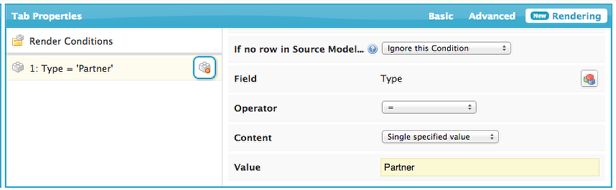
Select the green icon to add a new condition.
- Select Model: Choose the model where “account type” was retrieved.
- If no row in Source Model: Ignore this condition
- Field = Type
- Operator = Contains
- Content = Single Specified Value
- Value = “Partner”
Using the Operator “Contains” allows us to show the tab when the value is “Partner / Reseller” or “Channel Partner”.
View your results.
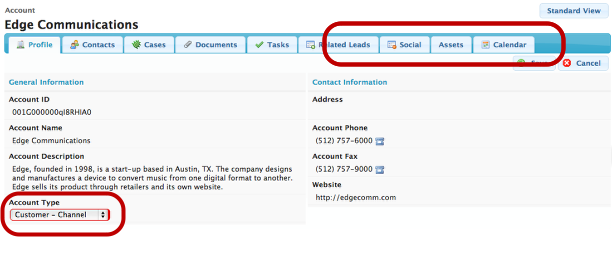
If Account Type is Customer - Channel - the partner tab does not show. But as soon as you select type “partner”
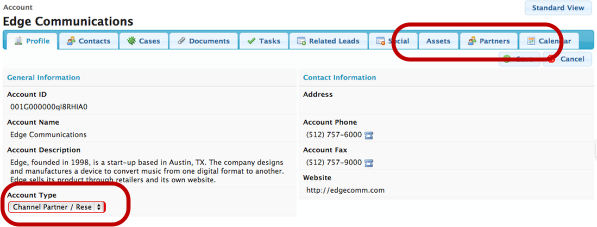
The Partners tab appears.