Dynamic Creation of Models and Components
This article describes how to dynamically instantiate and load Models and Components from JavaScript.
If you are trying to modularize parts of your Skuid Pages, ordinarily it is best to extract the parts of your page that you want to reuse into a separate page, including the supporting Models. (Be careful to change the names of your Models to be page-unique in this case, otherwise there may be Model name conflicts).
However, there are some circumstances where it makes sense to create in JavaScript the Models in a page and/or some of the Components. This is also useful when trying to create different Models based on criteria. For instance, perhaps you have a picklist letting the user select one of several objects to see a Table of, e.g. Contacts or Leads. Based on the user’s selection, you want to change the object name queried for in a Model, as well as query for a few different fields. This saves you from having to have both a Contact and a Lead model in your page, with one or the other going unused.
Step 1. Getting Started
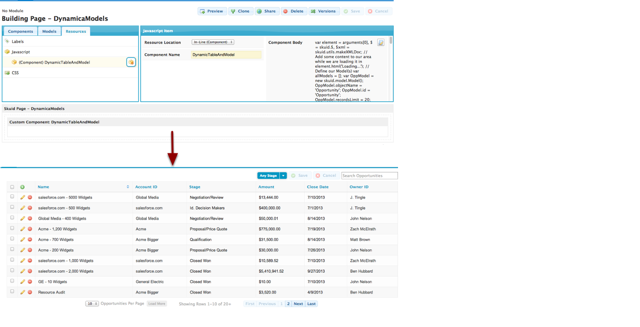
For this tutorial, we’ll create a basic Skuid Page that does nothing but register a Component type called “DynamicModelAndTable”, and then instantiate this component once in the Page body. Here is a link to the XML for this page if you just want to grab and get started.
What this page will do is:
- Dynamically instantiate a Model on the Opportunity object that will pull in 20 Opportunities
- Dynamically instantiate a Table component bound to this Opportunity Model.
Step 2. Register a custom Component Type
A. Create a JavaScript Resource
The JavaScript code that will perform this dynamic instantiation can be defined either in a Static Resource that’s requested on page load, or it can be defined inline, in a <script> tag inserted into the HTML markup for this page.
For this example, we’ll define our JavaScript inline.
There are several ways to dynamically insert content into the body of the page we’re creating with Skuid. We could wait until the page has finished loading, and then find the body element and add child DOM elements to it. But Skuid provides a more synchronous approach by letting you define custom Component Types, which you can then instantiate actual Components and place wherever you want within a complex page layout using the “Custom” component available from the Components list.
The definition of custom Component Types is done from JavaScript using the API method skuid.componentType.register, like this:
1 2 3 4 | skuid.componentType.register('sayhello',function(element,xmlDefinition,component){
// Component body goes here!
element.html('hello world');
});
|
But Skuid provides a way to skip this boilerplate code and cut right to the meat – the body of your Component Type — via the “In-Line (Component)” JavaScript Resource Location. This simply wraps your code in the skuid.componentType.register function call, inserting the name of your In-Line Component resource.
For our example, we’ll use the In-Line Component construct to provide the body of our code:
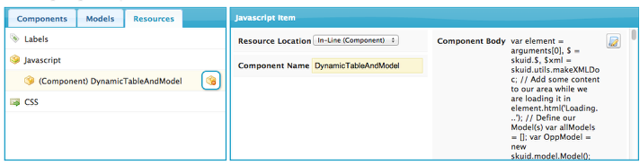
- From the Skuid Page Composer, go to Resources.
- Click on JavaScript
- Click on the icon to add a new JavaScript Resource.
- Change the Resource location to In-Line (Component)
- Set Component Name to “DynamicModelAndTable”
B. The Component Body
Now, we’ll add a basic body to our Component:
1 2 3 4 | var element = arguments[0],
$ = skuid.$;
// Add some content to our area while we are loading it in
element.html('Loading...');
|
Let’s dig into this, as there’s a lot assumed in even this small bit of code.
When we instantiate a custom component, as we’ll do in the next step, we get handed, as our first argument (referring back to the skuid.componentType.register function), a DOM element that Skuid will add, in place, into the parent / container component in which you’ve placed this custom component. So what we’re doing here is to get a reference to this element, so that we can add content to it.
For now, all we’ll do is to add the text “Loading…” to the DOM element.
3. Instantiate your Custom Component type
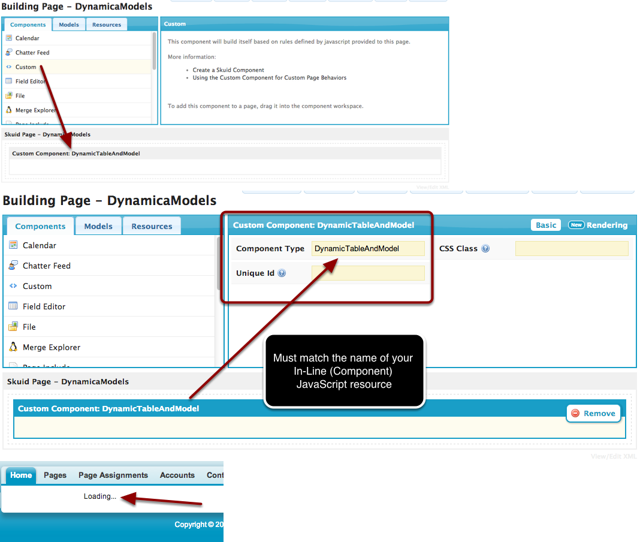
To actually instantiate an instance of our “DynamicTableAndModel” Component Type, we need to drag a “Custom” component into our page body, and specify the name of the Component Type we want to instantiate to be the name of our In-Line (Component) JavaScript Resource.
Once we do that, let’s Save our page, and Preview.
We should see the simple text “Loading…”
4. Dynamic creation of Models
Now for the real meat – let’s create a Model dynamically!
There are two main approaches to this, both leveraging the constructor for skuid.model.Model:
- Create a Model based on an XML representation of a Model
- Create a Model based on a JavaScript representation of a Model
To create a Model from an XML Model representation, such as you could retrieve by viewing the XML for a Skuid Page you’ve already built and finding the <model> node corresponding to a particular Model, you’d just need to create a Model using this syntax:
1 2 | var modelXMLString = '<model id="Opportunity" objectName="Opportunity" limit="20"><fields><field id="Name"/></fields><conditions/></model>';
var OppModel = new skuid.model.Model(skuid.utils.makeXMLDoc(modelXMLString));
|
This can be substituted for the parts of the following code sample where we will build up a Model from scratch using a JavaScript representation.
Returning to our Component Body, let’s replace it with the following code, which we’ll step through:
1 2 3 4 5 6 7 8 9 10 11 12 13 14 15 16 17 18 19 20 21 22 23 24 25 26 27 28 29 30 31 32 33 34 35 36 37 38 39 40 41 42 43 44 45 46 | var element = arguments[0],
$ = skuid.$;
// Add some content to our area while we are loading it in
element.html('Loading...');
// Define our Model(s)
var allModels = [];
var OppModel = new skuid.model.Model();
OppModel.objectName = 'Opportunity';
OppModel.id = 'Opportunity';
OppModel.recordsLimit = 20;
OppModel.fields = [
{ id: 'Name' },
{ id: 'AccountId' },
{ id: 'Account.Name' },
{ id: 'StageName' },
{ id: 'Amount' },
{ id: 'CloseDate' },
{ id: 'OwnerId' },
{ id: 'Owner.Name' }
];
OppModel.conditions = [
{
type: 'fieldvalue',
field: 'StageName',
operator: '=',
value: '',
state: 'filterableoff',
inactive: true,
name: 'StageName',
encloseValueInQuotes: true
}
];
allModels.push(OppModel);
// Initialize each of our Models
// so that they have index maps created
// and other internal guts,
// then register them with Skuid
// so that Skuid officially knows about them
$.each(allModels,function(){
// Register each of our Models with Skuid
this.initialize().register();
});
// Load all Models --- this will:
// (a) populate all metadata
// (b) run the queries on the models
skuid.model.load(allModels);
|
The first thing we do is create an Array of Models, which we’ll add just one Model to in this tutorial, but which in a complex scenario could contain any number of Models.
Next, we’ll create a new skuid.model.Model instance. This is the JavaScript object that Skuid internally creates for all Models defined in a page’s XML.
Now we’ll actually define the guts of the Model, specifying the following properties:
- id: the Model’s unique identifier
- objectName: the Salesforce object we want this Model to query for and allow us to interact with
- recordsLimit: the number of records to initially query for
- fields: the Model Fields we want to query for (the SELECT portion of the SOQL quer
- conditions: the Model Conditions we want to apply to our query (the WHERE portion of the SOQL query)
Each of these properties on the Model JavaScript object corresponds to properties that can be set declaratively from the Page Composer and which are stored there in the Page’s <models/> XML, so we recommend examining both the Skuid Model API documentation as well as the XML for the Models you’ve created in particular Skuid Pages to see which properties you need to set here in order to get your Models to request the data you’re after. It’s recommended to define Model queries from the Page Composer, generally, and then look at what was created and extract it into JavaScript.
Now, we need to call 3 methods on our Models:
- Initialize: this populates various internal properties on our Model, getting it all squared away and ready to go
- Register: this lets Skuid know that this Model exists, and allows Components to bind to it
- Load: this is an asynchronous method that requires going to the server. It populates all object and field metadata needed for the requested object and fields on this model, and then performs a query on the Model (if requested) and creates default rows (if requested). load ordinarily should only be called once on a Model — subsequent queries should be made using updateData, so that metadata is not re-retrieved unnecessarily.
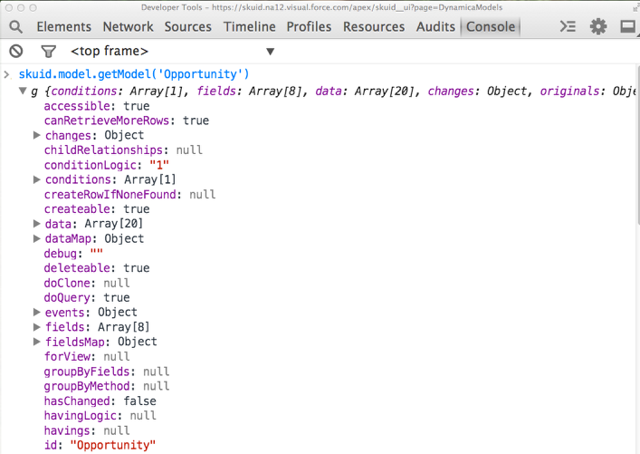
If we save and preview, we will now have access to our dynamically-created Opportunity model from JavaScript, using skuid.model.getModel - success!
Dynamic creation of Components
Next, we’ll extend our custom Component to dynamically instantiate a Table Component that is bound to our dynamically created Opportunity Model.
Waiting for our Models to finish loading
The first subtlety we have to overcome is that because the load( ) method we called on our Models is asynchronous, we have to wait for it to finish before instantiating any Components that are bound to the Models we created, otherwise these Components will not be able to instantiate themselves, as they are expecting these Models to not just exist, but be fully-loaded with data and metadata.
We have two code constructs available to us that allow us to “wait” for our asynchronous Skuid Model operations to finish before proceeding:
- callback functions
- promises
All asynchronous Skuid Model operations, such as save( ), updateData( ), and load( ), support both of these constructs. For this example, we’ll use the promise infrastructure. We can wrap our load( ) call in a $.when() block, and then define our “stuff to do next” in a .then() block, effectively saying “when these async operation(s) are done, then do this stuff”.
Here’s what it looks like:
1 2 3 4 5 6 7 | // Load all Models --- this will:
// (a) populate all metadata
// (b) run the queries on the models
$.when(skuid.model.load(allModels)).then(function(){
// SUCCESS function
console.log('models loaded and ready to go!');
});
|
Define the Component XML
Before we can dynamically generate a Table Component, we need to define what we want the Table to look like. What fields should it have? Row actions? Filters? etc.
To do this, we create an XML definition for the Table in memory, using the skuid.utils.makeXMLDoc method, which we will refer to in shorthand as $xml by declaring this as a variable. This is essentially the equivalent of the jQuery constructor, but is safe for generating XML documents in IE8 and IE9.
Where do we get the XML definition? We copy it from an example page, of course! That’s the best way to do it.
For our example, we then split up the XML string into pieces, and tack it together with jQuery append( ) , but this is not necessary, the XML could be defined as one long string, and then you could just call $xml(xmlString) and that would work just fine.
Here’s our example XML Definition for our Table:
1 2 3 4 5 6 7 8 9 10 11 12 13 14 15 16 17 18 19 20 21 22 23 24 25 26 27 28 29 30 | // Define the XML for the component we want to show in our element,
// which we'll instantiate once our Models are loaded
var $xml = skuid.utils.makeXMLDoc;
var xmlDefinition = $xml(
'<skootable showconditions="true" showsavecancel="true" searchmethod="server" searchbox="true" showexportbuttons="false" pagesize="10" createrecords="true" model="Opportunity" mode="read"/>'
).append(
$xml('<fields/>').append(
$xml('<field id="Name" allowordering="true"/>'),
$xml('<field id="AccountId"/>'),
$xml('<field id="StageName"/>'),
$xml('<field id="Amount"/>'),
$xml('<field id="CloseDate"/>'),
$xml('<field id="OwnerId"/>')
),
$xml('<rowactions/>').append(
$xml('<action type="edit"/>'),
$xml('<action type="delete"/>')
),
$xml('<massactions usefirstitemasdefault="true"/>').append(
$xml('<action type="massupdate"/>'),
$xml('<action type="massdelete"/>')
),
$xml('<views><view type="standard"/></views>'),
$xml('<filters/>').append(
$xml('<filter type="select" filteroffoptionlabel="Any Stage" createfilteroffoption="true" affectcookies="true" autocompthreshold="25" condition="StageName"/>')
.append(
$xml('<sources><source type="metadata" effectsbehavior="justdefault"/></sources>')
)
)
);
|
Run the Component factory
Now that we’ve define our Table Component’s XML, we can instantiate an instance of a Table using the skuid.component.factory() method. This method takes in XML and dynamically generates corresponding Components. It will auto-create a DOM element if you don’t provide one, but usually it’s easier to just run the Component factory right on the DOM element you’ve got in context, so you can pass this in via the element property on the options object you pass to the component factory:
1 2 3 4 5 6 7 8 9 | // Once the loading is finished,
// we'll build our components from XML
$.when(skuid.model.load(allModels)).then(function(){
element.empty();
skuid.component.factory({
element: element,
xmlDefinition: xmlDefinition
});
});
|
Putting it all together
Here’s the final body of our Component Type:
1 2 3 4 5 6 7 8 9 10 11 12 13 14 15 16 17 18 19 20 21 22 23 24 25 26 27 28 29 30 31 32 33 34 35 36 37 38 39 40 41 42 43 44 45 46 47 48 49 50 51 52 53 54 55 56 57 58 59 60 61 62 63 64 65 66 67 68 69 70 71 72 73 74 75 76 77 78 79 80 81 82 83 84 | var element = arguments[0],
$ = skuid.$,
$xml = skuid.utils.makeXMLDoc;
// Add some content to our area while we are loading it in
element.html('Loading...');
// Define our Model(s)
var allModels = [];
var OppModel = new skuid.model.Model();
OppModel.objectName = 'Opportunity';
OppModel.id = 'Opportunity';
OppModel.recordsLimit = 20;
OppModel.fields = [
{ id: 'Name' },
{ id: 'AccountId' },
{ id: 'Account.Name' },
{ id: 'StageName' },
{ id: 'Amount' },
{ id: 'CloseDate' },
{ id: 'OwnerId' },
{ id: 'Owner.Name' }
];
OppModel.conditions = [
{
type: 'fieldvalue',
field: 'StageName',
operator: '=',
value: '',
state: 'filterableoff',
inactive: true,
name: 'StageName',
enclosevalueinquotes: true
}
];
allModels.push(OppModel);
// Initialize each of our Models
// so that they have index maps created
// and other internal guts,
// then register them with Skuid
// so that Skuid officially knows about them
$.each(allModels,function(){
// Register each of our Models with Skuid
this.initialize().register();
});
// Define the XML for the component we want to show in our element,
// which we'll instantiate once our Models are loaded
var xmlDefinition = $xml(
'<skootable showconditions="true" showsavecancel="true" searchmethod="server" searchbox="true" showexportbuttons="false" pagesize="10" createrecords="true" model="Opportunity" mode="read"/>'
).append(
$xml('<fields/>').append(
$xml('<field id="Name" allowordering="true"/>'),
$xml('<field id="AccountId"/>'),
$xml('<field id="StageName"/>'),
$xml('<field id="Amount"/>'),
$xml('<field id="CloseDate"/>'),
$xml('<field id="OwnerId"/>')
),
$xml('<rowactions/>').append(
$xml('<action type="edit"/>'),
$xml('<action type="delete"/>')
),
$xml('<massactions usefirstitemasdefault="true"/>').append(
$xml('<action type="massupdate"/>'),
$xml('<action type="massdelete"/>')
),
$xml('<views><view type="standard"/></views>'),
$xml('<filters/>').append(
$xml('<filter type="select" filteroffoptionlabel="Any Stage" createfilteroffoption="true" affectcookies="true" autocompthreshold="25" condition="StageName"/>')
.append(
$xml('<sources><source type="metadata" effectsbehavior="justdefault"/></sources>')
)
)
);
// Load all Models --- this will:
// (a) populate all metadata
// (b) run the queries on the models
// Once the loading is finished,
// we'll build our components from XML
$.when(skuid.model.load(allModels)).then(function(){
  element.empty();
  skuid.component.factory({
    element: element,
    xmlDefinition: xmlDefinition
  });
});
|
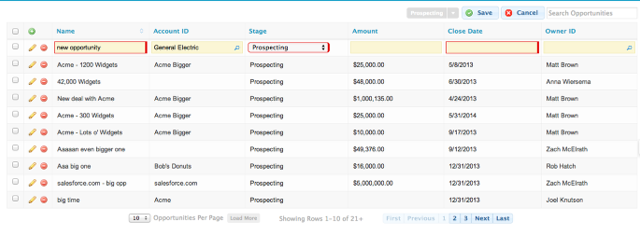
Click Save, and then click Preview, and you’ll see the “Loading…” message briefly, then a fully-functional Table on the Opportunity object will appear. That’s it!