Wizard Component: Custom Button Actions
The Wizard Component lets you define one or more steps through which a user may need to proceed as part of a process-oriented flow.
Each step can have a set of Buttons, which allow the user to perform the following types of Actions
- Navigate to another step
- Navigate to another page / URL
- Save / Cancel Models
- Run a sequence of Actions using the Skuid Action Framework (this is where you can integrate JavaScript Snippets)
The Action Framework will allow you to declaratively define most of the possible logic you might want a Button to perform. For example, as part of a “Close Case” wizard, you might want to do something like this:
- Change the Status of a Case to “Closed” (using the “Update rows in a Model” Action)
- Commit your changes to Salesforce (using the “Save Models” Action)
- Navigate to another step (using the “Navigate to step” Action)
As part of a Product Purchasing wizard, you might want to have a Button that, based on fields the user selects, loads up a catalog of Products, and then shows this catalog in another step. This could also be done through the Action Framework.
However, there are scenarios where you might want to perform complex logic that the Action Framework does not support, and in these scenarios, having your Button run a Skuid JavaScript Snippet is a good approach.
Parameters passed to Wizard Button Action Snippets
A reference to the step object for the step that the user is currently on.
Properties
(String) the step’s unique Id within the Wizard, e.g. “step2”
(String) the Label for the step, shown in the top-left of the Wizard above the step’s contents, e.g. “Step 2: Contact Details”
(jQuery-wrapped DOM element) the DOM Element containing the step’s contents.
(skuid.ui.Editor) the step’s associated Editor
(
wizard): the Wizard object that the step is a part of
Functions
shortcut to Wizard.prototype.navigate( toStepId). Navigates the Wizard to the step whose unique Id is toStepId. If no such step exists, no action is performed.
-
wizard.step.button.step.wizard A reference to the Wizard object for the Wizard that the user is navigating through.
Properties
(page-unique identifier) READ-ONLY. The Wizard component’s unique identifier
(String) READ-ONLY. The Id of the step that the user is currently on in the Wizard, e.g. “step2”
(jQuery-wrapped DOM element) the DOM Element containing the Wizard’s contents
(Array of step objects): a list of step objects corresponding to each step in the Wizard
Functions
Navigates the Wizard to EITHER the step whose unique Id is toStepId, iftoStepId is provided. If toStepId is null, and toUrl is provided, then the page’s URL is set to toUrl
Example: Validate required fields on Models, then navigate to another step
As part of a Wizard flow, you might not want to perform any Save operations until the very end of a Wizard. However, in this situation, it’s a good idea to verify that the user has filled in all required fields in any Field Editors / Tables contained in each step before allowing the user to proceed to the next step.
Here is an example of setting up a Button that runs a JavaScript Snippet that would perform this:
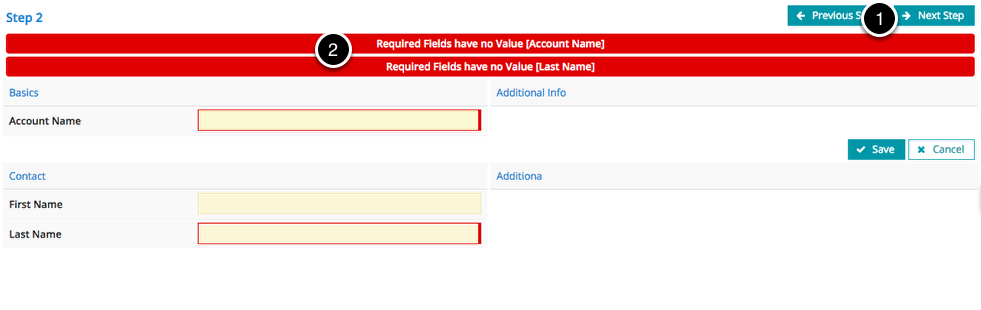
Let’s say that you have a “Log a Call” Wizard that allows a Salesperson to create a new Account, Contact, Opportunity, log a completed call, and create a follow-up Task—all in one Wizard. You’ve broken up the required fields into multiple steps. For this example, let’s say that Step 2 shows Field Editors with fields from an Account and a Contact Model. Before letting the user proceed to Step 3, you want to validate that the user has filled out all required fields on any Field Editors associated with the Account / Contact Models.
We’ll use a combination of the Action Framework and a JavaScript Snippet to achieve this.
Change your Next Step to the “Run multiple Actions” type.
- In Step 2, click on the “Next Step” action.
- Set Action Type to “Run multiple actions.”
Define two Actions to run
- Click the Actions tab in the properties pane.
- Click the + button twice to add two new actions.
- Click on the first action and set the following fields:
- Action Type: Run Skuid JavaScript Snippet
- Name of Snippet: validateRequiredFields_Step2
- Click on the second action. Set Action Type to “Navigate to Step,” and Step Id to “step3” (or the Id of whatever step you’d like to take the user to).
Add a new Inline Snippet
- Click JavaScript.
- Click to add a new JavaScript Resource.
- Set Resource Location to “Inline (Snippet).”
- Set Snippet Name to “ValidateRequiredFields_Step2.”
- Click to open the Resource Editor.
- Delete the contents of the editor and paste in the following code:
1 2 3 4 5 6 7 8 9 10 11 12 13 14 15 16 17 18 19 20 21 22 23 24 25 26 27 28 | var params = arguments[0],
step = params.step,
stepEditor = step.editor,
$ = skuid.$;
// Clear our list of messages
stepEditor.clearMessages();
var models = [
skuid.model.getModel("Account"),
skuid.model.getModel("Contact")
];
var messages = [];
$.each(models,function(i,model){
$.each(model.registeredLists,function(j,list){
var listMessages = list.validateRequiredFields();
if(listMessages && listMessages.length) {
$.each(listMessages,function(){
messages.push(this);
});
}
});
});
// If we have warning messages, do NOT proceed
if (messages.length) {
// Have our step's editor handle the messages
stepEditor.handleMessages(messages);
return false;
}
// Otherwise proceed!
|
Here’s what the Snippet is doing:
- We retrieve a reference to the step’s associated skuid.ui.Editor. We will need this so that we can take any validation error messages that we are passed and show them in the Step’s Editor’s messages area.
- We clear out any messages currently in the Step’s Editor’s messages area.
- We define the Models we want to validate.
- We loop over the skuid.ui.List objects registered on each Model, and call validateRequiredFields on each. This hands us an array of validation error message objects if any required fields do not have values.
- If we have any messages, we pass them to our Step’s Editor with handleMessages, and we return false to prevent the action script from proceeding to the next action — which is to navigate to Step 3. If we do not have any messages, the next Action will be run.
Save and Preview!
- Try to click “Next Step” without filling out any of the required fields for Account or Contact.
- Result: Validation Error Messages are shown in the Step’s Editor’s messages area.