Queue Component: Custom Item Renderers
The Queue component’s Item Display > Item Renderer Type property provides two choices to specify what shows up in each Queue Item’s “Tag” or “Card”:
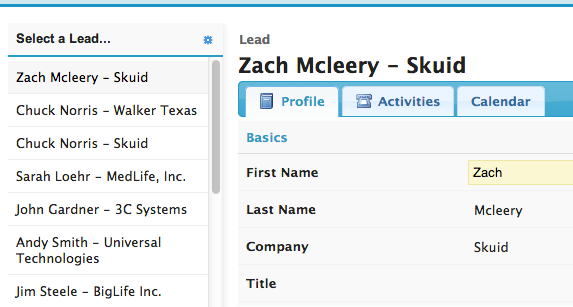
- Template — you must provide a Render Template containing fields to be merged with data from each row in the Queue’s Model, e.g. for a Leads Queue, you might have a Render Template such as
{{FirstName}} {{LastName}} - {{Company}}. - Snippet — you must provide the name of an Item Renderer Snippet which should define logic to apply to the DOM element for each Item in the Queue.
This tutorial describes how to write an Item Renderer Snippet and documents what parameters are passed to such a Snippet.
Item Renderer Snippet Reference
A Queue Item Renderer snippet is run whenever a Queue Item is rendered. All Items in a Queue are rendered when the Queue itself is first rendered, re-rendered, or in response to an updateData( ) on the Queue’s associated Model (e.g. after a user searches or filters a Queue).
A Queue Item Renderer snippet receives a single argument that is a JavaScript object with the following properties:
- arguments[0].item: The skuid.ui.Item for the Queue Item in context. Usearguments[0].item.row to get at the Item’s data row in the Queue’s Model.
- arguments[0].list: The skuid.ui.List to which the Item belongs.
- arguments[0].model: The skuid.model.Model from which the Queue’s data is derived.
- arguments[0].element: A jQuery-wrapped, empty DOM element containing the contents of the Queue Item. All desired content for the Queue Item should be added to this DOM element.
Example 1: Recreate the standard “Template” renderer
For this example, we’ll show how to use a Queue Item Renderer snippet to recreate the experience you’d get if you had selected “Template” as your Item Renderer Type and provided a Render Template.
We’ll modify the Queue on Leads we created in this tutorial to use a Queue Item Renderer snippet that does the exact same thing.
Set Item Renderer Type to “Snippet”
We’ll go into our Queue’s properties, then select the Item Display tab. We’ll change Item Renderer Type to be “Snippet,” and enter the name of an Item Renderer Snippet we’ll create in our JavaScript Resources are. For instance, we’ll call our Snippet “LeadQueue.ItemRenderer.”
Create the Item Renderer Snippet
Next we’ll create our Item Renderer Snippet. Navigate to Resources tab within the App Elements pane and create a new JavaScript Resource with Resource Location “Inline (Snippet)”, and name it “LeadQueue.ItemRenderer.” Add the following as the Snippet Body:
1 2 3 4 5 6 7 8 9 10 11 12 13 14 15 | var args = arguments[0],
item = args.item,
list = args.list,
model = args.model,
element = args.element,
row = item.row,
renderTemplate = '{{{FirstName}}} {{{LastName}}} - {{{Company}}}',
mergeSettings = {
createFields: true,
registerFields: true
};
element.html(
skuid.utils.merge('row',renderTemplate,mergeSettings,model,row)
);
|
The first variable we declare gives us access to the JavaScript object of context information documented above. In the next five variables we just get a local reference to all of the information we were handed in arguments[0].
In the renderTemplate variable, we define a merge template we want to use to display data from the current row we are handed, e.g. for our scenario, a Lead record from Salesforce. We use triple curly brackets here to prevent Skuid from running its standard Name field renderer logic on our FirstName, LastName, and Company fields, which, since this is a Lead record, are all “Name” fields and thus are rendered as Hyperlinks to the Lead record. We don’t want this hyperlink behavior for our Queue Item because it will interfere with our Queue Item On-Click Action, which is to Update a Page Include Panel in context of the selected Queue Item.
Alternatively, we could also have told Skuid to not run standard field renderer logic on merge fields in our template by setting createFields to false in our mergeSettings variable, and we could have then used double curly brackets instead of triple.
Result - same behavior as before
Example 2: Drag & drop Queues
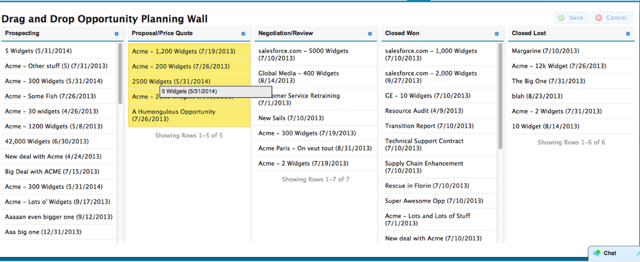
We’ll use a Custom Item Render Snippet, and some additional jQuery UI JavaScript, to implement these drag and drop queue components, where you’ll be able to drag items from one queue into another, and define data logic that will occur upon successful drops.
For our use case, we’ll create a page with 5 Models, all on the Opportunity object, each with one Condition on the Opportunity StageName field, but each having a different value for that Condition, allowing us to see our Opportunities broken out by Stage. We then create a Queue corresponding to each Model, and put each Queue in its own Panel in a Custom-width Panel Set.
You can grab the XML for this page example from our Sample Pages repository.
Queue Item Renderer
Here is the code for our Queue Item Renderer:
1 2 3 4 5 6 7 8 9 10 11 12 13 14 15 16 17 18 19 20 21 22 23 24 25 26 27 28 29 30 31 32 33 34 35 36 37 38 39 40 | var args = arguments[0],
item = args.item,
list = args.list,
model = args.model,
element = args.element,
row = item.row,
renderTemplate = '{{{Name}}} ({{CloseDate}})',
mergeSettings = {
createFields: true,
registerFields: false
},
$ = skuid.$;
element.html(
skuid.utils.merge('row',renderTemplate,mergeSettings,model,row)
).draggable({
revert: 'invalid',
appendTo : 'body',
helper : function() {
var original = $(this);
var helper = original.clone();
// Pass along a reference to the current list's contents
// so that we can compare lists
// to ensure we're not allowing dropping on the current list
original.data('listContents',list.contents);
helper.css({
'z-index' : 1000,
'width' : $(this).css('width'),
'height' : $(this).css('height'),
'border' : '1px black solid',
'padding' : '4px',
'background-color' : '#EEE',
'font-family': 'Arial,Helvetica,sans-serif',
'cursor':'move'
});
return helper;
}
});
|
The key piece here is that we make our Queue Item’s element draggable using the jQuery UI draggable( ) function (the latest stable version of jQuery UI is available in all Skuid Pages). The appendTo and helper properties define the behavior of the draggable item’s “helper” DOM element, which is what you drag around on the screen. We append it to the DOM body so that its draggability will not be restricted to its parent, the Queue, which won’t work because we want to allow our Queue Items to be dragged into other Queues.
We also attach some jQuery data, a reference to the contents of the current Queue Item’s skuid.ui.List, so that we will be able to prevent Items from being dropped into the Queue they came from.
At this point, if we associate this Queue Item Renderer snippet with our Queues, we should be able to drag Queue Items around our page.
Make Queues Droppable
The next step is to make the Queues in our page droppable, meaning that they are configured to accept elements being dragged.
The easiest way to do this is to add some global JavaScript that will be run when the DOM for the page is ready for us to work with. We’ll go find all of our Queues, and make each Queue’s .nx-list-contents element droppable using jQuery UI’s droppable behavior.
Create a new JavaScript Resource with Resource Location “Inline”, and paste in the following as the Resource Body:
(function(skuid){

    // Global setting -- if true, then all changes will be immediately saved,
    // otherwise, changes will remain unsaved until you click Save.
    var SAVE_IMMEDIATELY = true;

    var $ = skuid.$;

    var getQueueList = function(queueElement){
        var queueList;
        $.each(skuid.model.list(),function(i,model){
            $.each(model.registeredEditors,function(){
                if (this.element && this.element.is && this.element.is(queueElement)) {
                    queueList = this.lists[0];
                    return false;
                }
            });
            if (queueList) return false;
        });
        return queueList;
    };

    $(document.body).one('pageload',function(){
        $('.nx-queue').each(function(){
            var queue = $(this);
            var listContents = queue.find('.nx-list-contents');
            listContents.droppable({
                hoverClass: 'ui-state-highlight',
                accept: function(draggables) {
                    // Do not accept draggables
                    // that came from this list
                    return (!listContents.is($(draggables[0]).data('listContents')));
                },
                drop: function(e,ui){
                    var draggable = ui.draggable;

                    var sourceItem = draggable.parent().data('object');

                    // You will get a jQUery UI bug unless you detach the draggable.
                    // We wait until now to detach in order to get a
                    draggable.detach();

                    var sourceRow = sourceItem.row;
                    var sourceRowId = sourceRow.Id;
                    var sourceList = sourceItem.list;
                    var sourceModel = sourceItem.list.model;

                    var targetList = getQueueList(queue);
                    var targetModel = targetList.model;

                    targetModel.adoptRow(sourceRow);
                    sourceModel.removeRowById(sourceRowId);

                    var targetRow = targetModel.getRowById(sourceRowId);

                    // Find the first Condition in our target Model,
                    // and apply it to our target row.
                    // (that is, change the Stage of the dragged Opportunity)
                    var targetModelCondition = targetModel.conditions[0];
                    targetModel.updateRow(
                        targetRow,
                        targetModelCondition.field,
                        targetModelCondition.value
                    );

                    if (SAVE_IMMEDIATELY) {
                        targetModel.save();
                    }

                    // Re-render just the Source List and the Target List
                    sourceList.render();
                    targetList.render();

                }
            });
        });
    });
})(skuid);
In the accept function, we prevent Queue Items from being dragged back into the Queue they came from, by verifying that the List contents element of the dragged Queue Item is not the same as the List contents element that we are making droppable.
In the hoverClass property, we identify a standard jQuery UI class to apply to our Queue List contents whenever the User drags a draggable Queue Item over a particular Queue.
In the drop function, we establish references to the Models of the source Queue and target Queue, as well as to the data row for the Queue Item being dragged. We then use adoptRow( ) to integrate the dragged row into our target Queue’s Model, and use removeRowById( ) to remove the row from the source Queue’s Model. Next, we use updateRow( ) to change the Stage of the dragged row to the Stage of the target Model, dynamically determining the Stage by reading the value attribute of the first condition in the target Model. Then, if the configuration variable SAVE_IMMEDIATELY has been set to true, we immediately commit our change to Salesforce. Lastly, we re-render the skuid.ui.Lists which underly our source and target Queues, so that they will reflect the changes we made to their underlying Models.
At this point, our Queues should be fully draggable and droppable!
Slight CSS tweaks
The final step is to make some slight CSS tweaks. You may notice, if you’re building sequentially right along with us, that if a Queue has no Items in it, it’s no longer droppable! This is because its .nx-list-contents element, being empty, takes up no height on the screen. Therefore it is impossible for you to hover over it, and thus impossible to drop elements into it.
To fix this, we just have to give this element a minimum height. We do this using the CSS min-height property. We also extend this a little further so that, when the user actually hovers over an area, we extend the min-height even further to make the drop area even bigger.
So, the final step is to add an Inline CSS Resource with the following contents:
1 2 3 4 5 6 | .nx-queue .nx-list-contents {
min-height: 25px;
}
.nx-queue .nx-list-contents.ui-state-highlight {
min-height: 100px;
}
|
BONUS: Show Opportunity Owner’s Profile Photo
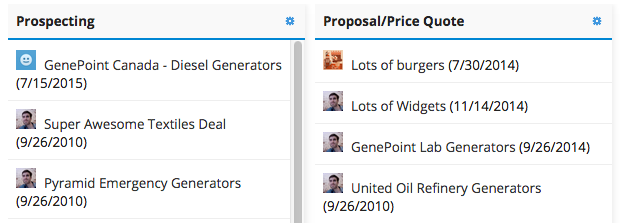
If you want to see the opportunity owner’s profile photo along with the opportunity name, do two things:
- Add the Owner.SmallPhotoUrl field to each of your Opportunity Model(s).
- Change Line 7 in the above JavaScript so that the renderTemplate now includes an Image showing the Owner’s Profile Photo:
1 2 3 4 5 | renderTemplate =
'<img src="{{{Owner.SmallPhotoUrl}}}" width="20" height="20" style="margin-right: 8px;"/>'
+ '{{Name}} ({{CloseDate}})',
|