Model Actions
Model actions allow you to trigger a sequence of actions that run automatically when model-level events occur using the Action Framework. Useful for creating consistent workflows within Skuid pages, model actions often remove the need for snippets while giving Skuid administrators the power to simplify and automate complex workflows.
Model actions have access to all Action Framework action types listed in the Action Framework topic.
To create model actions
- Navigate to the Models tab within the App Elements pane.
- Create or click on a model.
- Within the selected model, click Actions.
- Click the + button to create a new model action.
- Set initiating events (and properties of those events) in the Initiating Events tab.
- Add specific action framework sequences using the Actions tab.
- Click Save.
Initiating Events
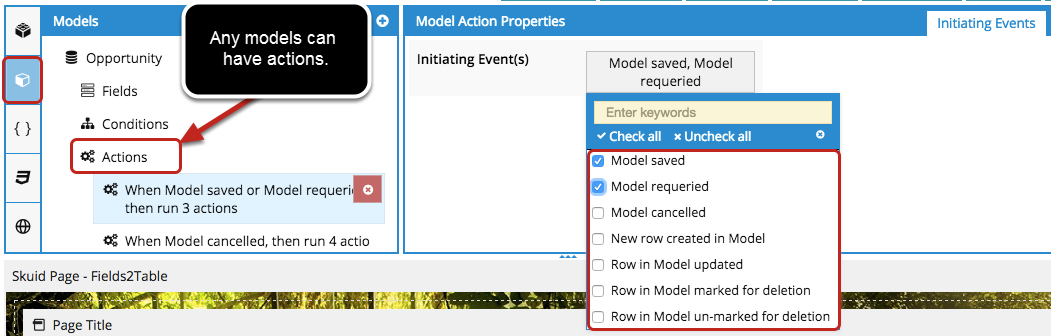
Initiating events are changes to Skuid models that can begin a sequence of Action Framework actions:
- Model saved: When the model is saved, whether as the result of user input or an Action Framework action.
- Model requeried: When the model is queried, which can occur on page load or by an Action Framework action.
- Model cancelled: When changes to the model (as the result of user input or an Action Framework action) are cancelled.
- New row created in Model: When a new data row is added to the model, as the result of user input or an Action Framework action.
- Row in Model updated: When one or more fields are updated as the result of user input or an Action Framework trigger. You may select whether this initiating event applies to specific fields or to all fields in the model.
- Row in Model marked for deletion: Marks the selected row on the model for deletion as the result of user input or an Action Framework trigger.
- Row in Model un-marked for deletion: Unmarks the row on the model selected for deletion as the result of user input or an Action Framework trigger.
Model condition changes are also selectable initiating events. For each of the following events, you may select whether any single filterable condition or a specific, individual condition will begin the sequence.
- Model Condition changed: If the value of a model’s condition changes (even in the background, unactivated).
- Model Condition activated: When a model’s condition is activated, whether or not the model affected by it has been requeried.
- Model Condition deactivated: When a model’s condition is deactivated, whether or not the model affected by it has been requeried.
- Model Condition reset: When the condition’s value is reset. This can only be done through Skuid’s JavaScript API.
Power use cases
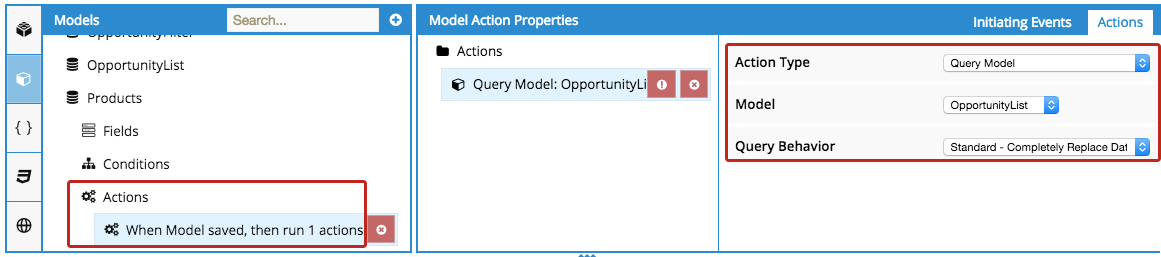
Update Roll-up Summaries Automatically

In this example, we have a Product drawer in an Opportunity table. We’ll use Model Actions to update the parent Opportunity whenever the Products list is saved, so users can see the new total without having to refresh the page.
Note: This “Total Price” field is a Ui-Only formula so it will update in real time. The formula is simply {{UnitPrice}}*{{Quantity}} (because Unit Price is the API name for Sales Price).
Create an action where saving the Products model will query the Opportunity model.
Push Data from Ui-Only Fields to Database Fields
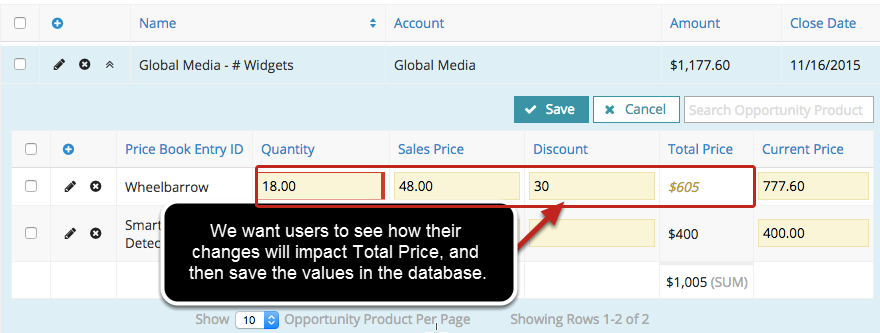
Many times you want to use Ui-Only fields so that users can see in real time how their changes will affect data. But, you want these Ui-Only fields to push their values to the “real” fields in the database, so that these values will be saved.
In this example, Discount is a Ui-Only field {{DiscountUI}} and Total Price is a Ui-Only Formula Field where {{UnitPrice}}*{{Quantity}}*((100-{{DiscountUi}})/100). But, when users click “Save,” we want the value they entered in the Ui-Only Discount field to be saved in the real Discount field in Salesforce.
Add a model action
Include a model action so that when the Ui-only discount field is updated, the Salesforce Discount field is updated
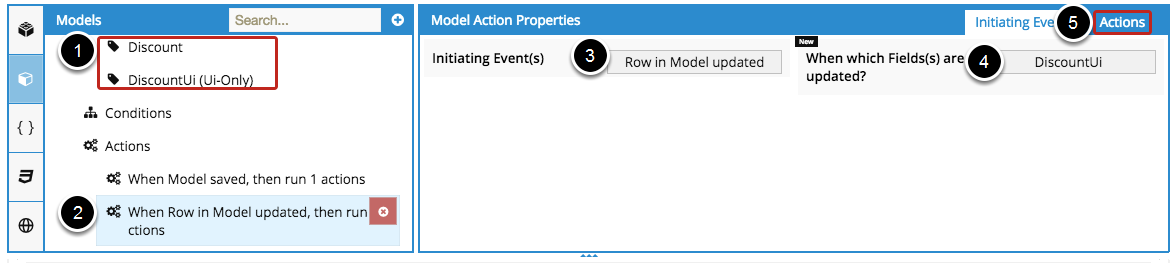
- Make sure the Salesforce field is included in your model.
- Add a new model action.
- Choose Row in Model updated as the initiating event.
- Choose your UI-only field as the updated field.
- Click to add Actions.

- Add an action to Update a field on row(s) on the Products model, in this case we’ll choose the Discount field.
- For Value, enter the API name of your Ui-only field, in this case {{DiscountUi}}
Now, when your Ui-only field is updated, the corresponding Salesforce field will also be updated. #FTW
Use a Field Editor as a Custom Filter
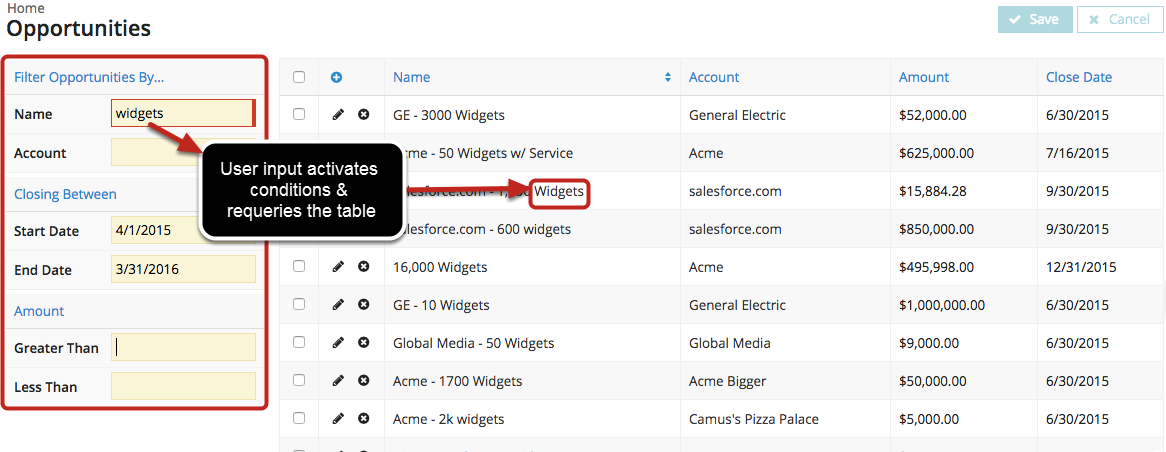
What you need:
- At least two models, one to control the filter, and at least one to control the each list of records being filtered
- A field editor in “edit mode” set to the filter model, and a table (or other list of records) set to the list model.
In this example, we’ll set both models on the Opportunity object, one to control the filter, and one to bring in the list of opportunities that will be filtered.
For the Filter Model
Don’t load data on page load and do create default row if model has none.
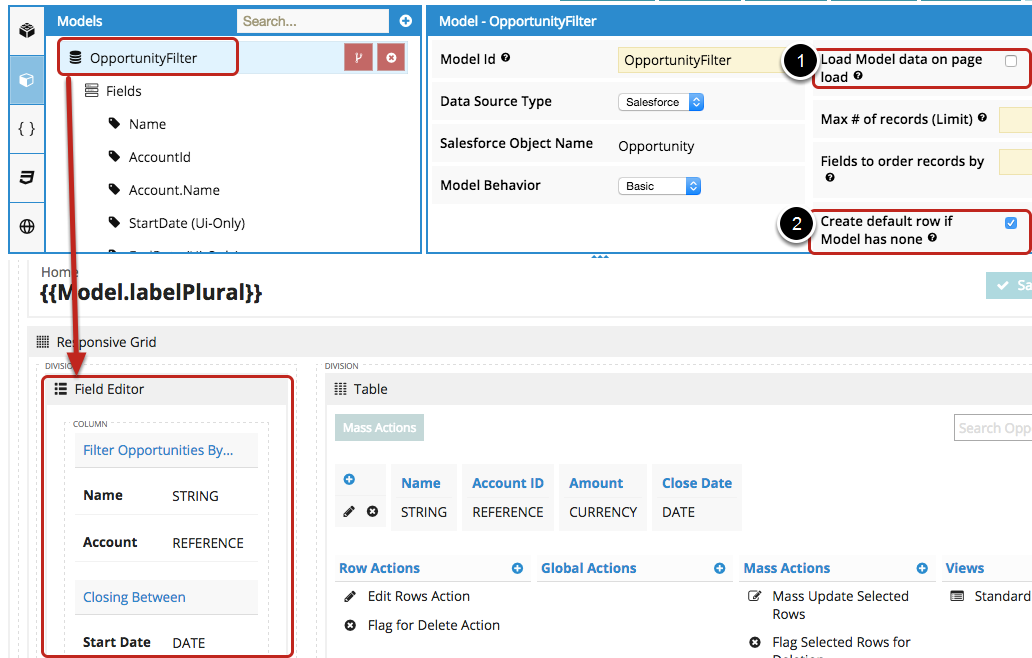
We won’t be saving anything in this model, it’s just a house for the user’s filter criteria. So make sure that you uncheck “Prevent users from leaving page if this Model has unsaved changes” in the model’s advanced properties.
- Add a field editor to the page, set it to edit mode.
- Add only the fields where you want users to input their filter criteria. Let’s say Name and Account. We’ll also add some Ui-Only fields, like Start Date and End Date so users can enter a date range.
- We’re putting this field editor in the left division of a responsive grid to create a sidebar with the table on the right. The sidebar division behavior is “fit to content” and the column gutter size is 15px.
For the other model(s)
Add conditions for the filter to modify.
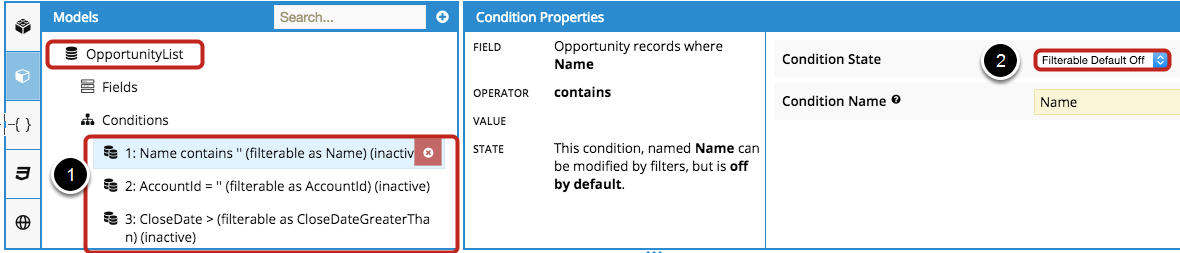
- For each list model, add conditions that you want to respond to changes in your first model.
- Set each condition to Filterable Default Off.
For example, we have
- Name contains
- AccountId =
- Close Date >
- Close Date <
- Amount >
- Amount <
For the model actions
When the field is updated, activate & set conditions and requery list model.
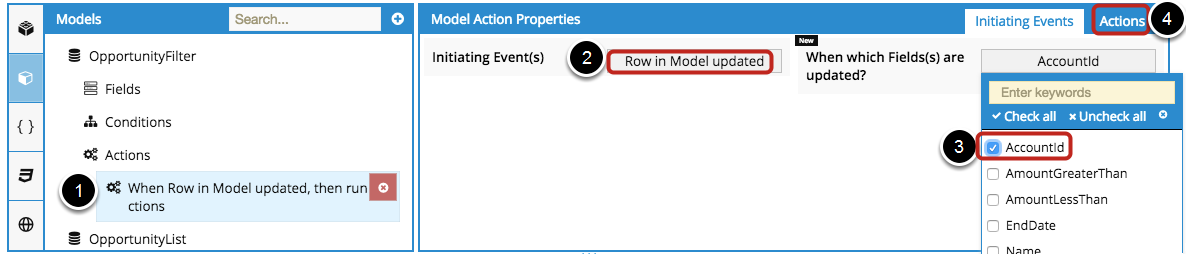
- On your filter model, add a new model action for each field you want to filter on.
- Choose Row in Model updated as the initiating event.
- Select one of your fields. (You should create a similar model action for each field that you want to activate a condition).
- Click to add the actions.
Add two actions for two initiating events
Add actions for each initiating event: Activate & Set Model Condition, and Query Model.
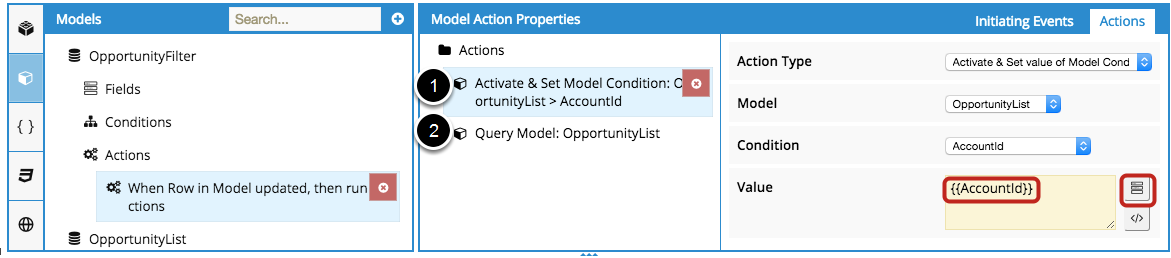
- Add an action to Activate & Set the Model Condition on your list model that corresponds to this field. For value, use merge syntax to bring in the field value from the filter model (you can also click on the field-selector button to enter it automatically if you don’t know the API name, or don’t feel like typing. (Your Ui-only fields will also show up in this list!)
- Add another condition to Query the list model.
We’ll create a similar model actions on for each field on our filter model:
- When the AccountId field is updated, insert its value into the Account Id condition on the list model and requery the model.
- When the Name field is updated, insert its value into the Name includes condition on the list model and requery the model.
- When the Start Date Ui-Only field is updated, insert its value {{StartDate}} into the Close Date < condition on the list model and requery the model.
- When the End Date Ui-Only field is updated, insert its value {{EndDate}} into the Close Date > condition on the list model and requery the model.
- When the Start Date Ui-Only field is updated, insert its value {{StartDate}} into the Close Date < condition on the list model and requery the model.
- When the Amount Greater Than Ui-Only field is updated, insert its value {{AmountGreaterThan}} into the Amount > condition on the list model and requery the model.
- When the Amount Less Than Ui-Only field is updated, insert its value {{AmountLessThan}} into the Amount < condition on the list model and requery the model.
More with Model Actions
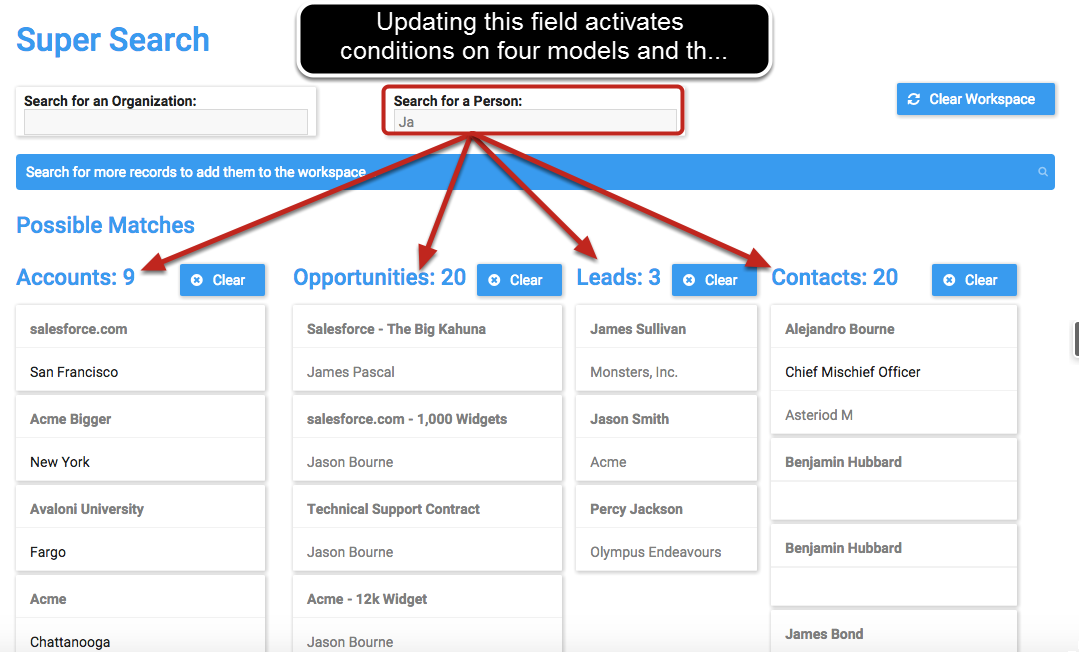
For example, we use this same principle to activate and set conditions on multiple models and then query them based on user input in one field. When this field is updated, the model’s action script de-activates any conditions that were set elsewhere on the page, activates the corresponding condition on each model, and queries the models.